by Lisa Cooke | Mar 11, 2017 | 01 What's New, RootsMagic |
A GEDCOM file is a universal type of file that genealogists use to move data from one genealogy software program to another. Using these helpful tips below, you can open genealogy files your family members send to you, or share your data with others.

When and Why You Would Need to Open a GEDCOM File
A Genealogy Gems reader recently wrote:
I recently signed up for [the Genealogy Gems] newsletter. I received a CD from a relative with family history information that was set up through Family Tree Maker. I am currently not subscribed to any of the genealogy sites. My question is, how can I retrieve this information [from the CD.] Can you help?
The answer to the question is: Use another program to open the GEDCOM file from the CD. Let me show you how easy it is to open and create GEDCOM files.
GEDCOM Basics
GEDCOM is an acronym standing for Genealogical Data Communication. It is a universal genealogy file that allows you to exchange genealogical data between different genealogy software programs.
Because it is “universal” in nature, a GEDCOM file can be read by many different types of genealogy software. That means, if you are using RootsMagic, you can still share all the data you have collected with your cousin who uses Family Tree Maker, and she will not have to type in all the names, dates, and places manually.
Occasionally, not all the information included in a GEDCOM file will transfer perfectly. There are differences in how that information is interpreted and some things, like notes and sources, may be affected. However, for the most part, much of it will transfer correctly.
How to Open a GEDCOM File
Our reader needs to open a GEDCOM file contained on the CD he was sent. To do this, he must have a program on his computer that will read a GEDCOM file. There is an option I would like to share with you.
RootsMagic is a downloadable software for both Mac and PC users. (And, it is the one we here at The Genealogy Gems Podcast use! That’s why we accepted them as a sponsor of the podcast.)
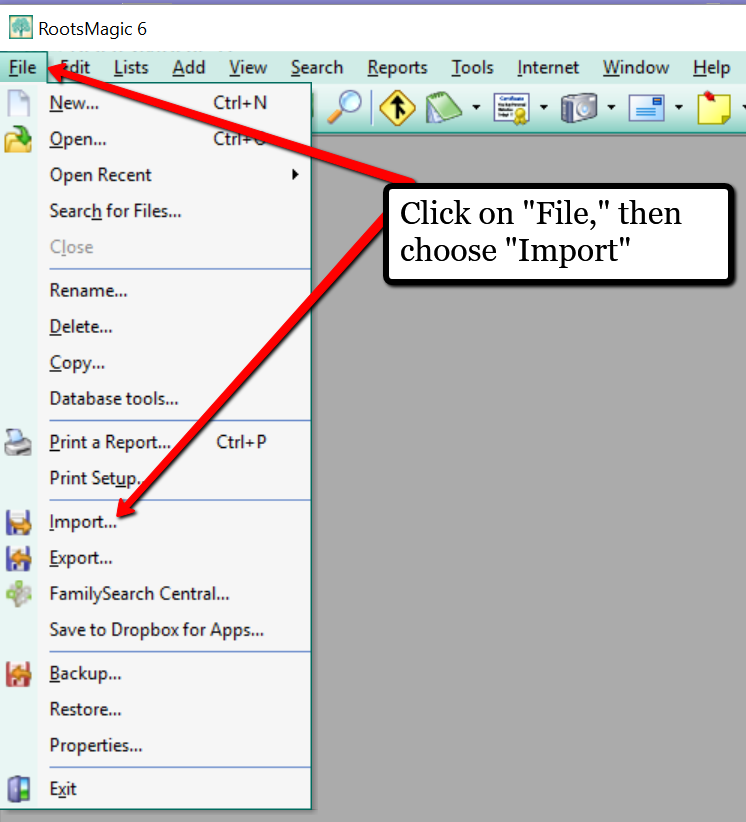
Once you have downloaded RootsMagic to your computer, open it. At the top left corner, click on File and from the pull-down menu, choose Import.
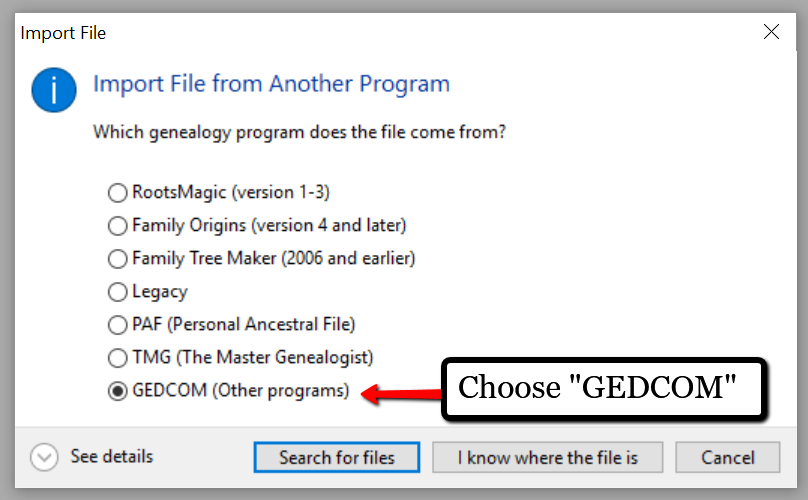
Now, a new pop-up window will open and ask from what source you would like to import from. You will notice several options, but for our reader’s question, he will choose the GEDCOM option.
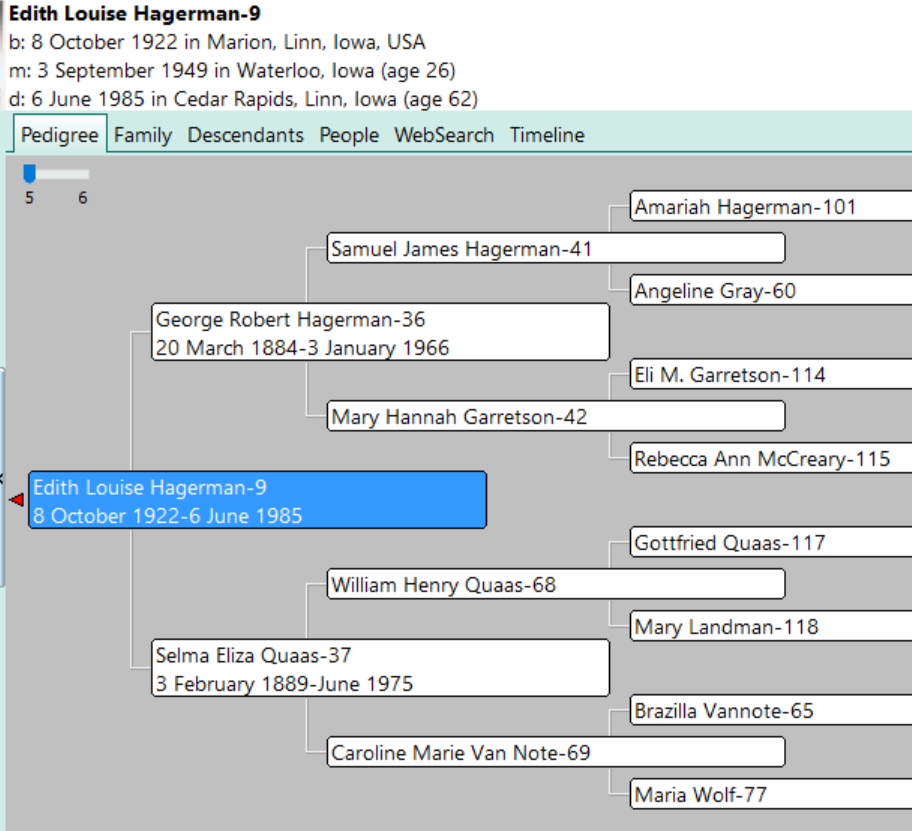
Then, choose I know where the file is, and the file explorer window will appear. In this case, our reader would click on the CD that he has loaded into his computer’s disk drive, and follow the prompts to open the GEDCOM file. All that information his relative sent him will be slurped into RootsMagic and he can easily look through the pedigree of his family.
Creating a GEDCOM to Share with Others
RootsMagic also allows you to create a GEDCOM file. This is what you would send to your relatives when they would like to have a copy of the family tree.
To do this, open RootsMagic. Click on File, as we did before, and this time choose Export from the pull-down options.
The export box will pop-up. You can choose what you wish to have included in this export. I typically choose Everyone, but you can do yours by family names by clicking on the down arrow next to Everyone and choosing Select from list.
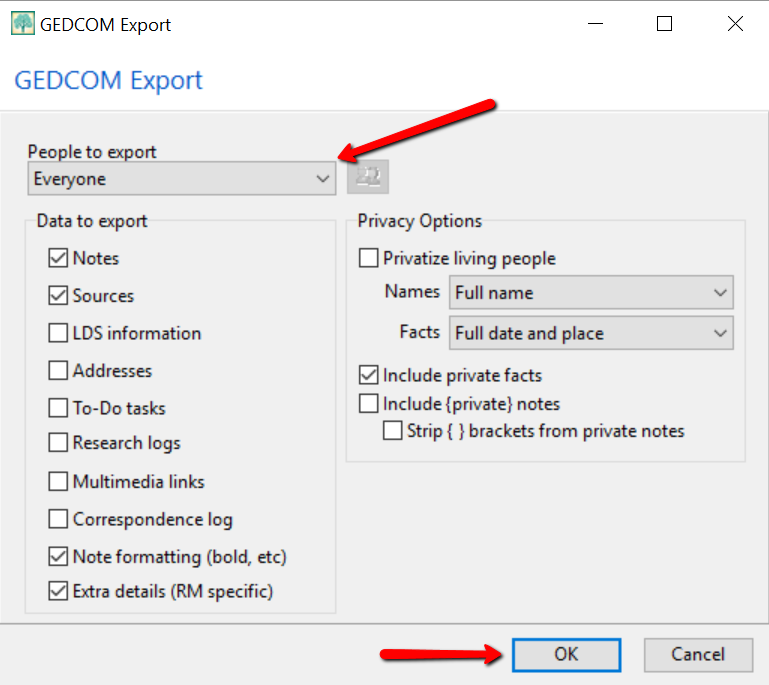
Once you have clicked OK, the GEDCOM file is ready to be saved to your computer. Save the file on your desktop or somewhere you will be able to locate it again. Remember to name the file and pay attention to where you are saving it!
Creating a GEDCOM from Ancestry.com
If you have stored your genealogy data at Ancestry.com, you may be interested to know that you can create a GEDCOM file for your family tree there as well. It’s just a matter of signing into your Ancestry account, locating the Tree Settings, and then clicking Export. I found a nice article outlining the steps on how to do that here.
Protecting Your GEDCOM Files
Creating a GEDCOM is also a great way to save or backup your hours and hours of family history research. One of the saddest tales of genealogists everywhere is losing their computer or printed family files with all that work!
GEDCOM files can be saved to a hard drive, saved to an external unit, emailed, put on a thumb drive, or uploaded to the Cloud. You can also invest in a company like Backblaze, the official backup of The Genealogy Gems Podcast, that will automatically backup all your files. (Read more about Backblaze, here.) All of these methods protect you and your genealogy.
More on Protecting Your Genealogical Data
Learn more about Backblaze, The Genealogy Gems Podcast’s first choice when it comes to backing up precious genealogy research and personal files. Read the article’s below and determine if Backblaze is the answer you’ve been looking for.
How to Download Backblaze in 4 Easy Steps
Backing Up Your Genealogy with Backblaze – Q & A
by | Feb 26, 2014 | 01 What's New, Ancestry, Beginner, FamilySearch, MyHeritage, Trees
 As you may have already noticed, a lot of websites these days host millions of family trees: MyHeritage.com, Ancestry.com, FamilySearch.org, Geni.com, FindMyPast.com, Archives.com and more. There are virtual forests and forests of family trees out there! How can you find a tree that includes your family? How can you be sure it’s yours? How do you know that what you see is accurate?
Get started with these 7 Steps: How to Find Your Family Tree Online:
1. Choose a site from the list above and create a free log in.
Which should you choose?
- FamilySearch.org is the only one that offers totally free access to all user-submitted family trees as well as the historical records that can help you with your research. However, the other sites offer a variety of free access options, especially to user-submitted trees.
- MyHeritage is known for its international user base (check out its user map here) and multi-language access.
- Some sites have different portals that specialize in records from different countries. For example, Ancestry.com (with a U.S. focus) owns Ancestry.ca for Canadian genealogy, Ancestry.co.uk for the United Kingdom and Ancestry.com.au for Australian records. Similarly, FindMyPast.co.uk (U.K. focus) also hosts FindMyPast.com (U.S.), FindMyPast.ie (Ireland) and FindMyPast.com.au (Australia). Check out additional sites for specific countries (including non-English-speaking) here. If your family recently immigrated, look for a site about “the old country.’ If you have pretty deep roots in your current country, or you’re not sure, pick a site that specializes in your current home.
2. Enter the name of one of your relatives in the Search bar.
Each site files its family trees a little differently: some with historical records and some separately. Search trees at FamilySearch here. On Ancestry.com, look under the Search option for Public Member Trees. Enter names of your relatives, along with any other details you know (like a birth date and place or a spouse’s name). Try different combinations, sometimes using the person’s first and middle name, trying a maiden name, entering a nickname, etc. Increase your odds of finding people by entering a range of years (like 1880-1890) for a date and a more general place, like a state, rather than the name of a little town. If you get too many results, enter more specific information.
Which relative(s) should you choose?
- One who is deceased, if possible. Records about living people may be restricted for some places (but not all).
- If possible, one with a relatively unusual name. They may be easier to spot.
- One you know several things about: a full name (including maiden for women), dates and places of birth, marriage and death; burial place; where they lived during their lifetime; names of their spouse(s), sibling(s) and/or child(ren).
- One who lived as long ago as possible, to increase the chance that someone has posted a tree. But a grandparent is a great starting point, if that’s as far back as you know. If your grandparent is still alive, ask them their parents’ names, and start with your great-grandparent.
- Need to learn more about your relatives first? Read this article on how to gather information about your family.
3. Click on results labeled as “family trees.” Are they “yours?”
Browse the search results. Do any of these names and details look familiar? Everything doesn’t have to be a perfect match for a tree to include your roots. Sometimes different information is handed down through different branches of a family. Sometimes people get their information from sources that don’t match yours. Sometimes people just guess or patch together parts of different family trees without looking closely to see if they’re right.
Tech tutorial: What exactly are you looking at when you look at a family tree online? Before the days of internet genealogy, researchers organized family history findings on their home computers in one of several specially-designed software programs. These programs could generate .GED files (often referred to as GEDCOMs) that would allow researchers using different software to share their findings. Many people have now uploaded their GED files to genealogy sites like the ones we’re talking about–or they’ve just built a family tree from scratch right on the site.
4. Evaluate the accuracy of what you find.
The best way to judge the accuracy of a family tree without researching it yourself is to see what proof is offered. Do you see any records mentioned (like footnotes) or attached to the tree? Common records include tombstone images; government or church vital records (birth, marriage or death records) and census listings. Do you see photos attached? Photos may indicate the submitter has access to family records or albums (bonus!).
If a tree mentions lots of sources, it’s more likely to be accurate–at least for the pieces of information that are sourced. If a tree doesn’t have sources, it doesn’t mean it’s wrong, it just means you don’t know if it’s right.
Sometimes you’ll find a “branch” on a tree that goes back many generations without a single source mentioned. Beware! Sometimes these branches are just copied from other trees. This may particularly be true if a branch is connected to a royal line. Royal lines are well-documented in history and some people have created family trees with the hope of running into royal relatives. These connections may not have been thoroughly researched–they might just represent “wishful thinking.” Again, look for sources.
5. Optional step: reach out to the submitter of promising-looking family trees.
Some sites allow you to contact them through confidential email routed through the site (you may have to purchase a subscription first). You might contact a submitter to meet a possible cousin, share information you have or ask for more details about what they posted. If you contact them, be polite–don’t open with “you got my grandfather’s birthday wrong” or you may never hear back. You may not hear back anyway, if the submitter is no longer researching, their email changed or they have passed away.
6. Google your surname along with the phrase “family tree” or “genealogy.”
See if any personal websites pop up with your family tree (or other family history information) in them. Evaluate the information by looking for accurate details (as far as you know) and lots of sources mentioned. Look for an “About” or “Contact” page to learn more about the submitter of this information.
7. Verify it yourself.
Wandering through forests of online family trees may give you the urge to create your own tree. An accurate, and sourced tree! If so, good for you. Keep reading the articles suggested below to learn how to get started!
Up next, read:
Get Started: How to Find Your Family History for Free. Perfect for the beginner!
Explore the Genealogy Gems website for more tools, tips and resources that can help you put together your family’s “bigger picture.”
Sign up for our free e-newsletter and receive my FREE ebook on using Google to find your family history.
Check out my step-by-step Family History podcast for beginning genealogists.
Post an Online Family Tree. Listen to a podcast episode (or just read the show notes) on how to post your own family tree online.


