by Lisa Cooke | Jan 5, 2015 | 01 What's New, Evernote, images
 Recently I posted on How to Solve a Pesky Evernote Web Clipper Problem. In that post I explained how to save an Evernote web clipping as an image file.
Genealogy Gem reader Pat wrote in about how she likes to extract notes. She writes:
Hi Lisa,
I just ready your post about getting a note in Evernote out of the program and into another format on your hard drive. To get a text note out just open up the note and print it, to a pdf printer like Cute PDF. The only problem I see so far with this, is that CutePDF wants to call (everything)”printed” this way (as) Evernote.pdf, so you have to change the file name to avoid writing over the previous file. And, although I’m not a Word user I think it will allow you to import or open a pdf file and then save it as a doc file.
Thanks for all your information. I love listening to your podcast during my commute. – Pat
 This is a great tip. Genealogy Gems Premium Members can hear more about CutePDF in Premium Podcast episode 77. (Not a member yet? Become one here.) I’m also a fan of Primo PDF. Let me show you how the process Pat describes works.
How to Export a Web Clipping Note from Evernote to PDF:
1. Install a free PDF creator program (for example: CutePDF or PrimoPDF.)
2. In Evernote’s menu click File > Print.
3. Select PrimoPDF from the General tab.
4. Click the Print button.

5. In the pop-up window select ebook (select Prepress if you want a higher quality document.)
6. Click the Create PDF button.

7. In the Save As window select where you want to save the file.
8. Rename the file.
9. Click the Save button.

10. And there you have it, your note as a PDF file!

Resources
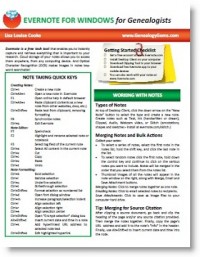
Need more Evernote help? My Evernote for Genealogists quick reference guide (image right) is available for both Mac and Windows users (pick up the one that goes with your computer’s operating system, not your mobile device).
Click here for digital download pdf guide.
Click here for laminated printed guide.
How to Save & Open Genealogy eBooks & PDFs to Your Mobile Devices
How to Get Started in Evernote, and the Ultimate Evernote Education
How to Add Text to a Web Clipping in Evernote
Premium Podcast episode 74: PDF Pandemonium (Premium membership required)
by Lisa Cooke | Dec 27, 2014 | 01 What's New, Census, Church, MyHeritage, Norwegian, Records & databases, Trees
 MyHeritage has announced a new arrangement with the Danish National Archive to digitize, index and make available online millions of Danish genealogy records. According to MyHeritage, these include:
- “Danish national censuses, including approximately 9 million images and 31 million records, covering the years of 1787 through to 1930. One of the most enlightening sources of historical content, census records provide a glimpse into a family’s past listing information about each household including the names of occupants, information on residence, ages, places of birth and occupations.
- Church records (3.9 million images) containing approximately 90 million names from 1646 to 1915. The Parish Register provides information regarding anyone who was born, baptized or confirmed (after 1737), married or died in a particular parish. The records include rich information about a person’s family: for example, for baptisms they list the date of birth, date of baptism, name of the child, parent’s names, occupations and residence, and often names of witnesses and godparents.”
According to MyHeritage, “The records, spanning almost 300 years, provide a window to the lives of Danish ancestors during fascinating periods in history including the Napoleonic wars, liberalism and nationalism of the 1800s, the Schleswig Wars and industrialization.
“The records will illuminate the lives and times of noted Danish historical figures such as Kierkegaard and Niels Bohr. Celebrity fans will be able to look into the family history of Danish Americans such as Scarlett Johansson and Viggo Mortensen for clues on their success. Many of the records will be made available on MyHeritage as early as April 2015 and the rest will be added during the year.
MyHeritage is a leader in family history for those with Nordic roots and is “the only major company providing services in Danish, Norwegian, and Finnish. With more than 430,000 users in Denmark and an additional 600,000 registered users in Sweden, 500,000 in Norway, and 280,000 in Finland, MyHeritage has amassed the largest Nordic user base and family tree database in the market.”
 Just one more reason we at Genealogy Gems are pleased to have MyHeritage as a sponsor of the Genealogy Gems podcast. Click to learn more about why we’ve chosen to partner with them.
by Lisa Cooke | Dec 26, 2014 | 01 What's New, Apps, Beginner, Blogs, Listeners & Readers, Publishing
Are you ready to start a genealogy blog (or improve one you already write)? Here’s a quick Q&A for you, prompted by questions by Genealogy Gems  Premium member Kevin:
Q: “I am ready to start writing a blog but my typing is slow. Is there a dictation app (iOS) or software (Windows) that I could use to dictate my first drafts of my blog posts?
A: If you go to www.genealogygems.com and scroll down and enter “Dragon software” into the Amazon box and click “Go” it will pull up a great dictation program that might be just what you are looking for. (Using our Amazon box supports the free podcast – thank you!)
Q: Which blog site do you use and why did you select it?
A: I use Word Press for my website and blog. They have a free version at wordpress.com. Google also has Blogger which is free. I have a free series of videos on the Genealogy Gems YouTube channel about how to set it up. They are a few years old, but will give you the basic idea.
Q: Do you compose your blog posts directly on your site or do you type them in Word or some other word processing program then cut and paste them into your blog?
A: It’s best to compose them directly into a new post on Word Press or Blogger. Cutting and pasting out of Word will likely carry over unwanted formatting which can cause headaches.
Listen to the Family History: Genealogy Made Easy podcast by Lisa Louise Cooke. It’s a great series for learning the research ropes and well as refreshing your skills.
Ready to get inspired and tutored on genealogy blogging? Check out my FREE podcast series on how to start a genealogy blog. Click here to reach my Family History Made Easy podcast landing page, then start with episode 38 and continue through episode 42. You’ll learn step-by-step how-tos and you’ll be introduced to some inspiring blogs that WORK. We often hear about success stories from listeners who started a blog after hearing these episodes. (We’d love to hear YOUR success story, too!)
by Lisa Cooke | Dec 19, 2014 | 01 What's New, Google, Google Earth, images, Maps
 If you have experienced frustration managing your genealogy files in Google Earth, you’re not alone. A recent email question from Genealogy Gems Premium Member Linda reminded me what the #1 culprit tends to be: the Temporary Folder. Linda writes:
“I have a question for you about Google Earth. I have been trying to play around with it and when I find a place and want to save it, the “Save to My Places” is grayed out and it won’t let me save. My husband said the same thing happens on his computer. I looked on a Google forum and someone posted a question about it not working recently. Do you happen to have any info about this and does the same thing happen to you?”
While Linda didn’t provide specifics as to what kind of “place” she is trying to save, I’ve been at this long enough to have a pretty good ideathat she found something like a Rumsey Historical Map that she wants to add as a permanent fixture to her geographic genealogy files in Google Earth. Fabulous! Or it may be as simple as someone emailed her a map with a single placemark on it. She has clicked to open it and Google Earth magically opened and displayed it on her screen. Awesome!
In both cases, the important thing to notice, is that the item was sent to the TEMPORARY folder in the PLACES panel. That’s because Google Earth doesn’t assume just because you wanted to look at something means you want to save it in your files forever. And this leads me to the answer to Linda’s question…
The only time “Save to My Places” will not be grayed out is when the item that you are looking to Save to My Places is in the TEMPORARY folder. In other words, it is not yet saved to My Places (as in the cases I mentioned above.)
The Temporary folder is the most overlooked feature of Google Earth, and can play havoc with you unless you understand how it works, particularly in conjunction with the menu functions.
Here’s how to save an item in the Temporary folder to be a permanent part of your My Places:
- Click to select and highlight the item in the Temporary Folder
- Go up to the menu click FILE
- Select SAVE
- Select SAVE TO MY PLACES

The item will then jump from your Temporary folder into My Places. You may need to open My Places by clicking the small black arrow next to it in order to see it at the bottom of your list.

Once an item (such as a place mark) is created, and it appears anywhere in the Places panel other than the Temporary folder (such as in a folder you created, or under My Places,) it is technically already in My Places, and therefore does not need to be Saved to My Places. And that is why that option is grayed out.
Think of “Save to My Places” as “MOVE to My Places”.
Once your item is in My Places, from that point forward you will be saving any changes you make to it by selecting FILE > SAVE > SAVE MY PLACES.

This procedure saves changes made to any and all files in your My Places, including the new file you just added. Anything in your Temporary folder will be lost when you close Google Earth.
Play it Safe!
Be smart and get into the excellent habit of saving My Places every 10 minutes or so, (in case Google Earth, our computer, or internet connection crashes,) and most definitely when you close the program at the end of your work session.
Happy Googling!
Lisa
by Lisa Cooke | Dec 16, 2014 | 01 What's New, Cemeteries, Humor, Inspiration, Memory Lane
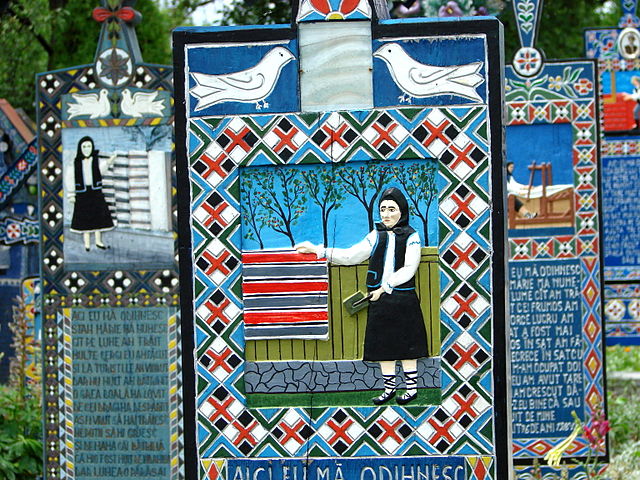
The “Merry Cemetery” Sapanta, Romania. Image credit: “Merry Cemetery – Sapanta – Romania 01”, by Adam Jones (Adam63). Wikimedia Commons image at- http://commons.wikimedia.org/wiki/File:Merry_Cemetery_-_Sapanta_-_Romania_01.jpg#mediaviewer/File:Merry_Cemetery_-_Sapanta_-_Romania_01.jpg.
A gravestone creator in a small town in Romania took his mission seriously to memorialize the dead. But he did in, er, “living color,” so to speak. With plenty of colorful images and even dirty little secrets and gossip carved onto tombstones of the local residents at the “Merry Cemetery.”
As reported in the New York Daily News, the woodcarver responsible for over 1000 gravestones in the “Merry Cemetery” would wander through town, taking notes on people’s quirks and secrets. Some flaws–drinking and carousing among them–are memorialized colorfully on their tombstones. On other stones, you’ll find his sad laments for the untimely passing of a child or the death of an adult by a sad accident.
“There’s no point in hiding secrets in this small town in Maramures, so people’s lives are captured honestly in their epitaphs,” reports the article.
The woodcarver was Stan Ion Patras, who lived from 1908-1977. Conscious of the legacy he was leaving–and perhaps anxious to tell his own story rather than have someone else do it–Patras carved his own tombstone before he passed away. He trained his replacement, who continues to add to the brightly colored crosses.
Here’s another detail I thought was neat: Patras’ folk art was highly symbolic. According to a New York Times article on the cemetery, “The portrait of the deceased is central, surrounded by geometric designs in symbolic colors: yellow for fertility, red for passion, green for life, black for untimely death. The color scheme is keyed to the subject’s life — if, for example, the deceased had many children, yellow carries the design. Some crosses are crowned with white doves representing the soul; a black bird implies a tragic or suspicious end. The background is always blue, the color of hope and freedom.”
What’s the most fascinating cemetery you’ve ever visited? What’s the most memorable epitaph you’ve ever found? Share it on our Genealogy Gems Facebook page!
 Recently I posted on How to Solve a Pesky Evernote Web Clipper Problem. In that post I explained how to save an Evernote web clipping as an image file.
 This is a great tip. Genealogy Gems Premium Members can hear more about CutePDF in Premium Podcast episode 77. (Not a member yet? Become one here.) I’m also a fan of Primo PDF. Let me show you how the process Pat describes works.


 Just one more reason we at Genealogy Gems are pleased to have MyHeritage as a
  Premium member Kevin:


