by Lisa Cooke | Oct 22, 2013 | Ancestry, Beginner, Family History Podcast, FamilySearch, Records & databases, Research Skills
 Tune in Tuesday: The Family History: Genealogy Made Easy Podcast
Published October 15, 2013
by Lisa Louise Cooke
[display_podcast]
Download the Show Notes for this Episode
Welcome to this step-by-step series for beginning genealogists—and more experienced ones who want to brush up or learn something new. I first ran this series in 2008. So many people have asked about it, I’m bringing it back in weekly segments.
Episode 3: Working Backward and the SSDI
In our first segment in this episode my guest is Miriam Robbins Midkiff, a well-known genealogy blogger and teacher. She shares her best research tips, what motivates her to delve into her family history and how that discovery has enriched her life.
Then in our second segment we answer the question, “Why do we work backwards in genealogy?” and then fire up the Internet and go after your first genealogical record. Below, find current links to the record sources I talk about in the show. Also, when I recently checked, the Social Security Death Index was no longer free at WorldVitalRecords as I mention in the podcast and some of the site features I mention may have changed. I’ve given you links below to more options for searching, including plenty of FREE options!
Working Backward
When it comes to tracing your family history, there are standard methods that will help you build a solid family tree. Starting with yourself and working backwards is a cornerstone of genealogical research. It will be tempting to start with a great grandparent that you just got some juicy information on after interviewing Aunt Martha, but resist the temptation to start with that great grandparent, and go back to the beginning – and that’s YOU!
There’s a very good reason why working backward is so effective. Let’s say you have filled in info on yourself, and then recorded everything about your parents and now it’s time to work on one of your grandfathers and all you have is the date he died and the date he was born. If you are lucky enough to have his birth date and birthplace and you get his birth certificate it will tell you who his parents were, but it can’t predict his future can it? Where he went to school, where he lived over the years, etc. Documents can only tell you what has occurred in the past, not what will occur in that person’s future.
But if you get his death certificate it will give you key information at the end of his life that can lead you to the various events throughout his life. If you don’t have his birthdate and birthplace, you’ll probably find it on the death certificate. It will also likely name his parents and his spouse. A birth record can’t tell you who he will marry, but a death record can tell you who he did marry. You can start to see how starting at the end of someone’s life and working backwards will be the most efficient and accurate way to research.
Records are like the bread crumb trail of your family tree! If you don’t work systematically backwards, it will be very easy to miss a crucial piece of evidence, and you might end up relying on guesswork and end up building a false history on it. Believe me you don’t want to invest time in a tree that you’re going to have to chop down and replant!
So now that you understand and are committed to following this cornerstone concept of systematically starting with yourself and working backwards, it’s time to fire up the Internet and put it into practice by finding your first record. What type of record will we be looking for? A death record of course!
Is one of your parents deceased? If so, you’re going to start with them. If they are still living, and you’ve got their information entered into your genealogy database choose one of their parents, your grandparents, who is deceased – or if you’re lucky enough to be starting at a young age you may have to go back to a deceased great grandparent! (And good for you for starting now while you’re young!)
The SSDI
Chances are the person that you’ve chosen, for this example let’s say it’s your grandfather, he most likely had a social security card. And there is a wonderful free database online in the United States called the Social Security Death Index, what is commonly referred to as the SSDI, that you can use to find that grandparent.
In 1935 the Social Security Act was signed into law by President Franklin Roosevelt, and consequently more than thirty million Americans were registered by 1937. Today, the Death Master File from the Social Security Administration contains over 89 million records of deaths that have been reported to the Social Security Administration and they are publicly available online.
Most of the information included in the index dates from 1962, although some data is from as early as 1937. This is because the Social Security Administration began to use a computer database for processing requests for benefits in 1962. Many of the earlier records back to 1937 have not been added.
The SSDI does not have a death record for everyone; and occasionally you may find an error here and there if something was reported inaccurately, but overall it’s a terrific resource! As with all records it provides clues that you should try to verify through an additional record source.
There are many websites that feature this database, as seen in the UPDATED links below. This database is free at most sites, even sites that charge for access to other data.
On the Search page, enter your grandparent’s given name which is their first name, the family name which is their last name or surname, the place of their death – this could just be the state – and the year they died, and click the Search button. Hopefully you will get back a result that includes your grandparent.
Now remember you’re looking at an index, not an original record or primary source. We talked about sources in Episode 2. A primary source is a document that was created at the time of the event by an authoritative source, usually someone with direct personal knowledge of the event that’s being documented, like a death certificate is completed at the time of death by the attending physician. These are the best and usually most accurate types of sources you can find. And that’s what we want!
The really key information in this search result is the county information. In order to get an original death certificate which would be your primary source you have to know which county they died in. You may already know that for your grandparent, but keep this in mind because the further back we go, the more crucial it will be to know the county involved since that’s where death certificates are recorded.
By any chance did your grandparent not show up in the results even though you know they worked after 1937 when the Social Security got rolling, and you know they have passed away? Don’t fret – We have other ways to try and find the info!
This brings us to what I think is a really important concept to keep in mind whenever you’re researching your family on the Internet. Each search is conducted at a specific moment in time. Running an SSDI search or a Google search tomorrow might give you results different than the one you ran today. The Internet is being updated second by second, and the SSDI has been updated several times over the years.
In the case of the SSDI database, you can’t be absolutely sure that the website you are using to search the SSDI has the most current version available. Look in the database description on the site to see how recently it was updated.
Here’s a perfect example of that: When I searched for my grandfather on my dad’s side from the Family Tree Legends website, I got no results. Now I KNOW he died in 1971 and I KNOW he worked his entire life so he had to have been registered with Social Security. Then I went to Ancestry.com and searched for him in their SSDI database and he popped right up.
On the other hand, my maternal grandmother shows up on all three websites I’ve mentioned. In most cases, you’ll find who you’re looking for, but occasionally, like with my grandfather, you may have to dig in your heels and try the SSDI on a couple of different websites to find who them. Never give up, never surrender. That’s my motto!
And of course, each website offers just a little different variation on the terms that you can search on.
So just in case you have a stubborn ancestor who eludes your first SSDI search, try finding them at several of the SSDI databases. If you do have luck on World Vital Records, be sure and click the More Details link next to your search results because it includes some fun extras like a link called Historical Events next to their birth year and death year that will take you to a list of important historical events that were happening those particular years. It’s kind of fun to see what was going on in the world when your grandparent was born.
You’ll also find a link called Neighbors which will take you to a listing of folks who lived in the same county as your ancestor and died in within a year or two of them.
But most helpful is that your research results on World Vital Records will include a listing of nearby cemeteries which are good possibilities for where your ancestor may have been buried. (Again, just clues to hopefully send you in the right direction.) But as I said, the death certificate is going to be your best and primary source and almost always includes the name and address of the cemetery where the person was buried.
Here are a few more search tips if you don’t find your ancestor right away:
1. Make sure that you tried alternate spellings for their name. You never know how it might have been typed into the SSDI database.
2. Many SSDI indexes allow you to use wildcards in your search. So for example you could type in “Pat*” which would pull up any name that has the first three letters as PAT such as Patrick, Patricia, etc.
3. Try using less information in your search. Maybe one of the details you’ve been including is different in the SSDI database. For example it may ask for state and you enter California because that’s where grandpa died, when they were looking for Oklahoma because that’s where he first applied for his social security card. By leaving off the state you’ll get more results. Or leave off the birth year because even though you know it’s correct, it may have been recorded incorrectly in the SSDI and therefore it’s preventing your ancestor from appearing in the search results.
4. Leave out the middle name because middle names are not usually included in the database. However, if you don’t have luck with their given name, try searching the middle name as their given name. In the case of my grandfather his given name was Robert but he went by the initial J.B. But in the SSDI his name is spelled out as JAY BEE! Go figure!
5. Remember that married women will most likely be listed under their married surname, not their maiden name. But if you strike out with the married name, go ahead and give the maiden a try. She may have applied for her card when single, and never bothered to update the Administration’s records. Or if she was married more than once, check all her married names for the same reason.
6. Don’t include the zip code if there is a search field for it because zip codes did not appear in earlier records.
While most folks will appear in the SSDI, there are those who just won’t. But knowing where information is not located can be as important down the road in your research as knowing where it IS located, so I recommend making a note in your database that you did search the SSDI with no result. This will save you from duplicating the effort down the road because you forgot that you looked there. I admit it, in the past I’ve managed to check out books I’ve already looked through and order a record or two that I already had. Lesson learned!
So here’s your assignment for this week: Go through your genealogy database and do a Social Security Death Index search on every deceased person who was living after 1937. Hopefully you will be able to fill in several more blanks in your genealogy database and family tree!
Up next: Episode 4: Genealogy Conferences and Vital Records
by Lisa Cooke | Oct 22, 2013 | 01 What's New, Beginner, Conferences, Family History Podcast, Research Skills, Who Do You Think You Are?
 Published October 29, 2013
[display_podcast]
Download the Show Notes for this Episode
by Lisa Louise Cooke
Welcome to this step-by-step series for beginning genealogists—and more experienced ones who want to brush up or learn something new. I first ran this series in 2008. So many people have asked about it, I’m bringing it back in weekly segments.
Episode 4: Attending Genealogy Conferences and Vital Records Requests
In our first segment, our guest is the longtime online news anchorman of genealogy, Dick Eastman, the author of Eastman’s Online Genealogy Newsletter. He talks about the changing industry and the benefits of attending genealogy conferences.
Next, you’ll learn the ins and outs of using some “vital” sources for U.S. birth and death information: delayed birth records, Social Security applications (SS-5s) and death certificates.
Genealogy Conferences Conversation: A Few Updates
- Dick and I talk about Footnote.com as a relatively small site. Has that ever changed! Footnote.com is now Fold3.com and it’s a go-to site for millions of online American military records.
- Family History Expos still offers an exciting conference, especially for first-timers. But there are others as well: In the United States, there’s RootsTech, the National Genealogical Society and many state and regional conferences (like one near my home, the Southern California Genealogical Society’s annual Jamboree). Find a nice directory at Cyndi’s List. Many conferences are starting to offer live streaming sessions for people who can’t attend: check websites for details. In addition, Family Tree University offers regular virtual conferences—where sessions and chat are all online! If you live outside the U.S., look for conferences through your own national or regional genealogical societies. If you can get to London, don’t miss Who Do You Think You Are Live.
- Dick now writes all of his Plus content himself. If you haven’t already checked out Eastman’s Online Genealogy Newsletter, you should! Both his free and Plus newsletters are great insider sources on what’s new and great (or not-so-great) in the family history world.
The SS-5
You can order a copy of the application that your ancestor filled out when they applied for a Social Security Number: the SS-5. I have done this, and they really are neat, but they aren’t cheap. So let’s talk about the facts you’re going to find on them so you can determine if it is worth the expense.
The SS-5 has changed slightly over time, but may include the applicant’s name, full address, birth date and place and BOTH parents’ names (the mother’s maiden name is requested). If your ancestor applied prior to 1947 then you will also very likely find the name and address of the company they worked for listed, and possibly even their position title.
Here’s an example of a Social Security application form:

In the 1970s, the Social Security Administration microfilmed all SS-5 application forms, created a computer database of selected information from the forms, and destroyed the originals. So it’s important to order a copy of the microfilmed original, rather than a printout or abstract from the Administration’s database. And luckily now you can request a Social Security Application SS5 Form online under the Freedom of Information Act.
It will help to have your relative’s Social Security Number (SSN) when you apply for a copy of their SS-5. First, it gives you greater confidence that their SS-5 exists. Second, it’s cheaper to order the SS-5 when you have their SSN. Third, the Social Security Death Index, in which you’ll find their SSN, usually has death data that makes your application for their SS-5 stronger. Privacy concerns have caused some genealogy websites to pull the SSDI, but you can still search it (in many instances for free) at the links provided in Episode 3.
Finally, here’s a little background on the Social Security Number itself. The nine-digit SSN is made up of three parts:
The first set of three digits is called the Area Number. This number was assigned geographically. Generally, numbers were assigned beginning in the Northeast and moving westward. So people whose cards were issued in the East Coast states have the lowest numbers and those on the West Coast have the highest numbers.
Prior to 1972, cards were issued in local Social Security offices around the country and the Area Number represented the state in which the card was issued. This wasn’t necessarily the state where the applicant lived, since you could apply for a card at any Social Security office.
Since 1972, when the SSA began assigning social security numbers and issuing cards centrally from Baltimore, Maryland, the area number assigned has been based on the ZIP code of the mailing address provided on the application for the card. And of course, the applicant’s mailing address doesn’t have to be the same as their place of residence. But in general the area number does give you a good lead as where to look for an ancestor.
The next two digits in the number are called the Group Number, and were used to track fraudulent numbers.
The last set of four digits is the Serial Number, and these were randomly assigned.
UPDATE: The website for ordering Social Security applications (SS-5s) has changed since the podcast first aired. For current ordering instructions, including online ordering, click here. The cost is still $27 to order a deceased relative’s SS-5 if you know the Social Security number and $29 if you don’t know it.
Delayed Birth Certificates
After 1937 folks who qualified to apply for social security had to have proof of their age. If they were born prior to official birth certificates being kept in their state, they applied for a delayed birth certificate.
Anytime someone needs a birth certificate for any reason, they have to contact the state—and often the county—in which the birth occurred. If a birth certificate exists, they can simply purchase a certified copy. But if there were no birth certificates issued at the time of the person’s birth, they could have a “delayed birth certificate” issued by that state or county.
In order to obtain a delayed certificate, they had to provide several pieces of evidence of their age. If these are considered satisfactory, the government would issue the certificate and it would be accepted as legal proof of birth by all U.S. government agencies.
Originally people turned to the census for proof of age. But eventually the Social Security Administration began to ask for birth certificates. For folks like my great grandmother who was born at a time and place where birth certificates were not issued, that meant they had to locate documents that could prove their age and allow them to obtain a delayed birth certificate. Delayed just meaning it was issued after the time of the birth.
Delayed birth certificates are not primary sources. (Remember we talked about Primary Sources in Episode 2. Since the delayed certificate was based on other documents, and not issued at the time of the event by an authority, such as the attending physician, then it is not a primary source. This means that while it’s great background information, it is more prone to error. In order to do the most accurate genealogical research you would want to try to find a primary source if possible. Chances are your ancestor used another primary source, such as an entry in the family bible, to obtain the delayed birth certificate.
The process for ordering a delayed birth certificate is likely going to be the same as ordering a regular birth certificate. You would start with the checking with the county courthouse, and then the Department of health for the state you’re looking in. Let them know that the birth record is a delayed birth certificate. Also the Family History Library card catalogue would be a place to look as many were microfilmed. Go to www.familysearch.org and search for delayed birth records by clicking on Search from the home page. Then click Catalog and do the keyword search just as the episode instructs, using “delayed birth” as your keyword. (Within that search, you can also add parameters for the place name.)
So the lesson here is that even though your ancestor may have been born at a time or in a location where births were not officially recorded by the state, they may very well have a delayed birth certificate on file.
Ordering Death Certificates
The Social Security Death Index is just one resource for getting death information. But in the end you’re going to want the primary source for your ancestor’s death, and that’s the death certificate. While many of your ancestor’s born in the 1800s may not have a birth certificate, there is a much better chance that they have a death certificate since they may have died in the 20th century. Each state in the U.S. began mandating death certificates at a different time, so you have to find out the laws in the state, and probably the county, since death certificates were filed at the county level.
As I said before, the death certificate is going to be able to provide you with a wealth of information. Of course you’ll find the name, date of death and place of death, and possibly their age at death and the cause and exact time of death, place of burial, funeral home, name of physician or medical examiner and any witnesses who were present. The certificate is a primary source for this information.
You may also find information such as their date and place of birth, current residence, occupation, parent’s names and birthplaces, spouse’s name, and marriage status. But because this information is provided by someone other than the ancestor themselves it is really hearsay, and the certificate is considered a secondary source for that information.
And lastly you may find a name in the box that says Informant. This is the person who reported the death to officials. Informants are often spouses, children, and sometimes, depending on the person’s circumstances, just a friend or neighbor. But the informant is almost always someone that you want to investigate further because they obviously were close to your ancestor.
Once you think you know the location where your ancestor died, and the approximate if not exact death date, you’re ready to order a certificate. If the person died in the last 50 years you’ll probably have really good luck at the county courthouse Department of Vital Records. The older the record, the more likely it may have been shipped off by the county records department to the state Department of Health. Look for helpful links to death records at Cyndi’s List Death Records.
Here are some tips that will ensure that you don’t get bogged down in bureaucratic red tape:
- Get the appropriate request form – this is usually available online.
- Print neatly and clearly – if they can’t read it, they will send it back to be redone.
- Provide as much information as you have.
- Provide a self addressed stamped envelope.
- Make one request per envelope.
- Include a photocopy of your driver’s license to prove your identity.
- Be sure to include your check for the exact amount required.
- Make a copy of the request form for your records and follow up.
- Lastly, keep in mind that county offices have limited personnel and are often swamped with paper work. So my best advice is that the more courteous and thorough you are the more success you’ll have.
Online Death Indexes
In the case of very old death certificates, as well as birth certificates, some state agencies have opted to hand them over to state Archives and Historical Societies, or at least make them available for digitizing.
And there you have it, lots of different avenues for tracking down your ancestor’s death records providing you with key information for climbing your family tree.
by Lisa Cooke | Oct 20, 2013 | 01 What's New, History, Maps
A recent blog post at slate.com caught my eye because it features a map from the genealogists-love-it David Rumsey map collection. But what captured my attention was the story the unfolded behind the foldable map itself. I think you’ll love it!
Blogger Rebecca Onion uses a 1929 souvenir map of the United States to tell the story of early commercial air traffic–specifically the story of the origins
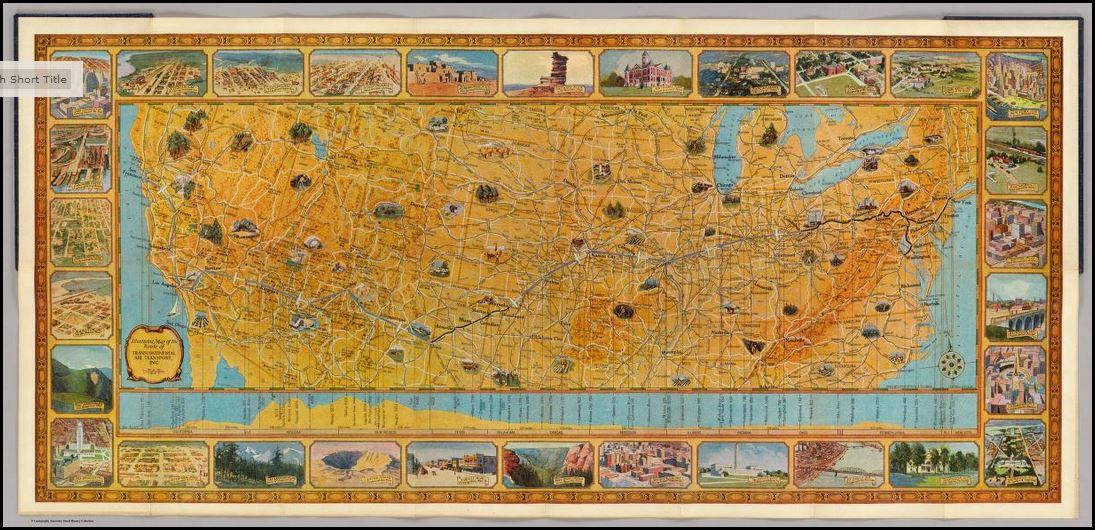
Rumsey TAT map
of airline giant TWA. Apparently early “transcontinental flights,” as they were advertised, were sight-seeing tours with short flights interspersed by train rides to the next flight location. The map featured in her blog post was a souvenir of one of these passengers, who added his own colorful comments on his experience.
This fun post is part aviation history, part map-lover trivia. The story unfolds even more in a short video documentary on Transcontinental Air Transport I’ve added below. It includes cool aerial shots and more on how the early air transport industry, er, got off the ground.
And don’t forget to use maps (storied or just the plain informational types) in your family history research! These can help you find your way around ancestral hometowns, chart migration routes as they would have and otherwise see the world (literally) in the same ways they did. David Rumsey’s map collection is one of the best online collections out there, with free access to over 44,000 high-resolution historical maps.
Learn more about how to use the David Rumsey historic map collection in conjunction with Google Earth by watching my free video class Google Earth for Genealogy.
My Genealogist’s Google Toolbox Kit, is a value bundle that includes my book The Genealogist’s Google Toolbox and Volumes I and II of Google Earth for Genealogy (on video CD). And right now the kit is available for 20% off!
by Lisa Cooke | Oct 18, 2013 | 01 What's New, British, Canadian, Google, Inspiration, Maps
Gail Rogers in Ottawa, Ontario, Canada recently shared how my presentation on using Google Earth for genealogy helped her find her way to the site of an old family business–and the place where her ancestor died. She’s given me permission to share it with you. I hope you find it as inspiring as I do!
“Just last week, I received an 1879 death certificate for my great-great-great-grandmother. She ran The Castle Inn in Stafford, Staffordshire, England after the death of her husband in 1863. To my sorrow and horror, I learned that she hanged herself probably within the establishment where she also lived!
“When I shared this with a group of English and Australian cousins who are also researching this family, one of them sent me a link to a 1960s photo of The Castle Inn, shortly before its demolition:
“Then I remembered your presentation about pinpointing your ancestor’s home in San Francisco. I’ve had several “family history” maps with icons that I’ve been working on for the past five years at Google Maps, so I went to the one for my Staffordshire ancestors, clicked on my icon for Eastgate Street in Stafford, and used the Street View to wander down the street, looking for the outline of the roofs, as you did with your old family photo. (You can view a video of my Google Earth for Genealogy class for free here on my website that demonstrates this technique.)
“I soon spotted the outline at the extreme left of the photo, “turned around” (virtually) and wham! There were the double Elizabethan-style timber-framed gables, just as they appeared in the older photo!”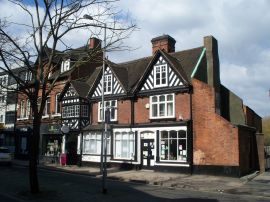
Gail, I was so glad to read that this helped you. I’ve gotten so much great feedback on that particular example of how to use powerful Google Earth (and Google Maps) tools to find important family landmarks.
 The presentation she’s talking about can be found in The Genealogist’s Google Toolbox Kit, a value bundle that includes my book The Genealogist’s Google Toolbox and Volumes I and II of Google Earth for Genealogy (on video CD). Even better, right now that kit is available for 20% off! The 2 discs are also available as a bundle on their own. And thanks, Gail, for sharing your success with us!
by Lisa Cooke | Oct 17, 2013 | 01 What's New, Conferences, FamilySearch, Flipboard, RootsTech
 Have I got a promo code for you!
Want to save off your registration for what’s shaping up to be one of the biggest family history events ever? Of course you do!
From now until November 30, 2013, Genealogy Gems blog readers can save an additional $10 off the already discounted early registration price for RootsTech 2014, happening February 6-8 in Salt Lake City. The promo code is RT14LTO by November 30.
#RootsTech promises to be a spectacular learning event, with over 200 classes and a dozen hands-on labs taught by knowledgeable experts, special lunchtime and evening events and more. Before January 6, you can get a full-access pass for just $159, an $80 savings off the full price of $239. But again, register before November 30 with the promo code above and you’ll only pay $149.
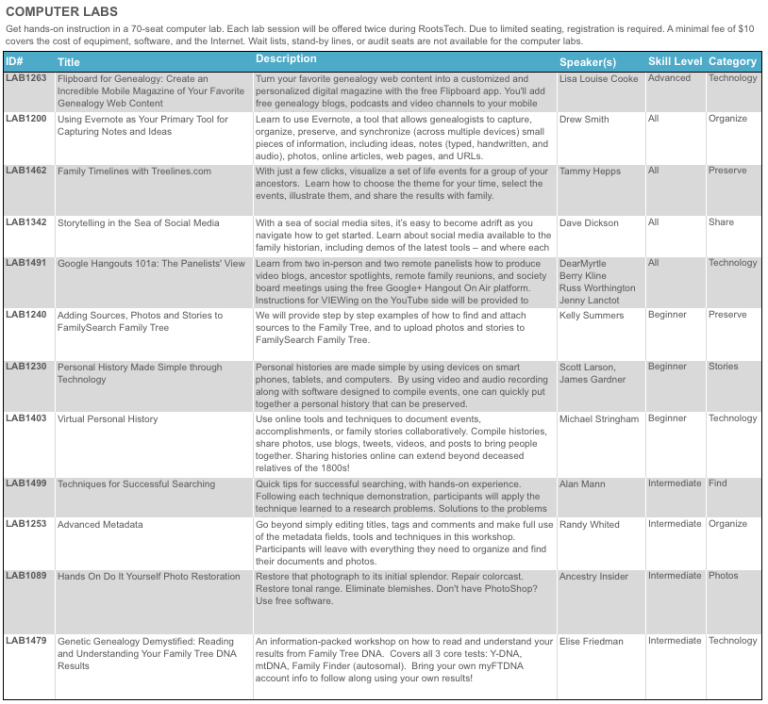
The full schedule of classes will be available when the app comes out in November, but RootsTech has posted the computer lab schedule. These labs were incredibly popular last year. They sold out fast and had to add more! Your early registration gives you dibs on labs like these, including my own class on Flipboard:
 Tune in Tuesday: The Family History: Genealogy Made Easy Podcast


