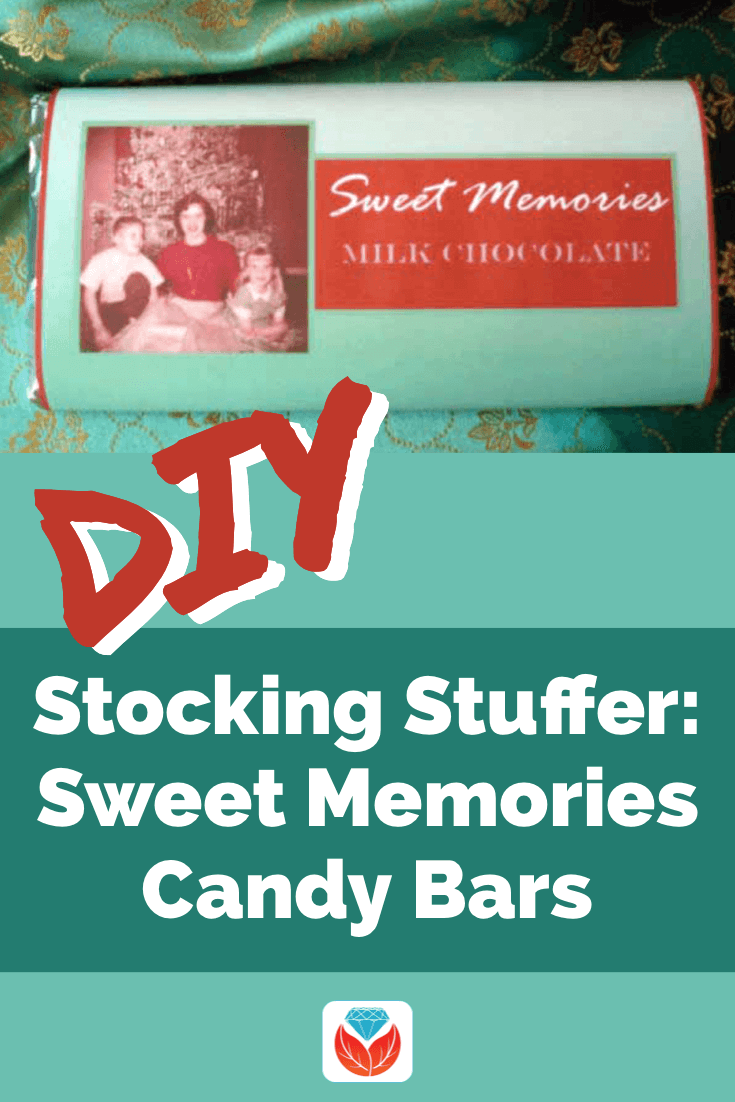
DIY Heritage Stocking Stuffer: Make Sweet Memories by Wrapping Them Around Chocolate
Are you looking for a fun, easy and downright delicious way to share some family history this Christmas? What better way to entice your family to have an interest in the family tree than wrapping that history around a luscious chocolate bar?
DIY: Stuff Their Heritage in Their Stocking
I firmly believe that family history should not sit on a shelf, but should be seen, touched, felt and even tasted!
Sometimes when a passionate genealogist shares the family history discoveries they have made, their relatives are less than enthusiastic to hear about it. (Sound familiar? I know I’ve experience this phenomenon.) This lack of interest may be more about the delivery of the information rather than the information itself. The trick is to serve up the family tree in an appealing and fun way.
That’s why a few years ago I designed these customized candy bars which I call Sweet Memories. They’re basically your favorite chocolate bar wrapped in a custom label with your own sweet family history memory on it. What could be better than that?!
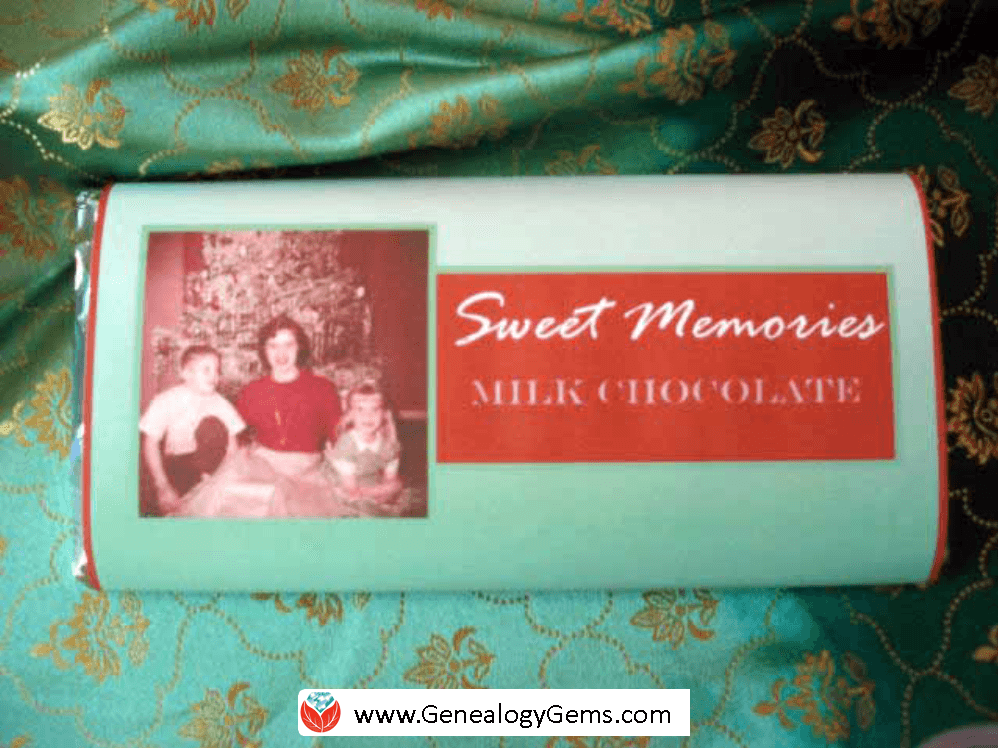
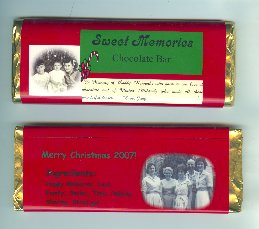
Here’s the first Sweet Memories stocking stuffer candy bar I made for Christmas.
They are really simple to make. The candy bars themselves are store bought. All you need is a computer, printer and some paper and you can whip some up in an hour or so.
What I especially love about these customized delectable delights is the conversation they stimulate. I loved seeing the surprises on the faces of my family, and then the reminiscing that soon followed. They loved seeing the old photos and the clever list of “ingredients” that provided insight into the character of their ancestors.
Don’t feel like you have to do exactly what I did on mine. Instead of a list of ingredients you could include a short funny story, favorite family quotes, or little-known fun facts about the ancestors in the photo. Use your imagination and have fun!
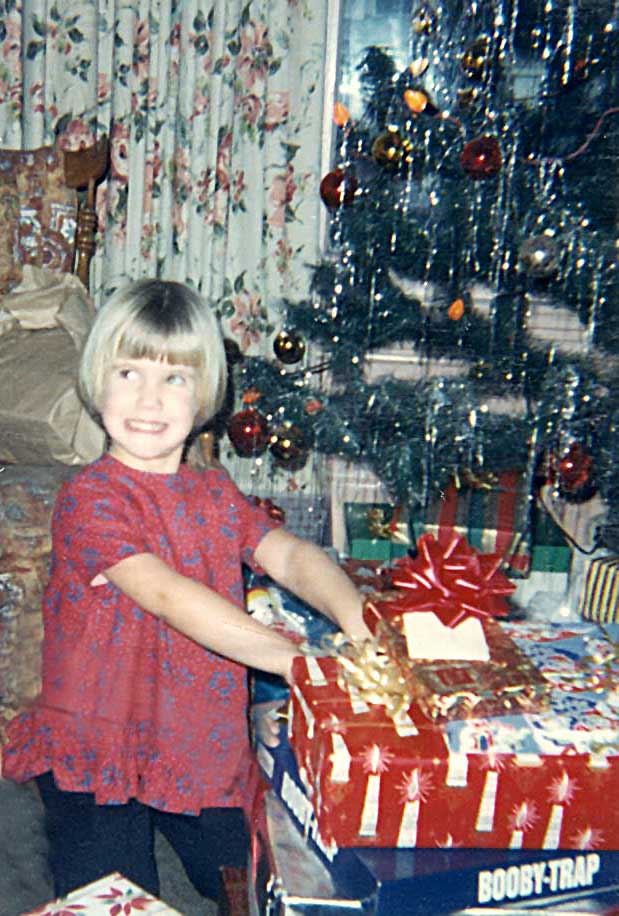
Me having fun at Christmas in 1966. Did you have the Booby-Trap game too? (Leave a comment)
Keep reading because after the step-by-step instructions below, I’ll share some more design ideas.
How to Make “Sweet Memories” DIY Stocking Stuffer Candy Bars
Here’s how to make your own custom labels and turn plain chocolate bars into wonderful holiday gifts for your loved ones.
Start by gathering up the following supplies:
- A 3.67 oz approximately sized Chocolate Bar wrapped in foil with a paper wrapper. (Dove and Cadbury are some of my favorites. Hmmmm!)
- Bright white printer paper
- Computer and printer
- A software publishing program that you can create your label in, like Microsoft Publisher. (Or try using a word processing programming using the text box feature.)
- Double sided tape (I use Scotch Brand Double Sided Photo Safe tape available here.)
- Scissors
- Scanned family photos, especially old holiday photos
These instructions are for creating the labels in Microsoft Publisher, but you could also do it in PowerPoint or any other design type software or app.
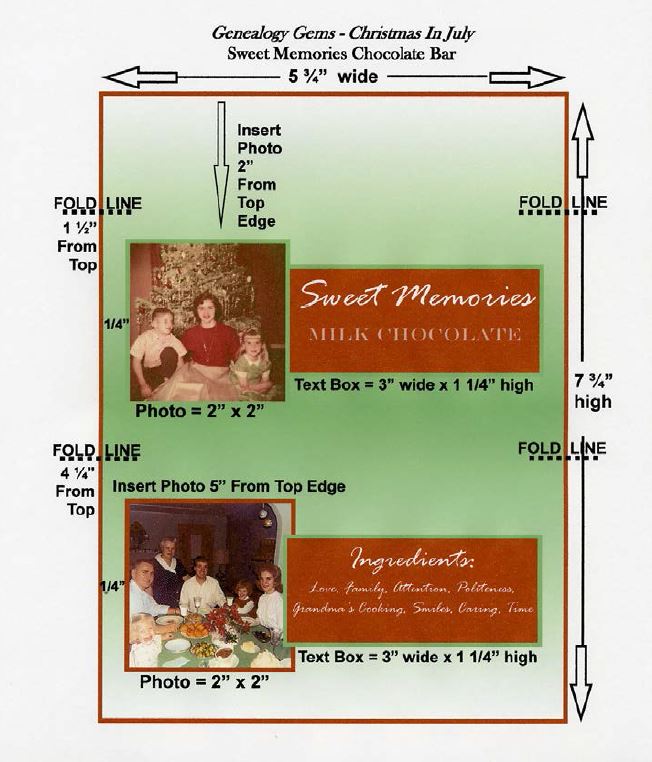
1. Create a Rectangle
On the blank page, create a 7 ¾” high and 5 ¾” wide rectangle using the Shape tool. This just gives you a nice outline to work in.
2. Add a Background
An easy way to add an interesting background is to scan a piece of scrapbook paper that you like. The scrapbook paper could be textured or have a repeating design. But you could also choose a favorite digital image.
Use the INSERT IMAGE function to get the image onto your page. Next, resize it to fit just over the rectangle that you created.
Another other option for the background is to select the rectangle and use the FORMAT FILL COLOR function to color the box with the color of your choice. I used green and then chose a gradient that went from light to dark for added interest.
3. Add an Old Photo(s)
You can add any digitized photo that you like. Dig through your old family photo albums to find Christmas photos from the past, or simply feature an ancestor or family. You can use the same photo for all your stocking stuffers, or surprise each member of your family with a candy bar featuring a different ancestor.
Use INSERT IMAGE to add your photos and resize them to fit.
For the front side image, I measured down approximately two inches from the top of the label, and that is where the top of the photo was placed. I set it ¼” from the left edge. Both photos are about 2” x 2”.
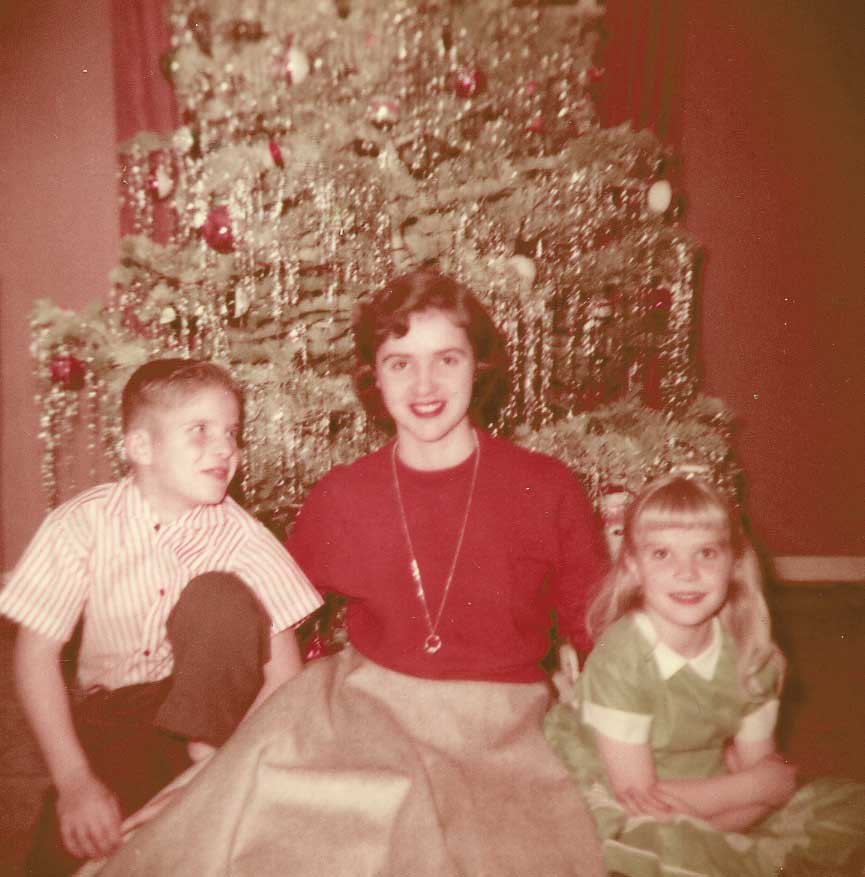
My uncle, mom and aunt in 1956. I used this photo for the front side of my stocking stuffer candy bar label.
4. Adding Photos to the Back of the Label
The backside photo begins 5” from the top of the label and is set ¼” from the left edge.
You may also want to include a small text box that states the date and location of the photos and the names of the people.
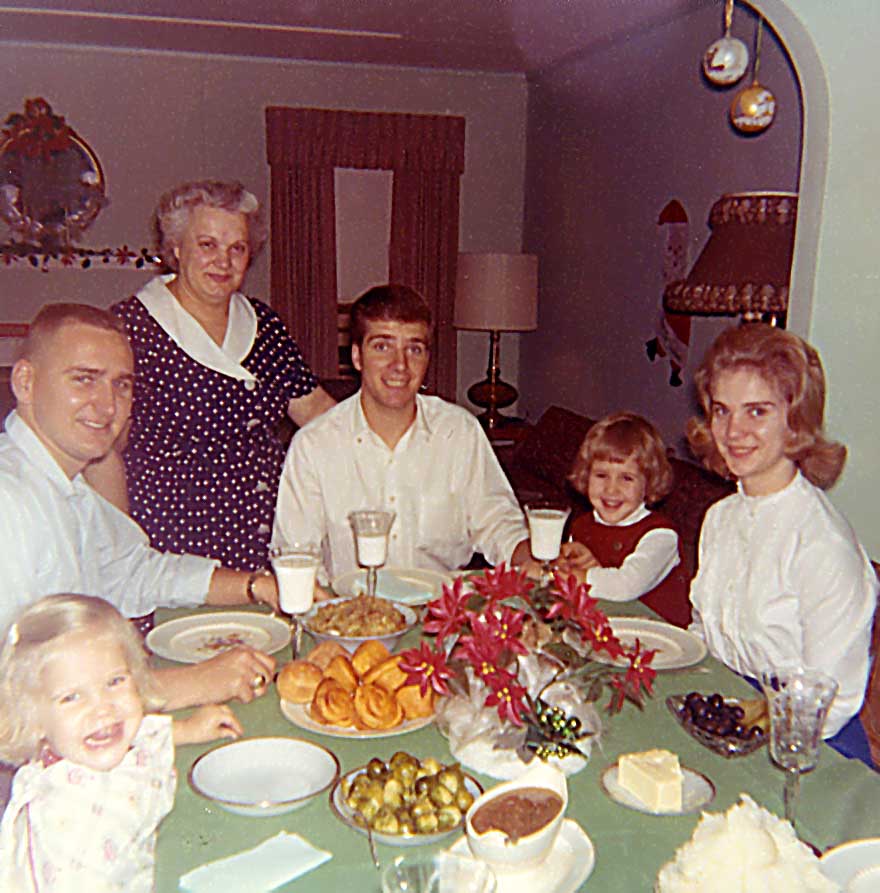
Christmas Dinner at Grandma’s House (I’m in the bottom left corner, mouth wide open as usual.) I featured this photo on the backside of my label.
5. Add Descriptive Text
The last step is to insert the text boxes.
Both the “Sweet Memories” text box and the “Ingredients” text box that I included are about 3” wide and 1 1/4” high. You can format them with the borders and colors that you want.
In my example, you’ll see that I took the color cues from the colors in the photos – the crimson red and soft green. Many apps have a color picker feature that will allow you to get an exact match.
 6. Add the Ingredients List
Every food item has an ingredients label on it, and this bar is no exception. I had some fun with the ingredients list and played up the family theme. I thought about my memories of my Grandmother and the values and elements she poured into each holiday. So my ingredients list reads:
- Love,
- Family,
- Attention,
- Politeness,
- Grandma’s Cooking,
- Smiles,
- Caring
- and Time.
Feel free to reflect your own family values in the list.
7. Print Your Label
Once you’ve got everything laid out on the screen the way you want it, it’s time to print.
From the menu, click FILE then PRINT and then click the PROPERTIES button. From this window be sure to select “high resolution paper” or “high brightness” as the media type, and select HIGH for the print quality to make sure you get the best, most professional looking label.
Print the label, then carefully cut it out.
8. Fold the Label to Fit
Follow the folding guidelines shown above, but keep in mind that your candy bar is going to dictate your actual fold lines.
The first fold line for my standard size Cadbury chocolate bar (which you can buy in bulk here) was 1 ½” from the top of the label and the second fold line is 4 ¼” from the top of the label.
(Disclosure: Genealogy Gems is a participant in the Amazon Services LLC Associates Program, an affiliate advertising program designed to provide a means for sites to earn advertising fees by advertising and linking to Amazon.com. Thank you for supporting articles like these by using our links.)
9. Tape the Label Closed
Remove the original wrapper of the chocolate bar, being sure to keep the foil wrapper in place and undisturbed. Use a small piece of double sided tape to stick the label to itself on the backside snugly.
And there you have it, your own custom family history themed chocolate bar! It’s ready to tuck into a Christmas stocking, use at your next family reunion, or at any other time you want to tickle someone’s sweet tooth and share memories.
More DIY Stocking Stuffer Design ideas
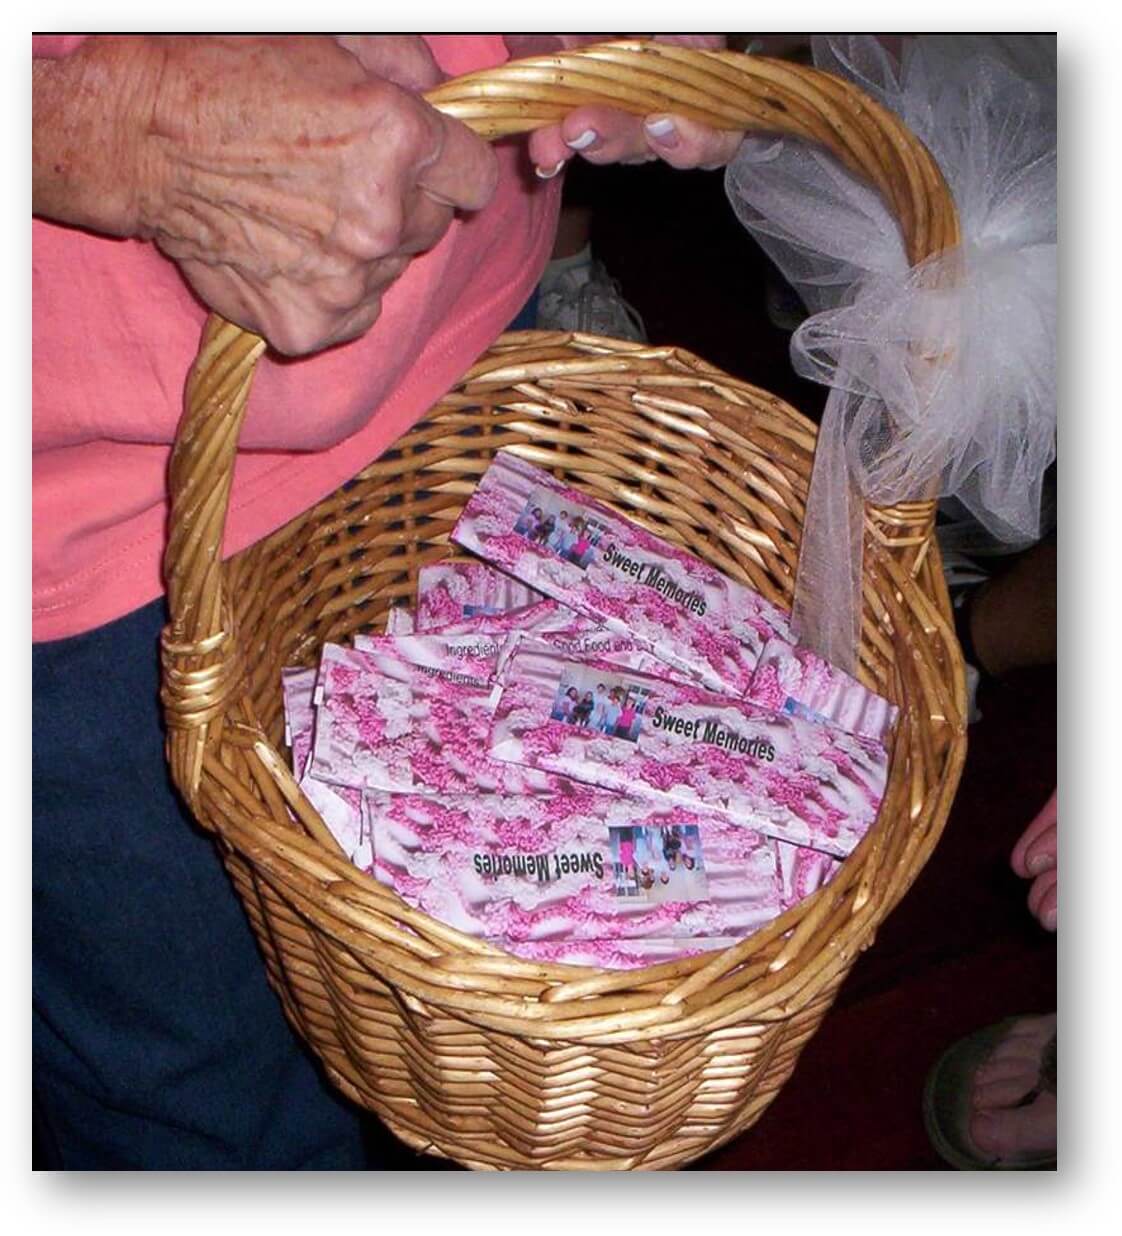
I promised you more examples of these Sweet Memories candy bars. Here are some from my Genealogy Gems Podcast listeners.
I love the vignette styling Judy gave her family history photos.
Genealogy Gems Podcast listener Judy shared her version of the Sweet Memories stocking stuffer candy bar.
And this listener took this DIY idea and used it to create candy bar treats for her family reunion. What makes these SO unique is that she used a family heirloom crocheted blanket for her background image. (How clever is that?!) She spread the blanket over the bed of a scanner to make a digital image of that she could use on the label.
Click here for more family reunion ideas.
Get more DIY project here at Genealogy Gems. You’ll also find great heritage crafting ideas–including photo displays and heritage quilts–on my Pinterest boards. If you enjoyed this idea I’ll hope you’ll share via Pinterest or Facebook. Did you like this idea and do you have other suggestions for a new spin on it or a favorite DIY family history project? I’d love to hear it so please leave a comment below.

 Thanks for sharing this post with others who will want a little more inspiration on how to share family history with loved ones. Just email the URL or post this article on your favorite social media channel.