by Lisa Cooke | Feb 11, 2020 | 01 What's New, MyHeritage |
Today MyHeritage launched MyHeritage In Color™ — a breakthrough new feature that automatically colorizes your black and white photos in seconds!
I’ve tried my hand at colorizing, both by hand many years ago, and more recently with software. It brings depth and life to old family photos. However, both methods are time-consuming. When making a choice between colorizing and more genealogy research, research definitely wins out.
The exciting news is that we don’t have to make that choice any more. This amazing new technology from MyHeritage makes it almost instantaneous! These are going to make great conversation pieces both online and in person.
Here’s the MyHeritage Announcement About MyHeritage In Color™
Based on deep learning technology, MyHeritage In Color™ brings your family history to life, revealing never-before-seen details — the results will blow you away!
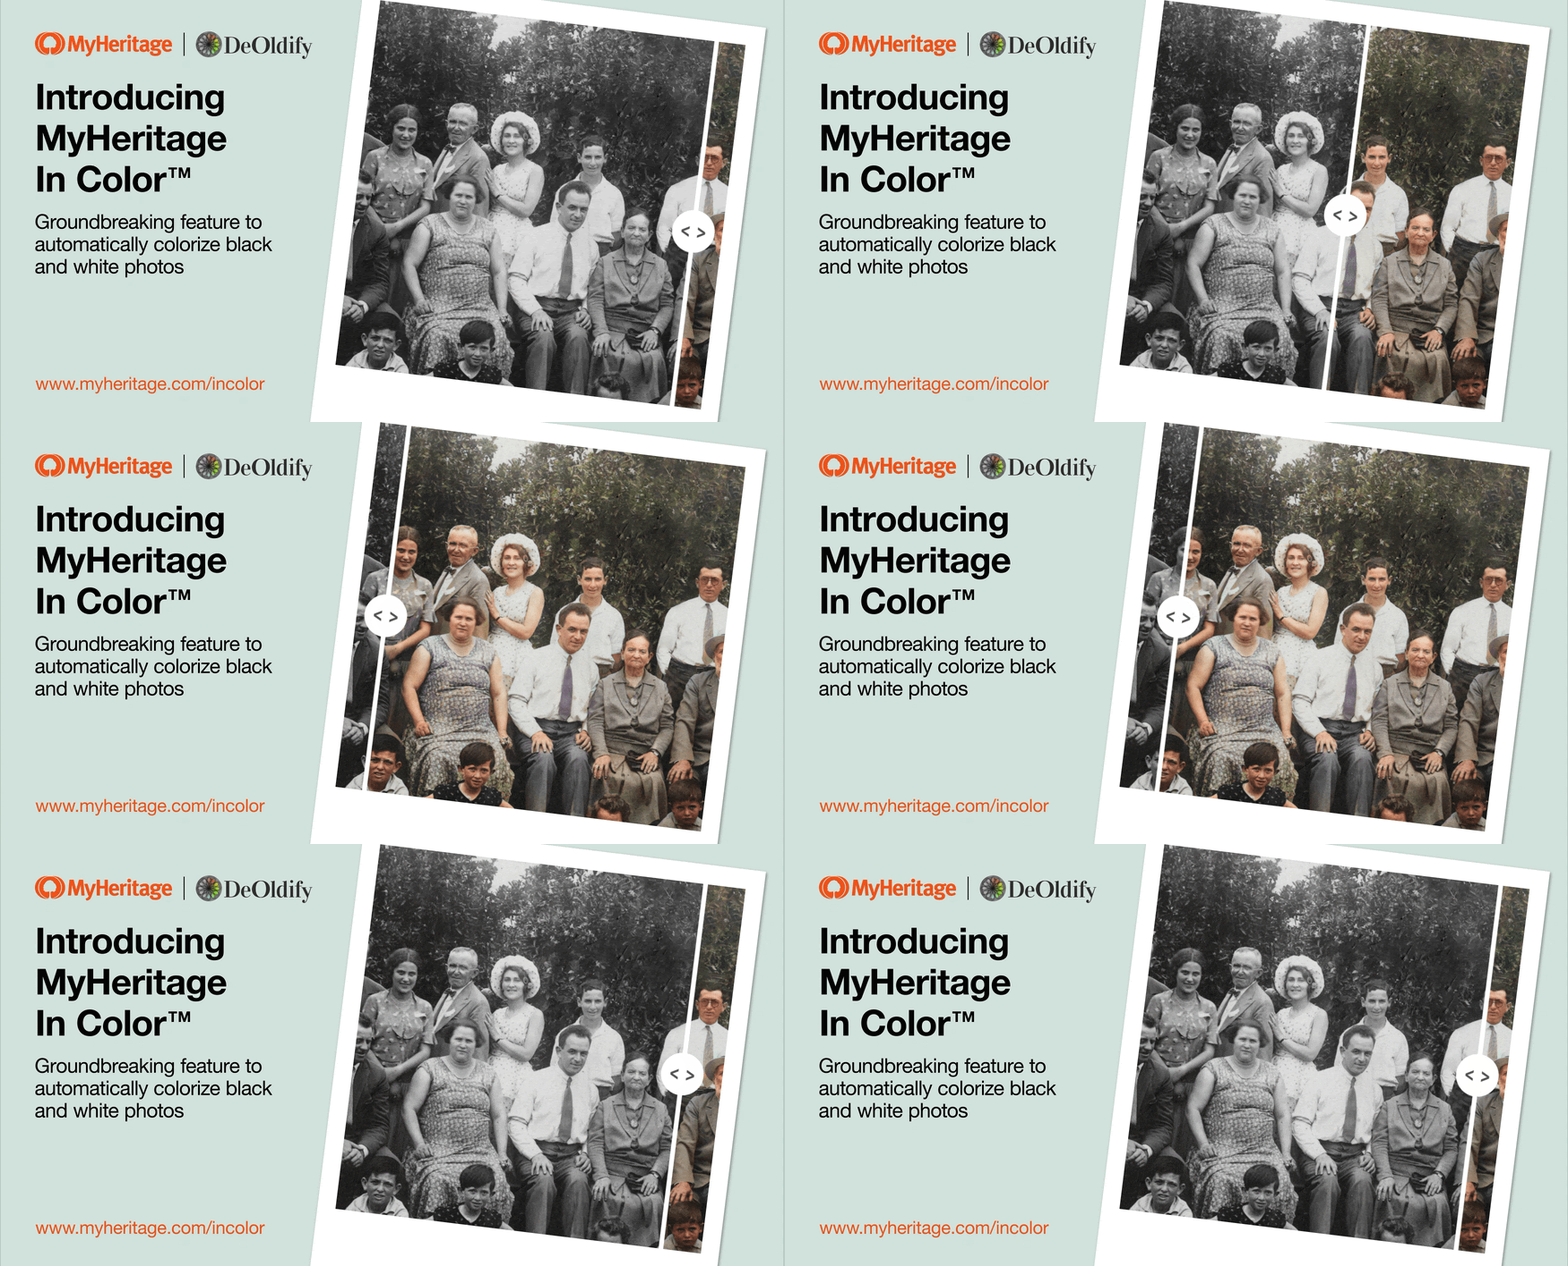
This feature uses the world’s most advanced technology for photo colorization, which is available exclusively on MyHeritage and is under license from DeOldify, created by Jason Antic and Dana Kelley. It allows you to do more than look at old photos — it lets you experience them, creating a deeper connection with your family history than you ever thought possible.
A Commitment to Authentic Preservation
Moreover, as part of our commitment to preserving the authenticity of historical documents, colorized photos will appear with a special embossed palette symbol at the bottom left corner of the photo to differentiate them from images photographed originally in color. All original black and white photos will, of course, remain intact and are not changed by the colorization process.
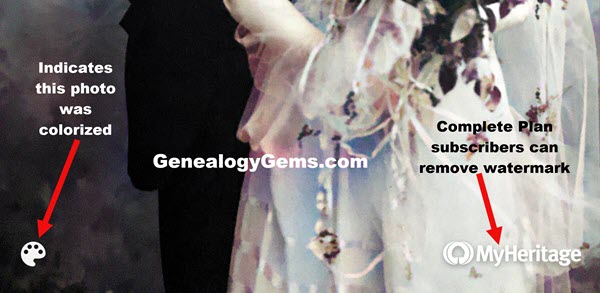
Supporting authentic preservation.
Use our new MyHeritage In Color™ page to upload photos to MyHeritage and colorize them instantly or scan in your photos using MyHeritage’s free mobile app.
Examples of MyHeritage In Color™ Colorized Photos
Here are some incredible examples of historical photos that we’ve colorized using MyHeritage In Color™.
Before:

After:
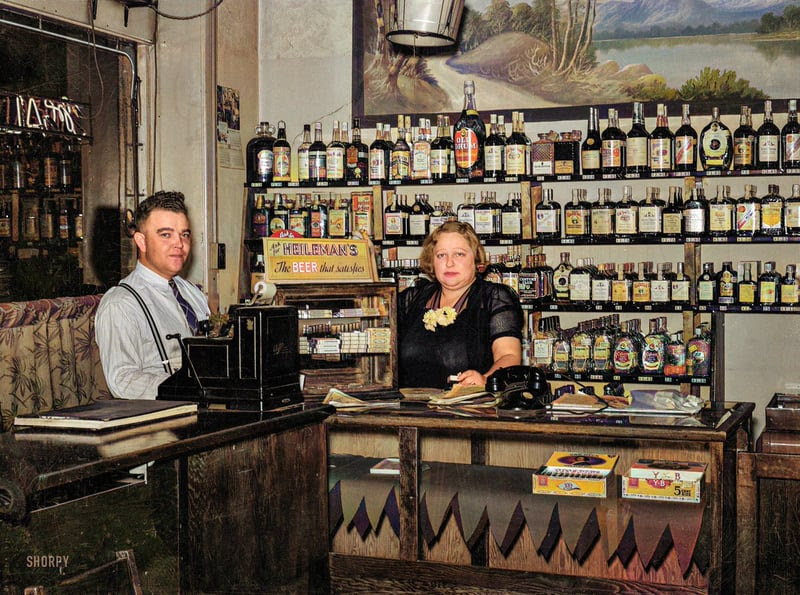
Manager of the Alamo bar, and Mildred Irwin, entertainer – North Platte, Nebraska, 1938
Before:

After:
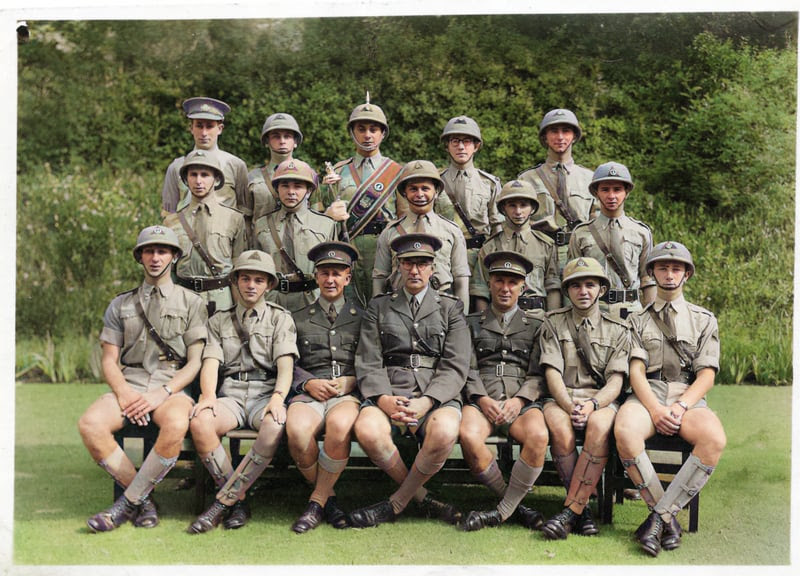
High school cadet marching band – Johannesburg, South Africa, early 1940s. Photo courtesy of Adam Fisher
Before:

After:
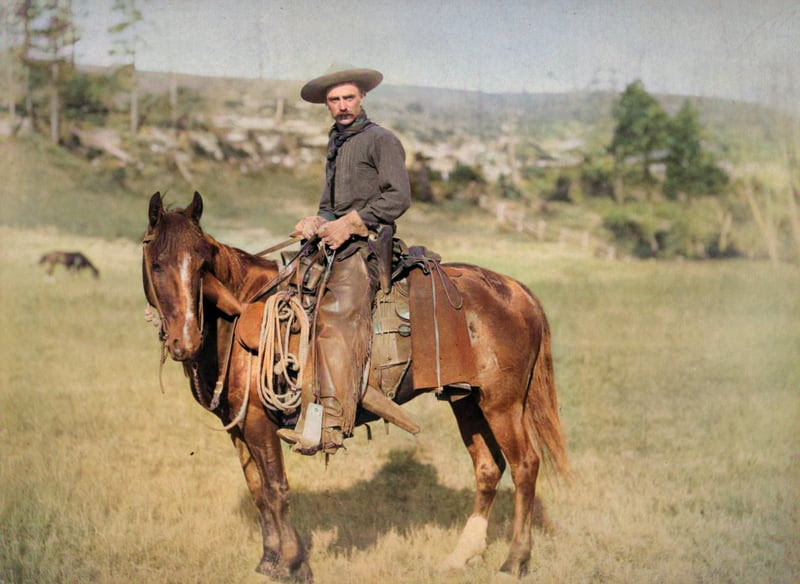
The Cow Boy
Before:
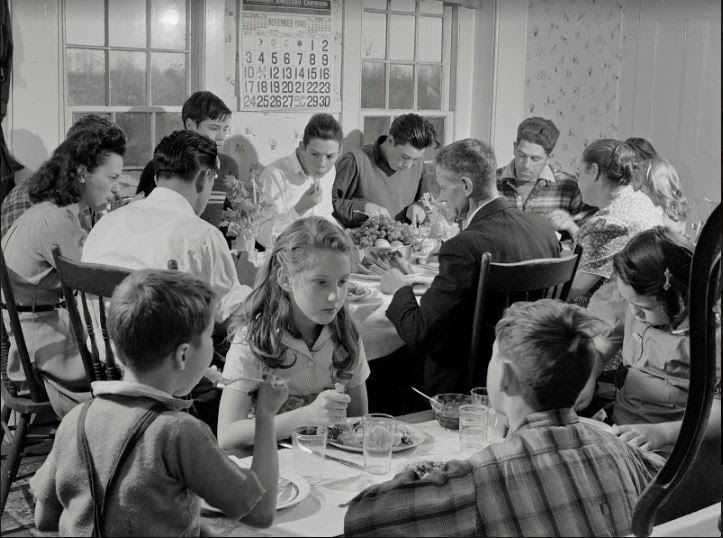
After:
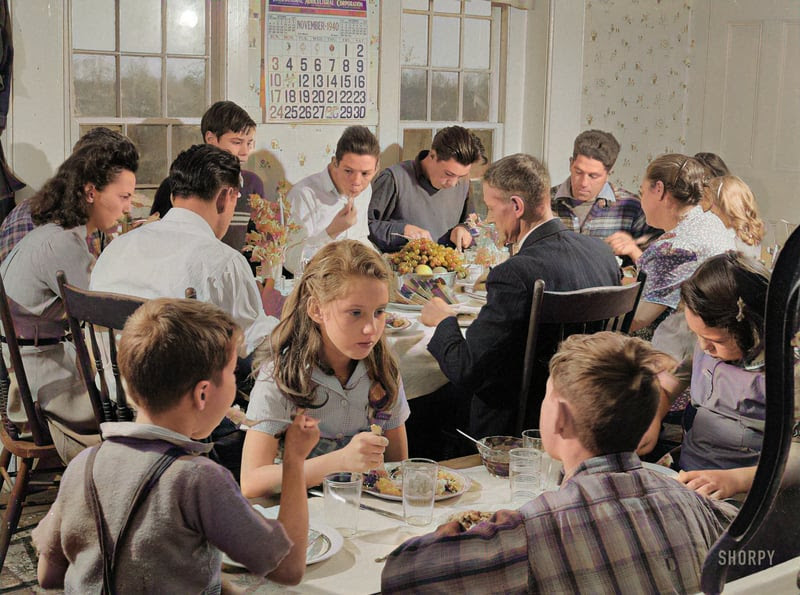
Family of Timothy Levy Crouch, a Rogerene Quaker, at their annual Thanksgiving Day dinner – Ledyard, Connecticut,
We sincerely hope that you enjoy bringing your family’s black and white photos to life with MyHeritage In Color™.
My Experience with MyHeritage In Color™
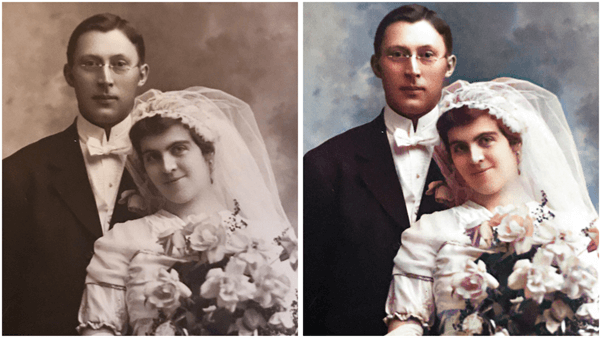
My husband has been peering over my shoulder, fascinated as I colorized old photos from his side of the family. I love what MyHeritage In Color™ did with the photo of Eddie Larson and his new bride:
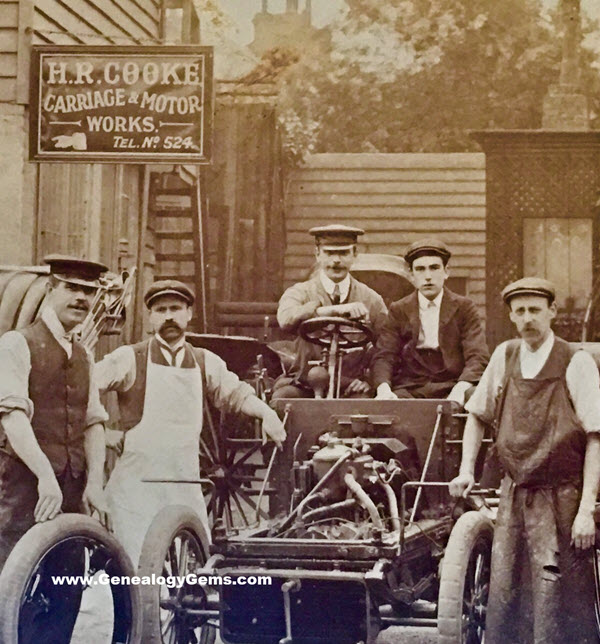
And I’ve shared this photo of myhusband’s grandfather Raymond at his father’s motor works home business in England:
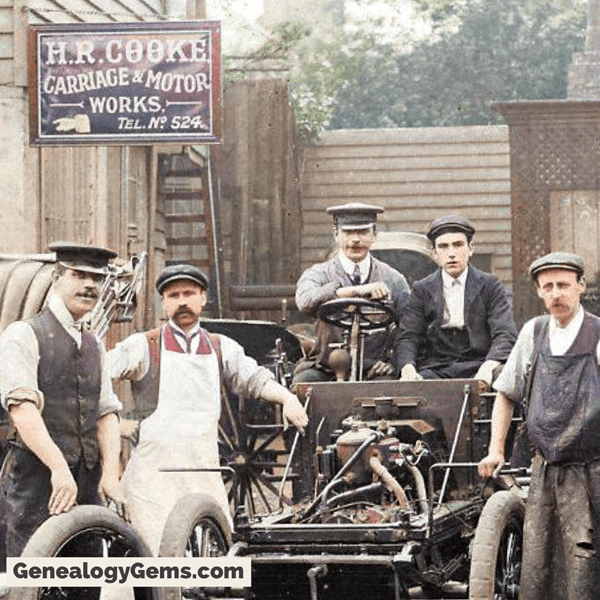
And here it is after colorizing:
Happy colorizing!
by Lisa Cooke | Nov 26, 2019 | 01 What's New, Photographs |
Do you have old family photo negatives in your closet? You may be wondering, “can I still get my old negatives printed into photos? What should I do with these old negatives?” To answer questions like these, we’ll need to think through your goals, budget and resources. Follow these 5 steps to digitizing old negatives and soon you may be looking at your family history in a new way!

Don’t Let Your Old Negatives Languish Like I Did
Having just gone through the process of getting my old family negatives digitized, I’m excited to share with you what I learned along the way.
In my case, I inherited photos and negatives from my paternal grandmother. I’m embarrassed to say how long they’ve been languishing in the guest room closet.
After having amazing success getting my maternal grandmother’s old home movies digitized (you can read more about that and listen to the podcast episode here), I became determined to finally address these items. It was time to see just what these negatives were and get them digitized and preserved. I couldn’t be happier that I did!
Here’s just one example of the negatives. This one is actually two photos in a medium size format. Though I’ve never seen these images before, I was pretty sure that the bottom picture was my dad and his little sister in the 1950s.
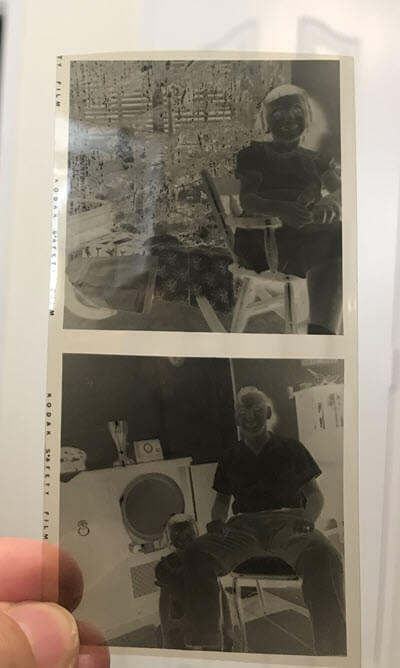
After professional scanning, I can fully enjoy this image:
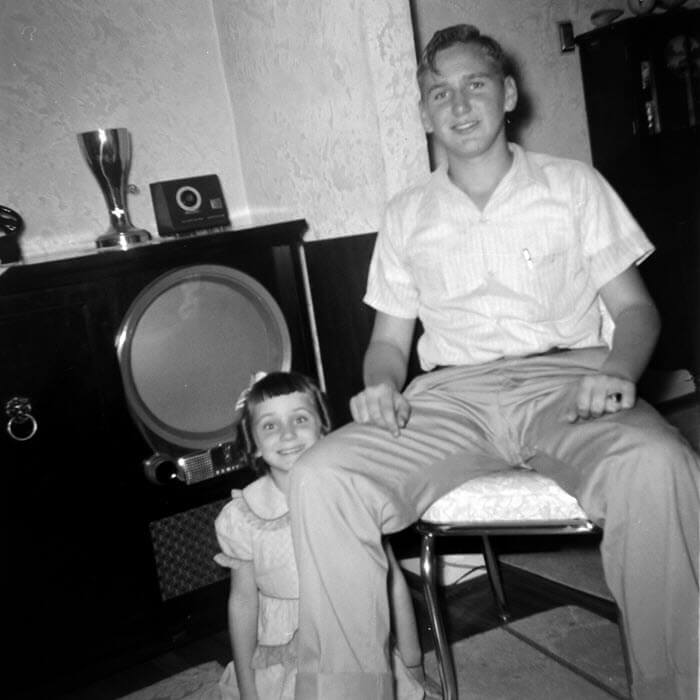
Getting these photos digitized has given me the opportunity to collect so many more family stories, like the one my Dad told me about the photo above when I emailed it to him:
“That was our FIRST TV, my mom had to have the large cabinet, I’m sure you understand that. Black and white only of course. I was about 12 years old, so that’s about 1951. First TV I ever saw was when my dad took me to his friend’s house and we watched wrestling. We got one not long after that. The first kids program I recall was Howdy Doody.”
Are you ready to finally digitize your old negatives? Here are my 5 Steps to Digitizing Your Old Negatives:
1. Consider Your Budget Before Digitizing Old Negatives
If you’re on a limited budget, you might be tempted to just do the scanning yourself with a home desktop scanner. While that may sound like a cost-effective option, it may turn out to be problematic in the long run. Here are several reasons why:
Home film scanners are an investment.
If you have an older scanner, it may not be suited to digitizing negatives. This means you’ll need to invest in a new flatbed scanner. While these days scanners like mine (the Epson Perfection V600) can scan film as well as documents, you still may not get the clarity and quality a professional service can deliver.
Scan quality can vary.
Scanning on your own puts your images at risk for being unclear. It can also be difficult to get them to a high enough resolution that they can be enlarged beyond their original size.
Negatives should be scanned between 1500-4000 dpi, with 4000 being optimum. Professional services like the one I used can reach these numbers, but it’s very important to ask exactly what the output will be when ordering. I get all my negatives digitized by Larsen Digital where I can select the desired scan size and I know I’ll consistently get the highest quality scan possible. Visit Larsen Digital here where you’ll also find their latest discounts exclusive to Genealogy Gems readers. For a limited time negatives are discounted with the coupon code: GenGem.
Digitizing negatives can be deceivingly time consuming.
Time spent carefully scanning is time not spent doing other things you love. And digitizing your negatives can only go as fast as your scanner can scan. Confirm the scanning time of any scanner you’re considering using and evaluate the quantity of negatives you have.
In my case, I have a fair number of negatives of various ages and sizes. Once they are digitized I don’t anticipate that I’ll have a need to scan more negatives in the future. Therefore buying a new scanner and dedicating desk space to it was not appealing.
Since my negatives were old family photos, I wanted to ensure that they were done right, so I opted for professional digitizing. In the end the financial investment was about the same. However professional scanning won hands down when it came to the quality of the scans and the time and space I saved. I would rather spend time researching my ancestors than scanning their negatives!
Keep reading because our next steps will help you keep your costs down while still getting your negatives professionally digitized.
2. Make Three Piles to Separate Your Negatives
Since we want to get our negatives digitized in the most cost-effective way it’s important to take a moment to identify which negatives are worth digitizing. We’re going to sort our negatives into three piles:
Pile #1: Digitize
These are the negatives you are going to send to the professional scanning service.
Pile #2: Archive
These are the negatives you want to keep, but don’t plan to digitize.
Pile #3: Throw / Give Away
These are the negatives not worth keeping. (Yes, there are some you don’t need to keep!) It certainly couldn’t hurt to send out an email blast to your family members to see if anyone is interested in keeping them. If not, toss!
As you can see, not all negatives are alike. So let’s head to step three and let’s start sorting in a discerning way.
3. Determine if You Already Have Photographic Prints of Your Negatives
Since digitizing photographs is generally less expensive than digitizing negatives, you will want to check to see if you already have a photo printed from the negative. This means it’s time to take a closer look at your negatives.
Here are just a few easy and low-cost options for viewing your negatives:
Do it the old-fashioned way.
Hold the negative up to a lamp.
Use your phone or tablet.
Here are two simple options:
1) Turn on your phone’s flashlight feature and then turn your phone around to face you and hold the negative in front of it.
2) Use a free app to turn your phone’s screen into a light box.
I downloaded the free Screen Light to my iPhone which is also available on Android. Open the app and adjust the setting to maximum “White” and “Light.” You can then hold your negative in front of it or even lay it on the screen.
I reviewed my pile which included negatives from my own family as well as the ones my grandmother gave me. I knew I had prints of all the color negative strips of the family I raised. In fact, in many cases I had double prints! (Remember the days of the double print developing?)
In the case of the negatives I inherited from my grandmother, I wasn’t so sure that I had photos of everything. The photos were probably printed when the negatives were developed, but I didn’t necessarily inherit all of the photos.
I carefully combed through my collection, making sure that I didn’t lose the context of the order in which they came to me. I knew there was a good chance that they may have been at least somewhat in chronological order. That can be valuable information when it comes time for labeling the digitized files.
Consider purchasing some acid-free negative sleeves or envelopes like these so that you not only have a place to safely store them but you can also make notes about important details you notice and whether or not you have prints, etc. (Disclosure: We include affiliate links in our posts for the products we suggest. The compensation we receive if you make a purchase helps support articles like this one and the free Genealogy Gems Podcast. Thank you!)
In the end you will have a pile of negatives that you do have prints of, and a pile that you do not.
4. Select the Best Negatives and Photos to be Scanned
Now that you have reviewed your negatives, let’s make decisions about which negatives and photos will be scanned.
If you do have a photograph of the negative:
Determine if the photo is in better condition than the negative for digitizing. Again, photos are usually less expensive to digitize than negatives.
Typically, the negative will be in better condition, however over the years they may have been smudged or scratched, so a careful review is worth the effort.
If the photo happens to be in better condition than the negative, your next decision will be what to do with the negative that you will not be digitizing.
If the negative is in good condition and is an image of particular importance to you, put it in the Archive pile.
If the negative is not in good condition, and therefore not likely to ever need to be reprinted from the negative again, drop it in the Throw /Give Away pile. I know it’s hard to do, but the storage space you save can be used for other more important things.
If the photo has some flaws and the negative is in better condition, put the negative in the Digitize pile. You may still want to keep the photo for an album or display, but your digitized image will be created from the better quality negative.
If the printed photo is the item in better shape, but it still has some flaws, don’t fret. These days you can dramatically and easily improve the digitized scan of the photo with the free Adobe Fix app on your phone or tablet. Click the play button on the video player below to watch my short demonstration video:
Learn more about photo restoration on mobile devices in my book Mobile Genealogy available in the Genealogy Gems store.

My book “Mobile Genealogy” includes step by step instructions on using Adobe Fix.
5. Send Your Old Negatives in for Professional Scanning
Now that you have organized a pile of negatives ready for digitization, it’s time to send them out to a professional scanning company.
I sent mine to Larsen Digital. I’ve met them in person and have been impressed with the quality of their work, and the incredibly wide variety of digitization work they can do.
Visit the Larsen Digital website here. This page has special discounts specifically for Genealogy Gems readers. Click on Negatives and you’ll find many options. I was thrilled to see that they could accommodate the variety of negatives I have like:
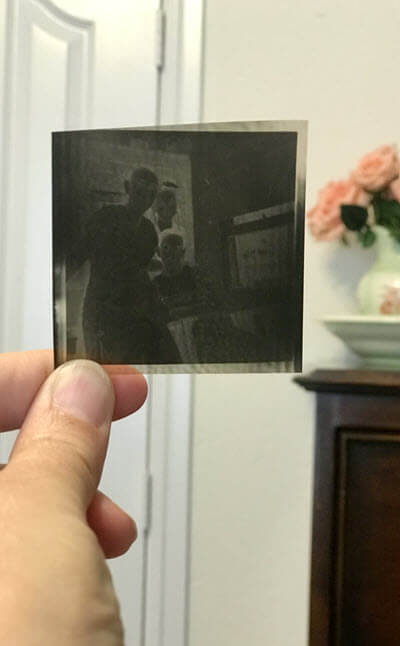
Medium format black and white negative
You may be a little nervous about mailing your negatives. At first, I was too, but the Larsen staff assured me that their customers safely and routinely mail their negatives. The key is to use a shipping service with tracking. I picked up a small priority box at my local post office. It gave me a little room for a little extra padding inside and I received a tracking number so that I could follow it on the journey. FedEx is another reliable way to go. Larsen was excellent about tracking the incoming and outgoing order.
When the order is complete, you will first receive a link where you can instantly download your digital files. Soon after your original negatives will arrive in the mail exactly as you sent them. Mine even came back in my grandmother’s original envelopes!
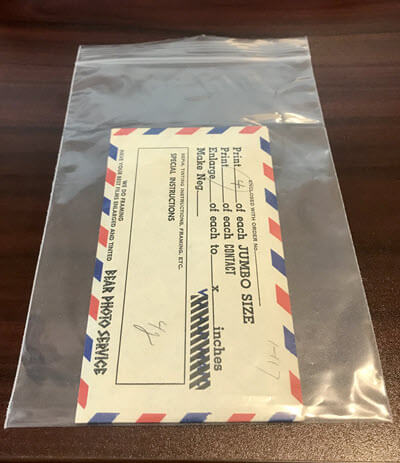
Digitized old negatives returned in their original envelope safe and sound!
The Results that Open Up a World of Family History
Needless to say, I am thrilled with the results of my digitization project! Many of the negatives are photos I have never seen before. (What in the world took me so long to get this done?!)
I just have to share a few examples with you. Here’s a photo of my great uncle proudly posing with his taxi cab in Ada, Oklahoma:
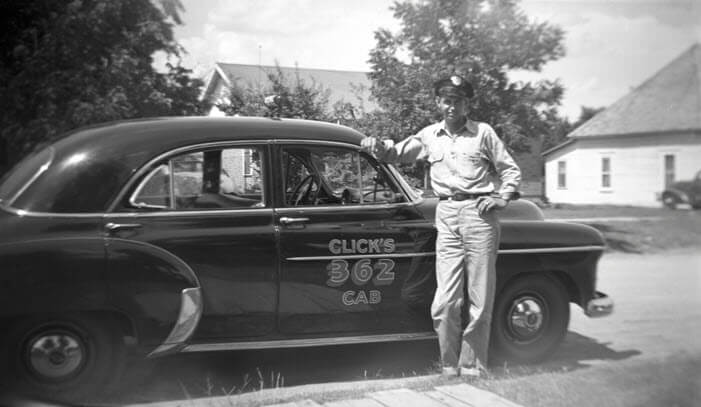
My great uncle next to his taxi cab in Oklahoma
My grandmother was an avid doll collector, so I wasn’t surprised to see my aunt in this photo with dolls. I was surprised and delighted though to spot an important artifact on the wall that held a significance to my grandparents. The framed photo of a ship commemorates one of the many ships produced at the Kaiser shipyards during World War II. Both of my grandparents worked there during the war: my grandfather helped build the ships, and my grandmother worked in in the office assisting with hiring the men and women who worked alongside him.
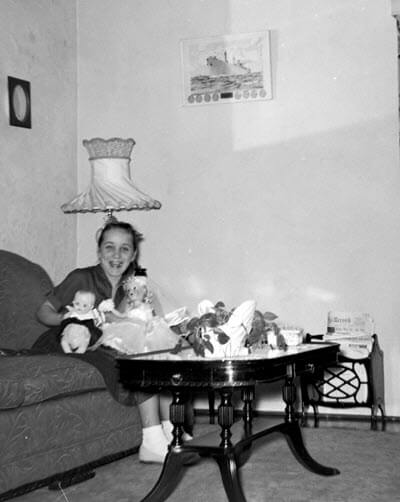
My aunt at home in the 1950s.
Although this next one has some blurring around the edges due to the person who took the photo, I treasure this rare shot of my great grandmother, my grandmother and her siblings.
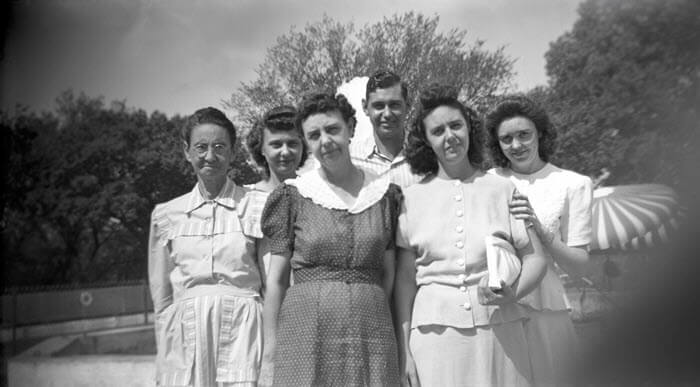
The Herring Family: My great grandmother is on the far left, and my grandmother is next to and just behind her.
A New View of Your Family History
Following these 5 steps for digitizing your old negatives will not only lead to new views of your family history, but ensure that your family history photos are preserved for generations to come.
If you found this article helpful, please share it with your friends. I can’t wait to hear in the Comments below the discoveries you make in your closets!
by Lisa Cooke | Sep 24, 2016 | 01 What's New, Apps, Photographs |
Every where we go, we are snapping pictures. Whether you are interested in capturing your current family history or want to preserve the past through pictures, photo editing apps and software are a must! Read more to learn what software and apps are out there for the active genealogist who loves to take pictures.
A Gems reader recently asked if we have any suggestions on photo editing software and apps for family history. Our Genealogy Gems team members are each active in their personal family history and are quite savvy when it comes to some of the best photo editing apps and software out there.
Lisa Louise Cooke’s Favorite Photo Editing Software and Apps
Lisa shares:

I think one of the best photo editing software programs out there is Adobe Photoshop Elements, the consumer version of the high-powered Photoshop CS/CC software. On my mobile device, Photoshop Express is my go-to photo editing app which I discuss in Chapter 8 of my book Mobile Genealogy. In fact, I use the app far more for the photos I’m actively taking with my iPhone 6 Plus than the software on my computer. 
Adobe Photoshop Elements is an ideal editor for entry-level photographers, image editors and hobbyists. You’ll find most of the features of the more expensive professional version, but with fewer and simpler options. It allows you to create, edit, organize, and share your images to social media sites. Use the built-in Guides to quickly accomplish your goals.
Adobe’s Photoshop Express app can be downloaded to your mobile device for free from Google Play (for Android) or the Apple Store (for iPhones.)
In her book Mobile Genealogy: How to Use Your Tablet and Smartphone for Family History Research, Lisa explains how the Blemish tool can be used to restore old family photos.
Using the Photo Express Photo Editing App for Photo Restoration
If you want to restore old family photos, this app is now also capable of doing a lovely job with the new Blemish Removal tool. The app allows you to access your photos straight from Dropbox, as well as Adobe Creative Cloud, and Facebook. You can copy the old photos you want to edit to a dedicated folder in Dropbox. Remember, always leave your master digital photos where they are on your computer, and make sure your computer is backed up. (The Genealogy Gems Podcast uses and recommends Backblaze.)
How to add photos to Adobe Photoshop Express:
- On the computer where your photos are stored, go into Dropbox (either your Dropbox desktop application, or sign in to your account at www.dropbox.com)
- Create a folder called “Photos for Editing”
- Save copies of the photos you want to edit into the folder you created, leaving the originals where they are on your hard drive
- On your tablet, tap the Adobe Photoshop Express app
- Tap Dropbox. (See the chapter on File Sharing and Storage for more information on Dropbox)
- Tap the “Photos for Editing” folder
- Tap the photo you want to edit
- The photo is now on your screen and ready to edit and embellish
- When editing is complete, tap Close, then Save
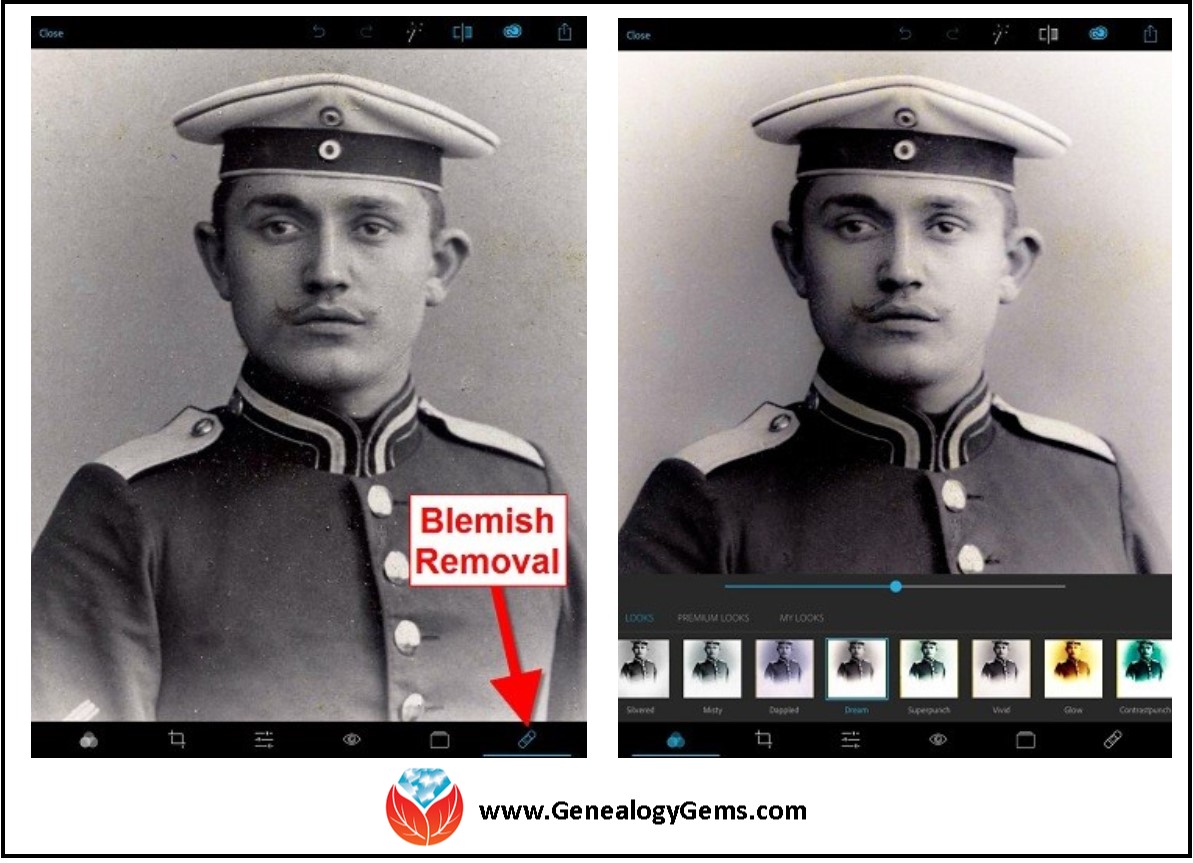
Above is a photo of Lisa’s great-grandfather. On the left is the original scan, and on the right is restoration with the Blemish Removal tool (the icon looks like a band-aid.) After the touch up, Lisa applied the Dream filter which provided a bit more clarity and softened the rough spots in the background. Dream is one of the many free “Looks” available in the app, in addition to “Premium Looks” filters that you can purchase. She loves the fact that if she finds a certain combination of filters is working well, she can save it under “My Looks.” This saves time in the future because with one tap, you can apply your own special mix.
Amie’s Favorite Photo Editing Software and Apps
Amie says:
“One of my favorite photo editing tools is Pixlr Express. It is easy to use without having to read through the ‘instructions.’ It is a web-based tool or a mobile app. It makes correcting and enhancing my old photos a breeze.”
Using Pixlr Express
Pixlr Express is a web-based tool and a mobile app. Resize, rotate, filter, correct, and even add borders and text. Pixlr Express is free to use, which is always a plus. On your laptop, simply go to www.pixlr.com/express. Click on Browse.

Choose the photo you wish to edit. The example below is a cute little picture of Amie’s dad in the fourth grade.
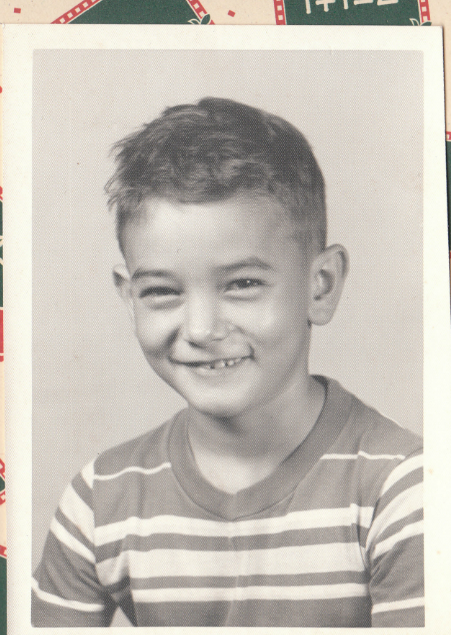
It could use some more color definition, maybe a new border to clean up the edges, and a caption on the front so that when shared, others will know who it is. To begin doing these edits, first click Adjustment.
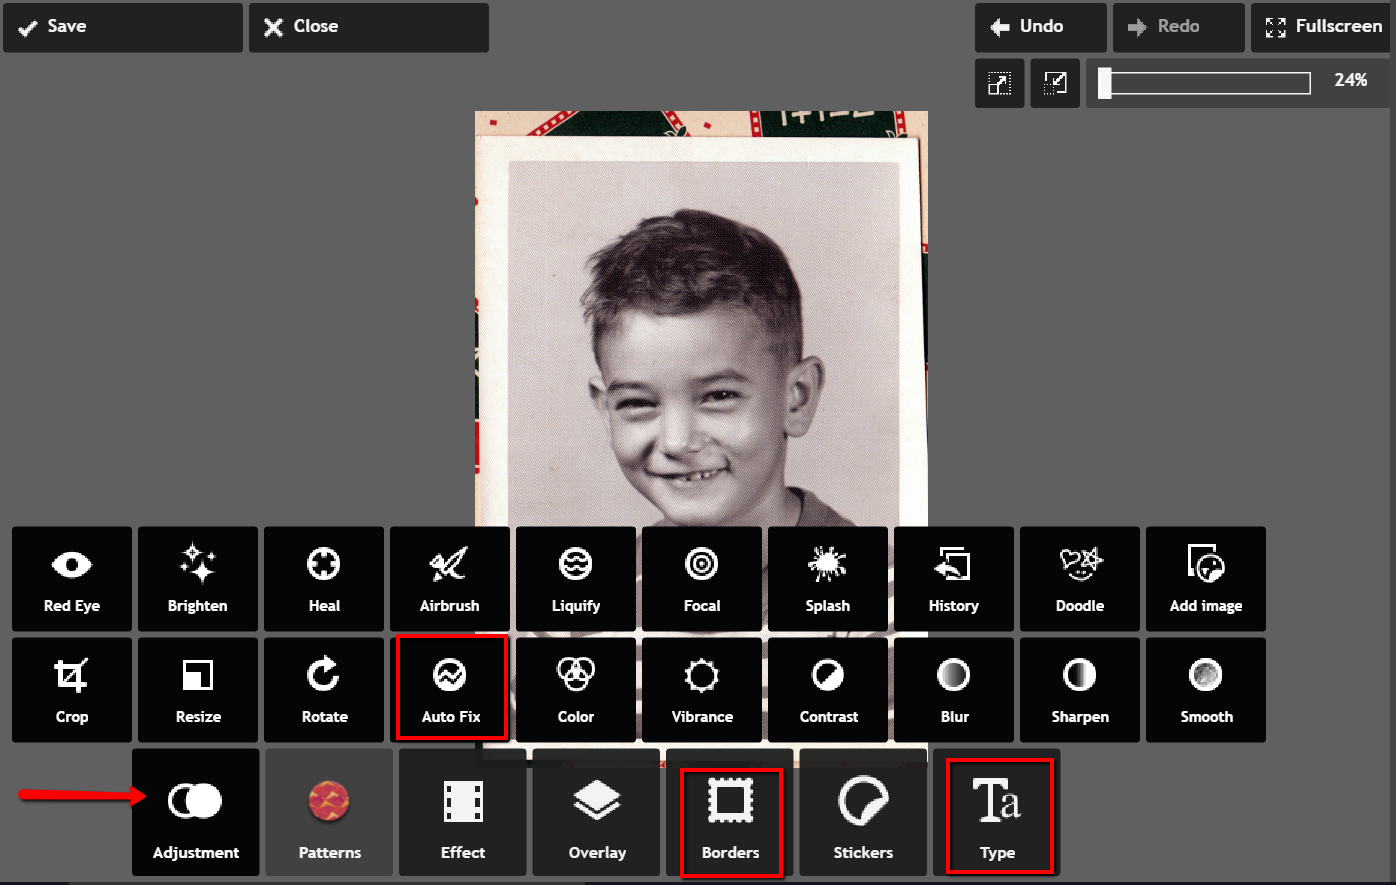
From the icons that pop-up, choose Auto Fix. It really looks great with just the click of one button! Add a fun border if you wish and click Type to add the text you want. Here’s the finished product in less than 3 minutes:
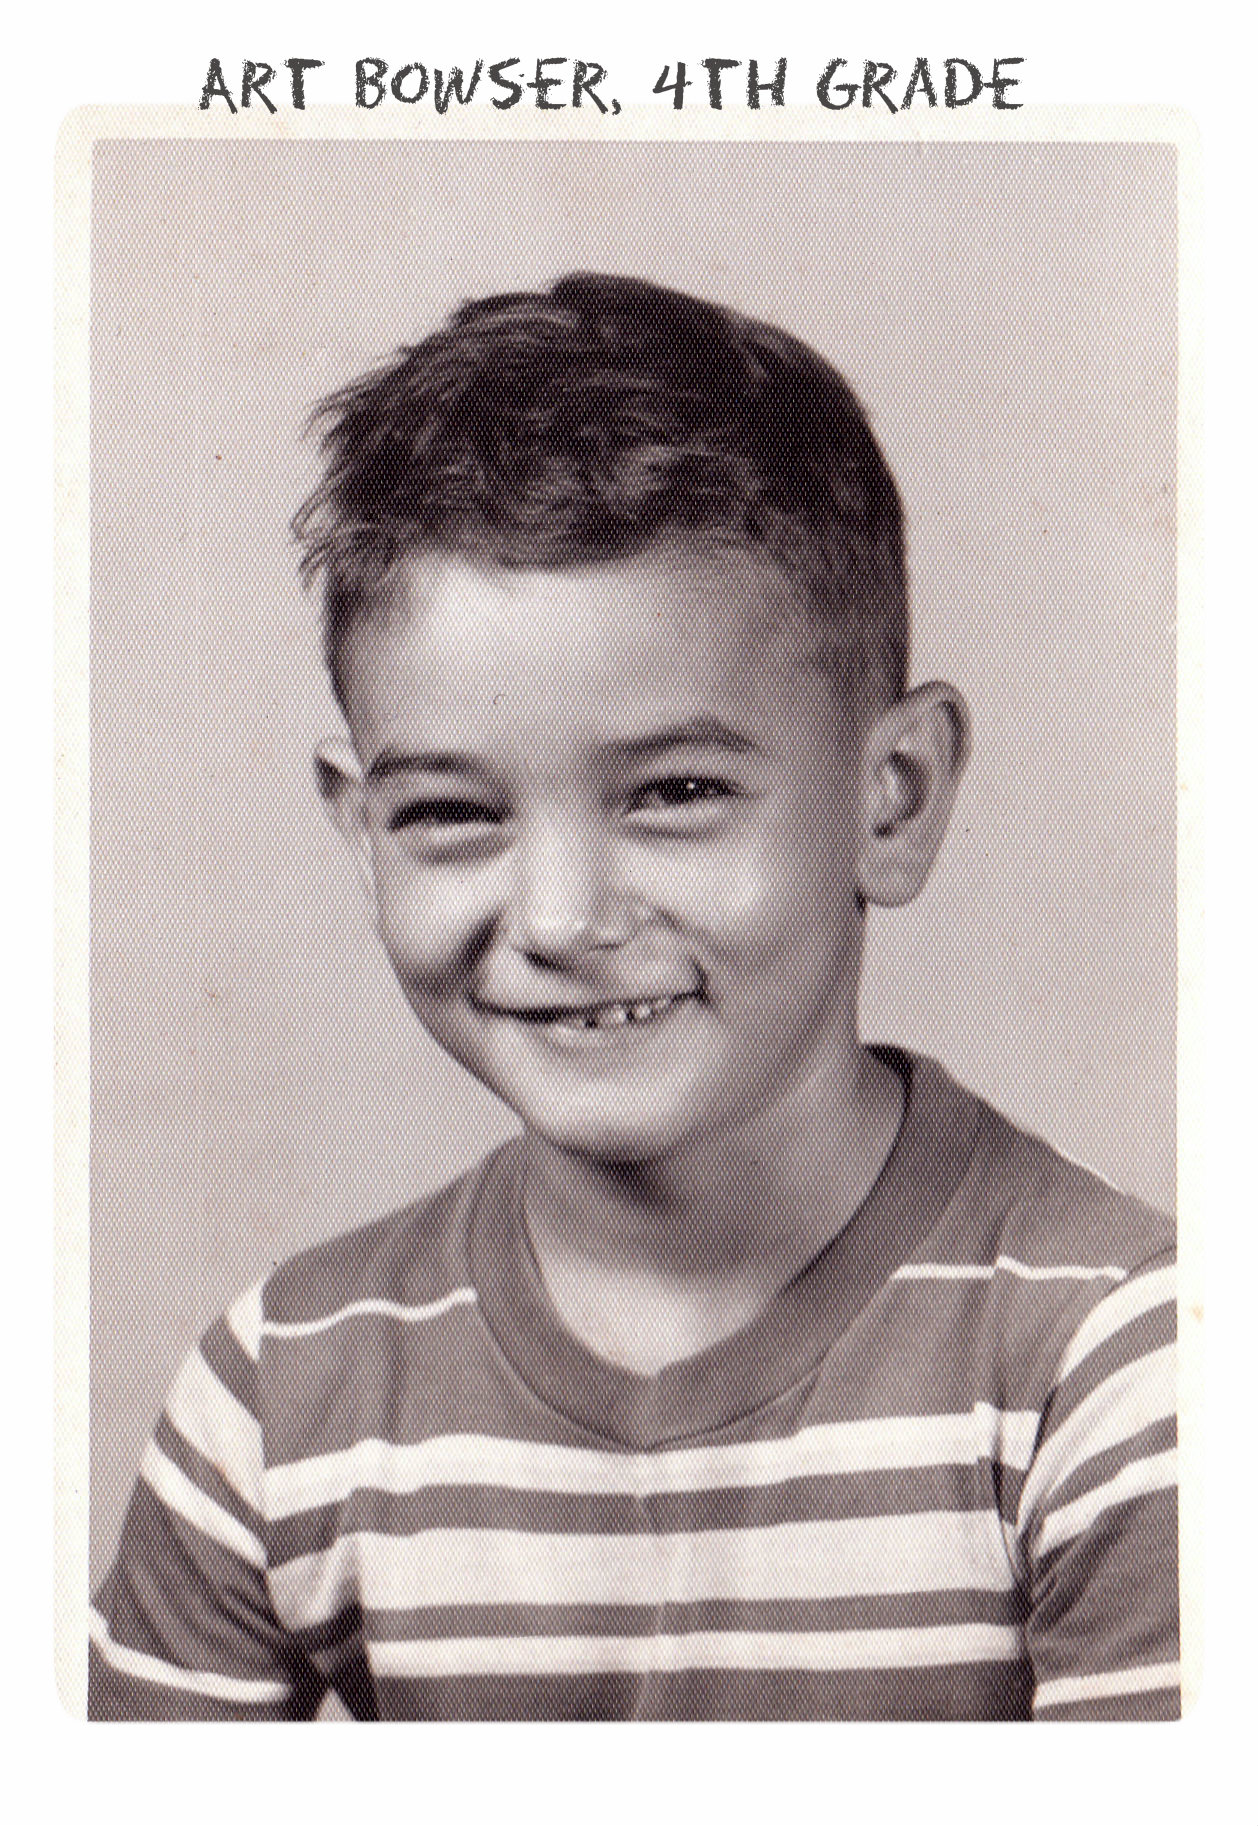 Don’t you just love it!
Enlisting the Help of Others
In some cases, our old photos are in seriously bad shape. We could pay to have a professional doctor it up, but I enlist the help of others at one of my favorite Facebook groups. Photo Restoration Free Service group on Facebook is dedicated to fixing images for free. Many of the people offering their talents are truly amazing. One man in particular caught my attention and gave me permission to use a before and after shot of his work. Thank you to Balazs and others who gave their permission for the before and after screenshot you see here.
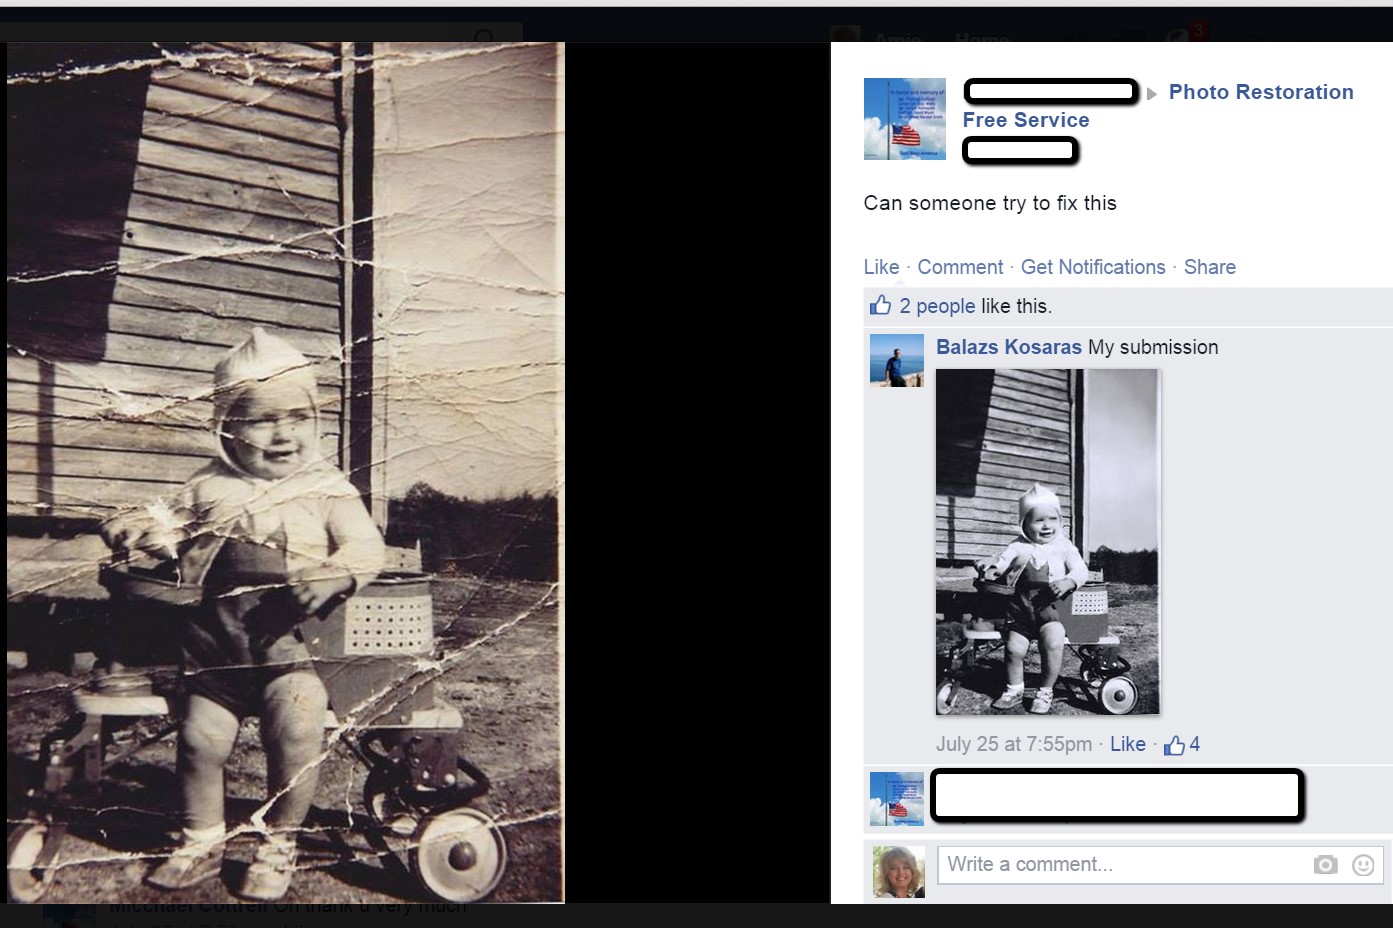
What are your favorite photo editing apps? Do you use a different app for your mobile device? We’d love to hear from you and what you are doing to make the most of your treasured family photos. Please leave a comment in the comment section below.
Sunny’s Tips for Restoration of Digital Documents
It’s not only the pictures of ancestors we sometimes need to restore, but it can also be those hard-to-read images of documents. When dealing with this problem, Sunny says:
“I do most editing on my laptop. This is where the nearest free software is and the default photo editor for Microsoft 2010. Most of the time, I just want to tweak the lighting: brighten up a scanned image or heighten the contrast in the image. To do this quickly, I open the image, then click Edit Pictures > Brightness and Contrast. In the Before/After images shown here, I just adjusted the midtones (+22) to make the gray areas lighter, then upped the contrast (+43).”
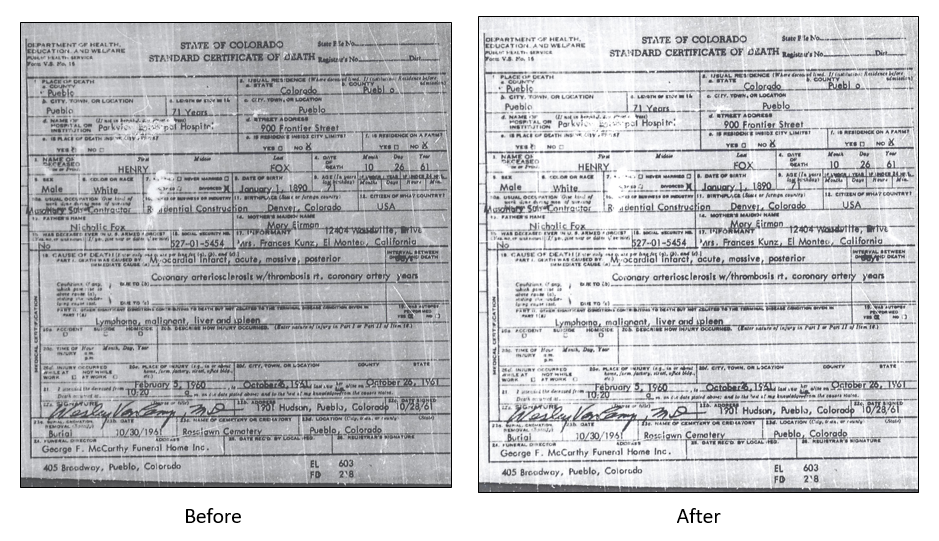
With so many photo editing apps available, it is hard to know what is going to work best for your needs. We hope that our experiences might help you to decide! We would love to see some of your before and after photos of a remarkable restoration. Will you share with us on our Facebook page? We’d love to hear from you!
More Gems on Photo Restoration and Preserving
“I Lost My Photos on My Phone!!” Here’s What You Need to Do
Tips for Digitizing Old Home Movies and Photographs
How to Use Google Image Search to Identify Old Photos on Smartphones and Tablets – Free Video


 Don’t you just love it!


