The Gift of Family History Video
Are you having a hard time coming up with the perfect gift for someone special on your list? The gift of video gives all year round, and doesn’t require you to buy the correct size. Make your video about family history, or the memories of the recipient, and get ready for hugs and smiles of appreciation for your thoughtfulness.
Do you remember the first Christmas that you realized it was better to give than to receive? It’s an amazing feeling when your heart swells at the thought of snagging the perfect present for the people you love the most. But if you’re like me, there are always one or two relatives who present daunting challenges. Perhaps it’s the elder members of your tribe who seem to want for nothing; or a Aunt who quietly returns everything.

My challenge this year is my Dad. He seems to want for nothing, and having an Amazon Wish List isn’t even on his radar. Last year Dad passed his high school scrapbook on to me. It’s brimming with some of his fondest memories: his Boy Scout membership card, newspaper clippings of his football prowess, and the cardboard glasses he wore to his very first 3D movie. I’m pretty sure his heart was swelling when he handed this treasure chest of beloved memories to his daughter, the family historian.
And that’s when I was struck with an inspiration: give it back to him in the form of a video.
Video: Gift Perfection
Here’s why video makes a perfect gift:
- It doesn’t take up precious space on the shelf
- It can be enjoyed from any computing or mobile device again and again
- It can be shared easily with others
If you have been in search of the perfect holiday gift, follow along with me, and give the gift of video.
Creating a Video Gift
If you’re short on time, consider making a video of an old family scrapbook. All you will need is a smartphone and 30-60 minutes. Pull a scrapbook off the shelf, and dust it off because it’s about to get a new life!
Step 1 – Photograph the album
You could use a flatbed scanner to scan each page and the individual items you want to highlight. But you can save a ton of time by putting your smartphone or tablet to use. For me, this was the ideal solution also because so many of the items in the scrapbook had become loose, and I wanted to be able to show the pages as they were originally laid out. By setting the book on a table I could just snap photos rather than turning it upside down on the scanner glass. And don’t worry about snapping the perfect pics because we’ll get them all snazzy in step 3.
Save the images to a free cloud service like Dropbox so that you can easily retrieve them on your home computer.
Step 2 – Head to Animoto.com
(Full disclosure: This post contains affiliate links and I will be compensated if you make a purchase after clicking on my links. I appreciate you using these links because that compensation helps make the Genealogy Gems blog possible. Thank you!)
Although Animoto does have an mobile app, I like using the web version on my computer which provides the advantage of a bigger screen. Click here to go to Animoto, and sign in to your account. Then, just click the Create button to start a new video project.
Choose a Video Style, which will include a music soundtrack. If the music isn’t quite what you had in mind, click Change Song and pick from a robust list of tunes. Animoto’s secret sauce optimizes and paces your slides to jive with the music. If the music is faster, the slides are faster, and if it’s slower, yep, the slides are slower. In the end though, you always have the final choice in the pacing of your slides and your entire video. Need a little extra time? Then just add a second music sound track.
Step 3 – Add Your Photos
Now it’s time to add your photos. Click Add Image, select Dropbox, and navigate your way to the folder where you saved your photos. Click the first one in the list, and then holding down the Shift key on your keyboard, click the last photo in the list, and click the Choose button. There you go: you’ve added all your images in one fell swoop! Imagine the time you saved over adding one item at a time.
I snapped all the full page photos first, and then I went back and snapped some of particular items I wanted to highlight with closeup images. That meant that when I added my photos they weren’t in exactly the right order. Thankfully, all I had to do was drag and drop them in the desired order. Easy peasy!


Edit your photos within Animoto.
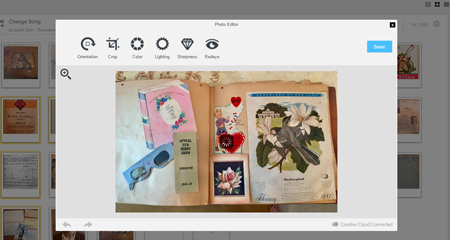
Another reason I adore using Animoto is that I can do all my editing right there in the dashboard. With a few clicks you can apply a quick crop, slight rotation, and image enhancement with a great result. (Image right)
You even have the option to add video clips with Animoto. So if I had a fancy to add my original video of turning the pages of the scrapbook (above) I would just drag and drop it onto the timeline. And it is that ability to drag images and video from your hard drive straight into Animoto that makes it so quick and easy to use.
Step 4 – Add Title Slides
Although my Dad’s scrapbook really speaks for itself, I decided to add a few title cards to help guide the viewer like:
- The Picture Show
- School Work
- Sports
- Graduation
And title cards are great for “The End” and any other message or credits you want to add.
If you want to add text within your project, click to select the item that your text will follow, then click Add Text from the menu, and it will appear immediately after the previous item. To add text at the end, just click the plus sign in the last box and again type your text. And remember, nothing is set in stone. If you change your mind you can drag the text to a new location, edit it, or delete it all together.
Step 5 – Preview & Publish Your Video
At any time during the process you can click the Preview Video button to see your work. If you like what you see, then click the Produce button in the Preview window to create the final product. And speaking of final products, here’s mine:
Learn More
Are you ready to start creating memorable videos for the loved ones on your list? Click here to learn even more and give Animoto a whirl. (And just think: no wrapping required. You’re welcome!)


