by Lisa Cooke | Oct 3, 2016 | 01 What's New, Google
You can use Google Slides for genealogy to create one-of-a-kind presentations, a virtual scrapbook, or a virtual library list…and it’s free! Here’s how to take advantage of yet another awesome Google tool.
I was recently asked if there was a software program or app, something free perhaps, to share a slideshow or create a visual presentation. There is! It’s called Google Slides. Here’s how Lisa Louise Cooke, author of The Genealogist’s Google Toolbox, explains it:
Google Slides is an online presentation application, much like Microsoft’s Powerpoint. It’s part of Google’s free office suite of tools. As a genealogist, it provides the opportunity to create and visually share your family history.
It’s a Cloud-based service and that means you can access your presentations wherever you are and on any computing device. You will sign-in to Google Slides with your personal Google account. That means you will be able to keep everything private unless you decide to share it. Although it’s Cloud-based, you can use it offline too. Any new presentations you create or changes you make will be automatically updated when you get back online. You can show your presentation at the next family reunion or genealogy society meeting even if there’s no Internet access.
There’s a lot of potential for using this powerful tool for genealogy!
With that great introduction, I’d like to share a few unique examples of how a genealogist or a genealogy society could use Google Slides.
Google Slides for the Genealogist
Google Slides is an easy way to create a fun slide show of your ancestor photos. This can be shared at family gatherings or reunions right from your laptop. You can also share the presentation with a click-able link.
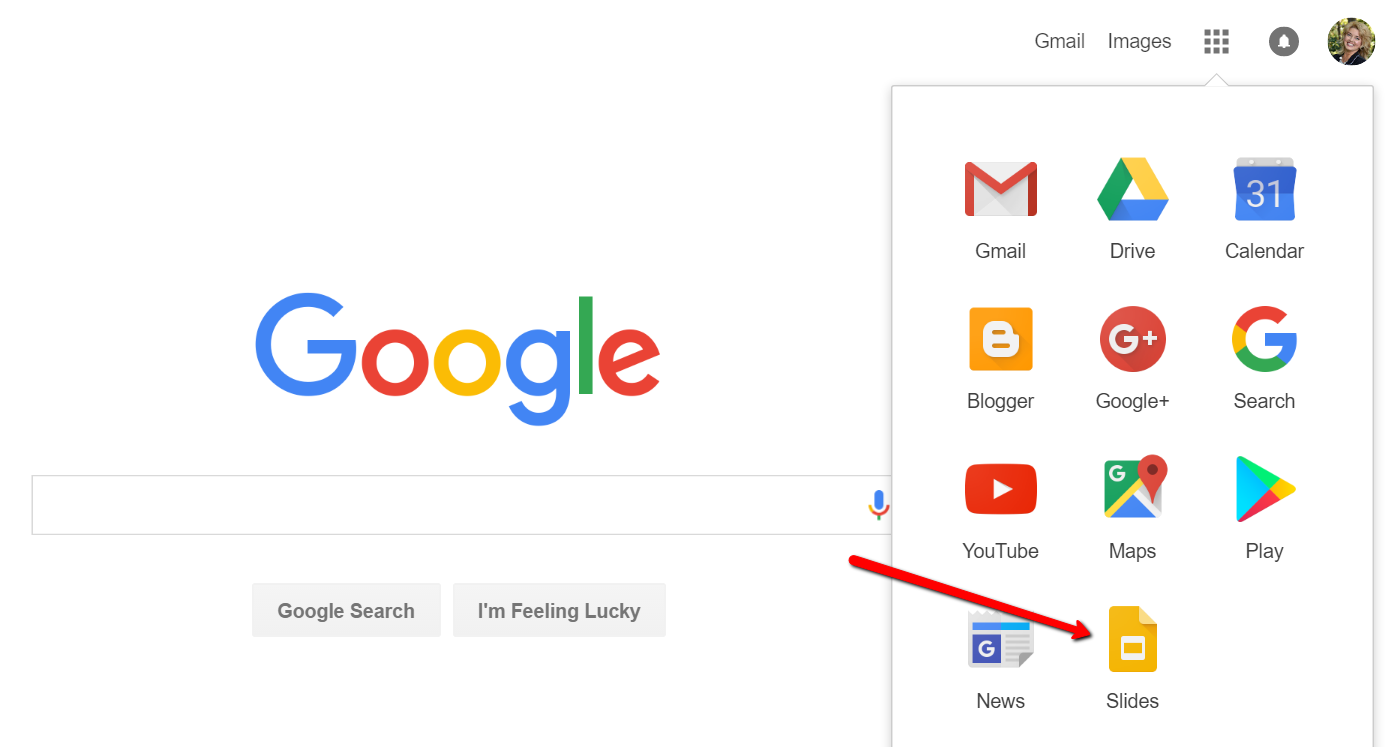
To begin, find Google Slides by going to Google.com and sign-in to your free Google account (or sign up if you don’t have one.) Click on the grid to the left of your sign-in avatar. This will bring down several options. If you don’t see Google Slides as an option, click More at the bottom.
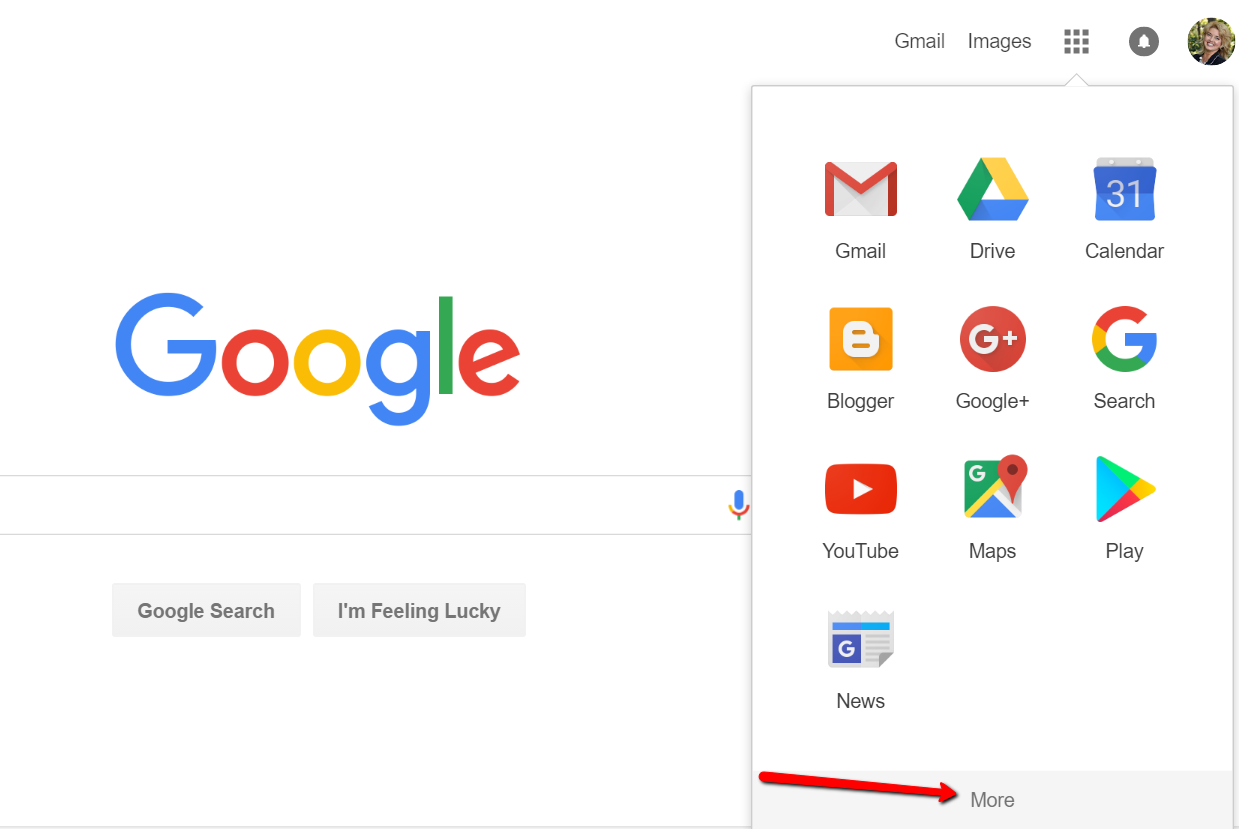
If you still don’t see Google Slides as an option, click on Even More from Google. This will take you to another screen of all sorts of Google goodies! Scroll down until you find Google Slides and click on it.
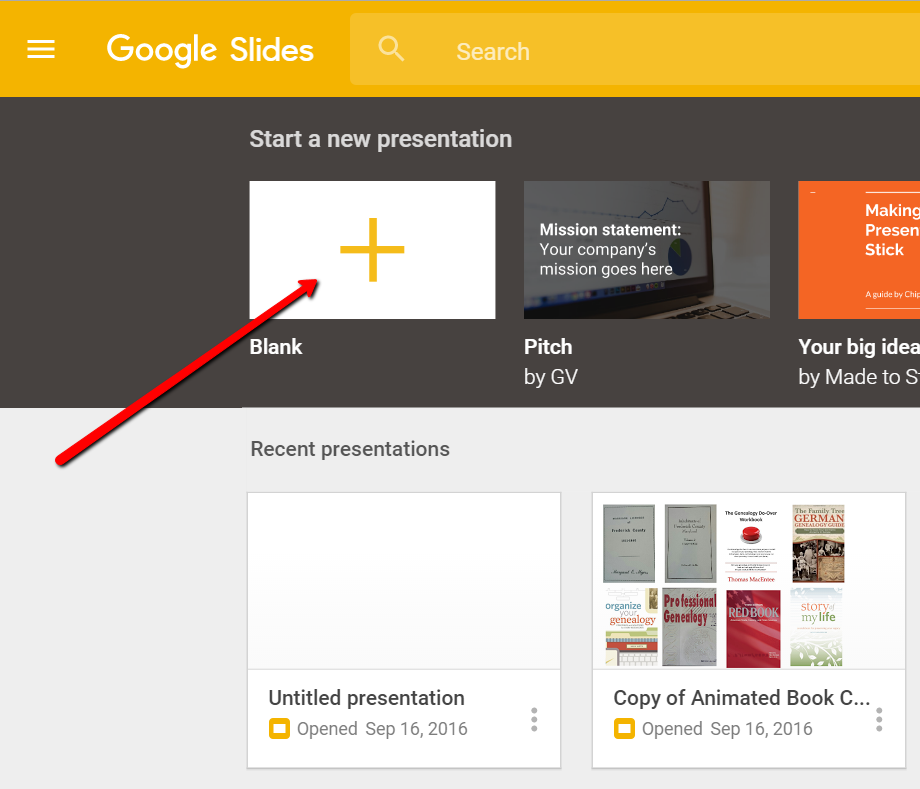
Once you have opened Google Slides, click the plus sign to begin.
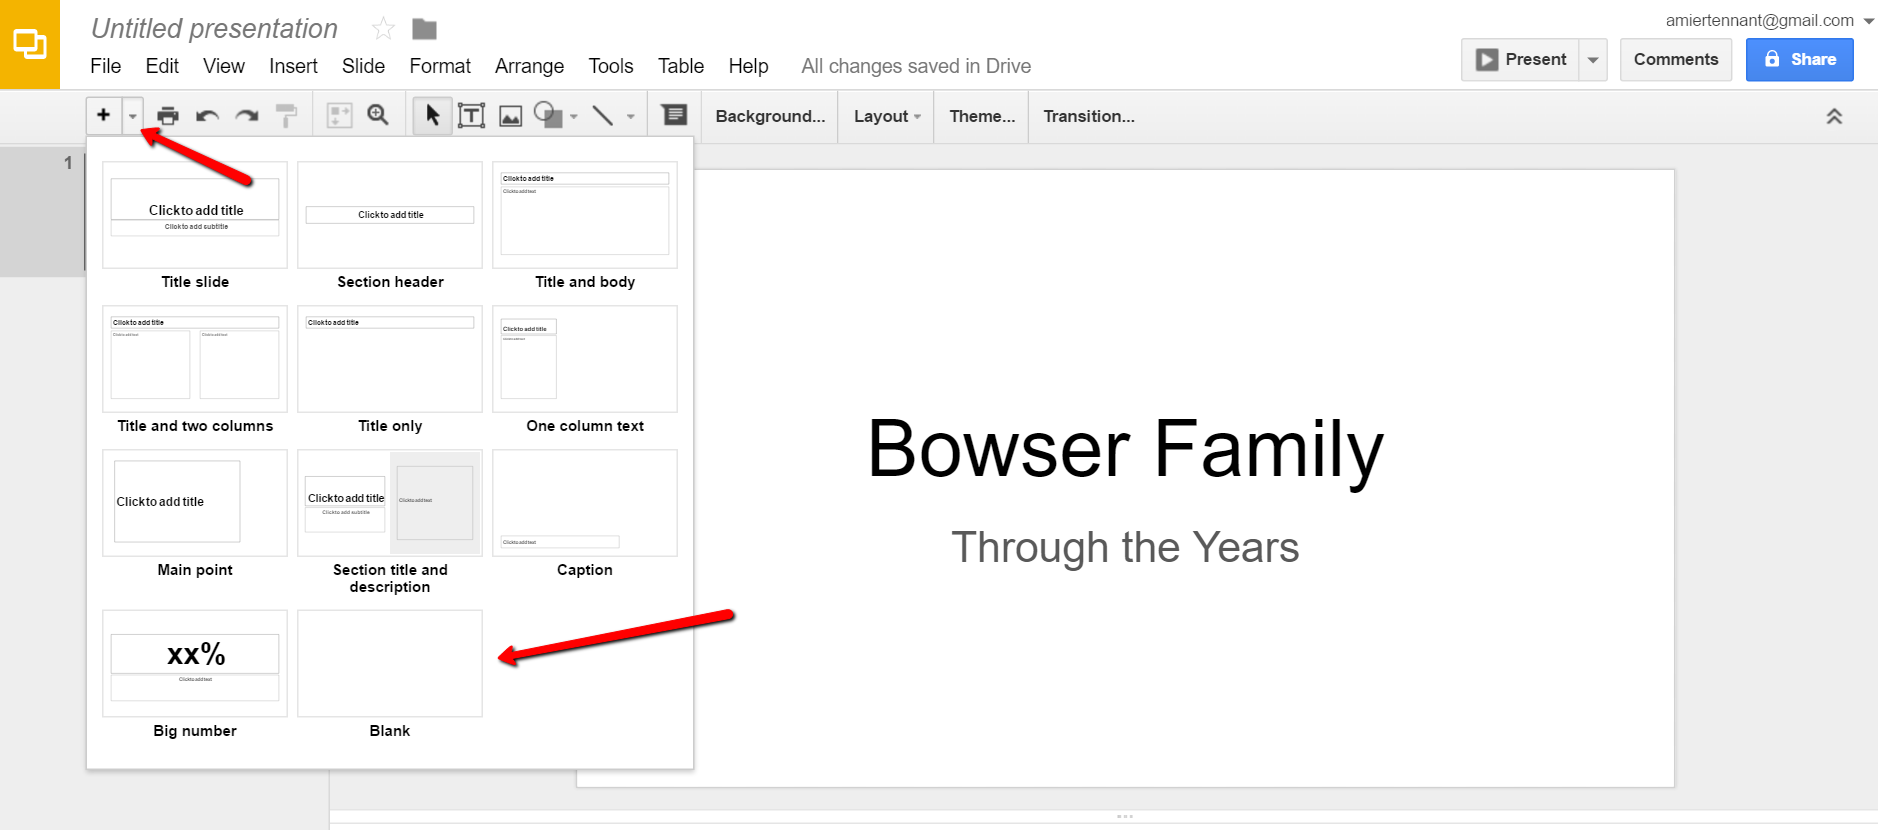
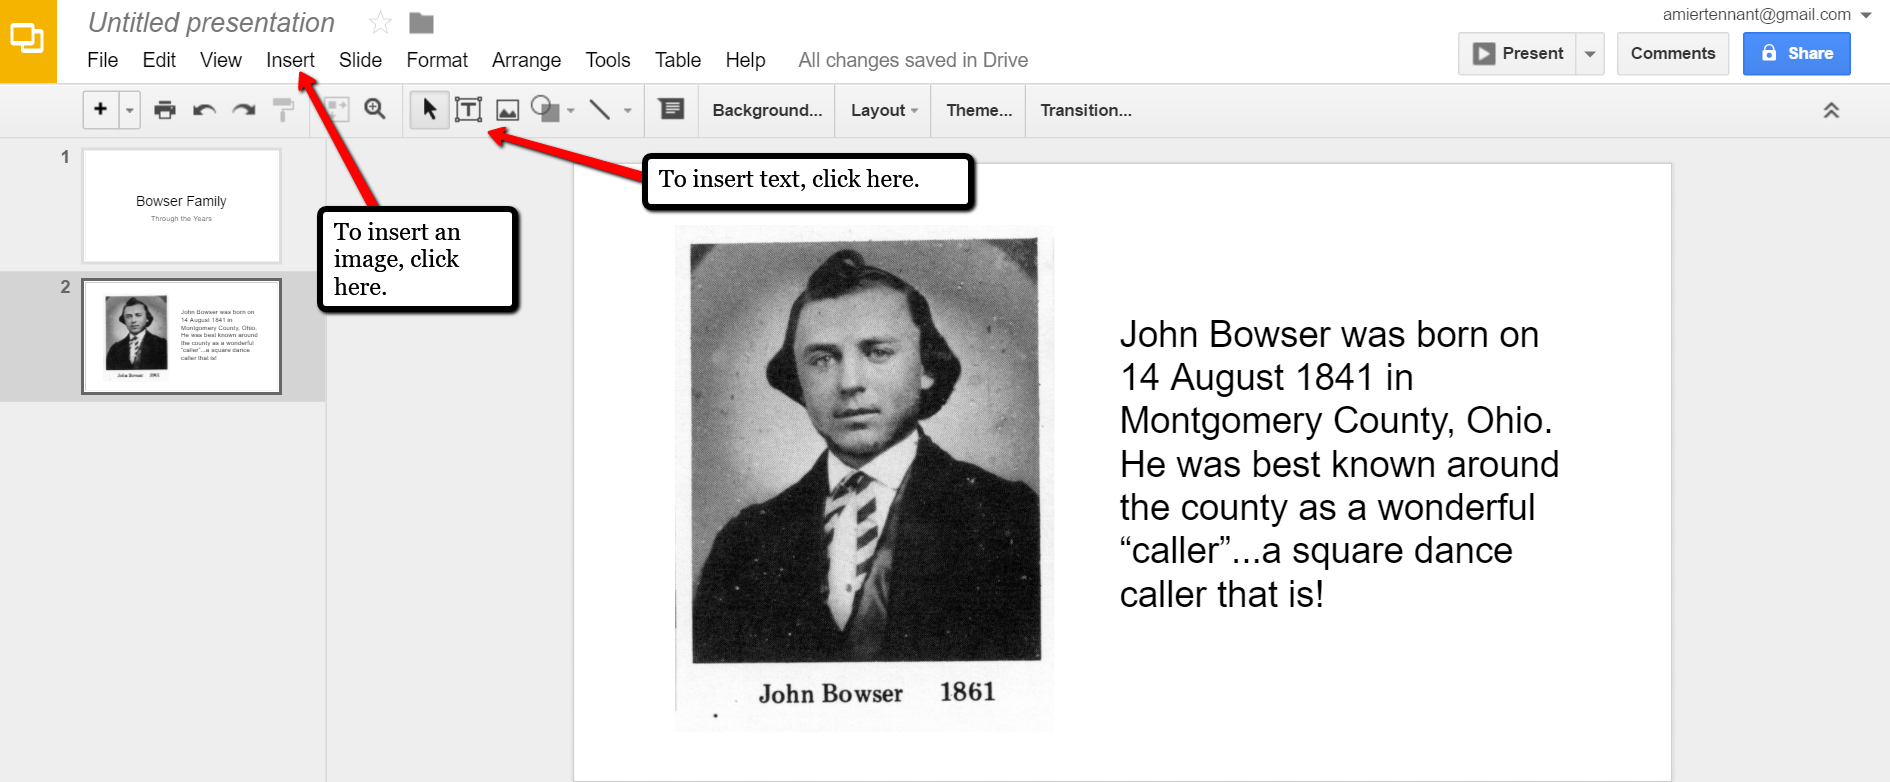
I added a title and then clicked the tiny arrow to the right of the plus sign to add a new blank slide.
At the new slide and each additional slide, you can add a picture by first clicking Insert from the labels listed across the top, then choose Image. A pop-up window will appear and allow you to Choose an Image to Upload. You will then find the image you have saved on your computer and click Open.
Keep adding your slides until you have all of them created.
Sharing Your Google Slides Presentation
Like many of us, I like to share my ancestor photos with my family and friends. While at a family gathering of a small group, I just set my laptop up on the coffee table and we huddle around. Bring up your Google Slides presentation on your laptop or mobile device and click on Present at the top right of the screen. The computer does the rest and presents a slideshow for your viewers.
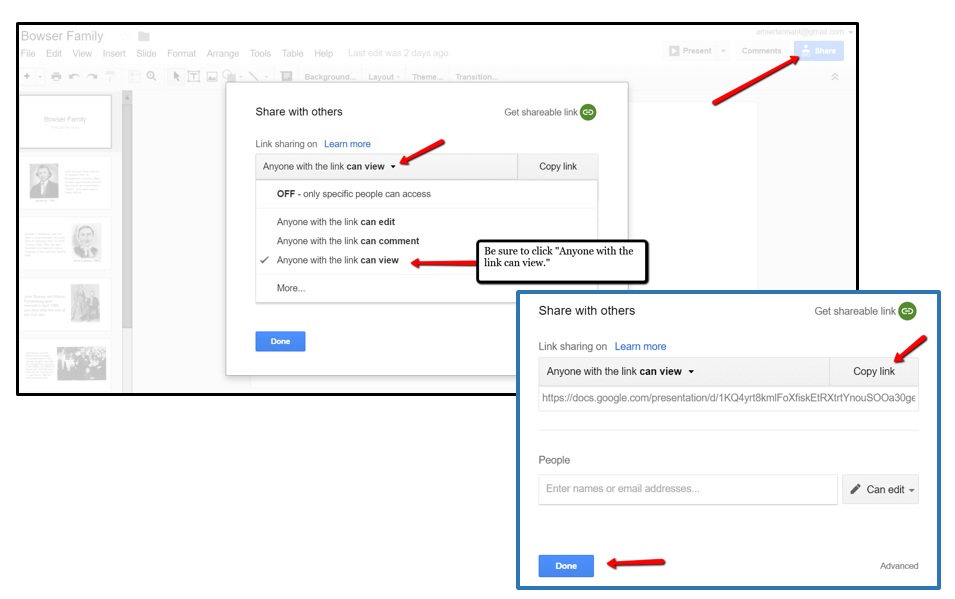
You might also wish to share your slides with family and friends far away. You can do this by sharing a link. To create a shareable link, click Share at the top right corner.
A pop-up window will appear. Click the little drop-down menu next to the words “can view.” This option allows you to choose whether you wish people to be able to edit, comment, or view only. I typically choose the “view only” option. Then, a shareable link is created for you. Click Copy link and paste that into an email directly to a family member, to your family history blog, in a Tweet, or in a Facebook post. Wa-la! You have shared your Google Slides presentation.
Create a Virtual Book Cover List with Google Slides
Another stellar way to use Google Slides for genealogy is to create a convenient virtual library list. A recent article found online gave me the idea of creating a library list using images of the covers of books.
For example, if you enjoy attending genealogy conferences and buying books for your society, you may get stuck wondering, “Do we already have that in our collection?” By creating a virtual book cover list, you won’t have to wonder anymore!
You will first need to begin this project by taking a picture of the covers of each of your books and saving the images to your computer or laptop. I took pictures, cropped them, and sharpened them up a bit with my smartphone. Then, I saved them to a file folder on my computer named Book Covers. [Tip: It would be an even better idea to save the Book Covers folder to your Google Drive!]
For something quick and easy, use the virtual book cover template here:
Virtual Book Cover List Template. If you choose to use this link, when it opens, click
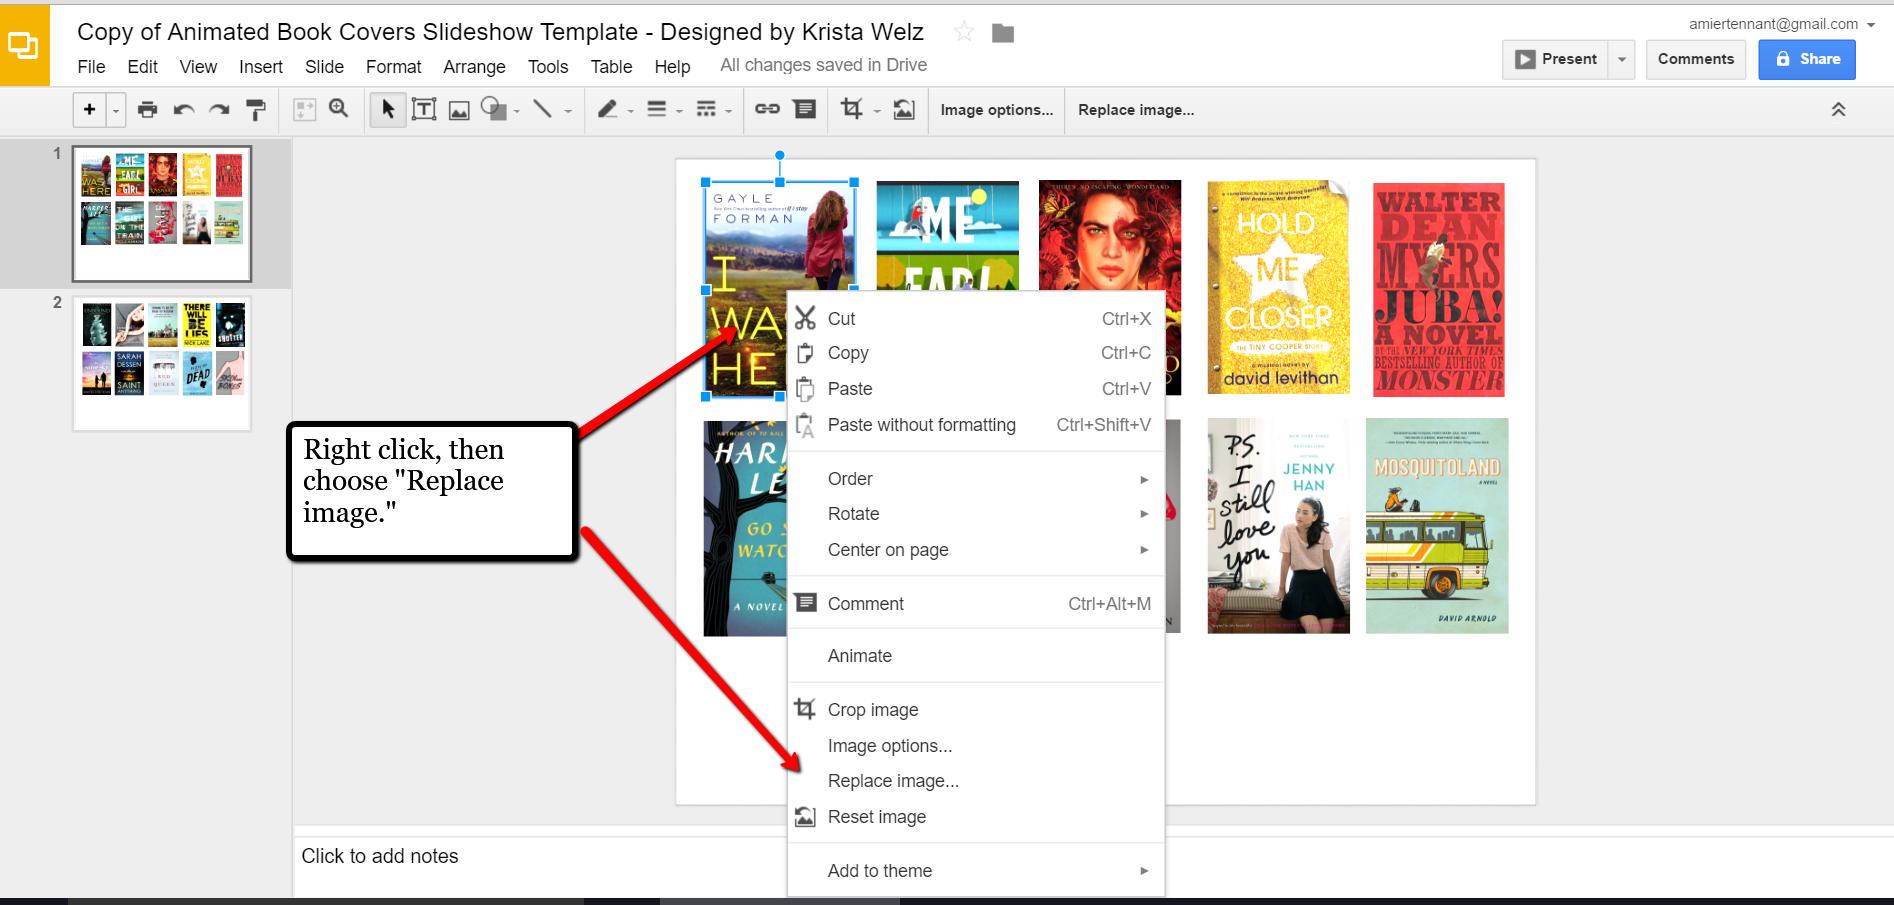
Make a copy and Google Slides will open. Right click on any of the book cover images you see, a pop-up window appears. Choose
Replace image and then find an image of one of your own book covers.
Once you have replaced each of the book covers with ones of your own, you can rearrange them with the click-and-drag method. You might want to put them in alphabetical order or perhaps categorize them by subject or place.
When you have finished, don’t forget to title it. There is no need to save it because Google Slides automatically saves for you. Google Slides is accessible from any of your devices and can even be viewed on-the-go from your mobile device. You’ll love this feature when you are trying to decide what books to add to your genealogy library.
How Can You Use Google Slides for Genealogy?
We are sure there are dozens of ways to use Google Slides for genealogy. Give Google Slides a try and if you think of another use for this wonderful tool, let us know about it in the comments below! Thanks for reading, friends.
More Gems on Google for Genealogy
by Lisa Cooke | Aug 27, 2016 | 01 What's New, Apps, Listeners & Readers
A virtual funeral, is that a real thing? Absolutely. Broadcasting a live service online is an innovative way for families to come together when time and distance keep them apart.
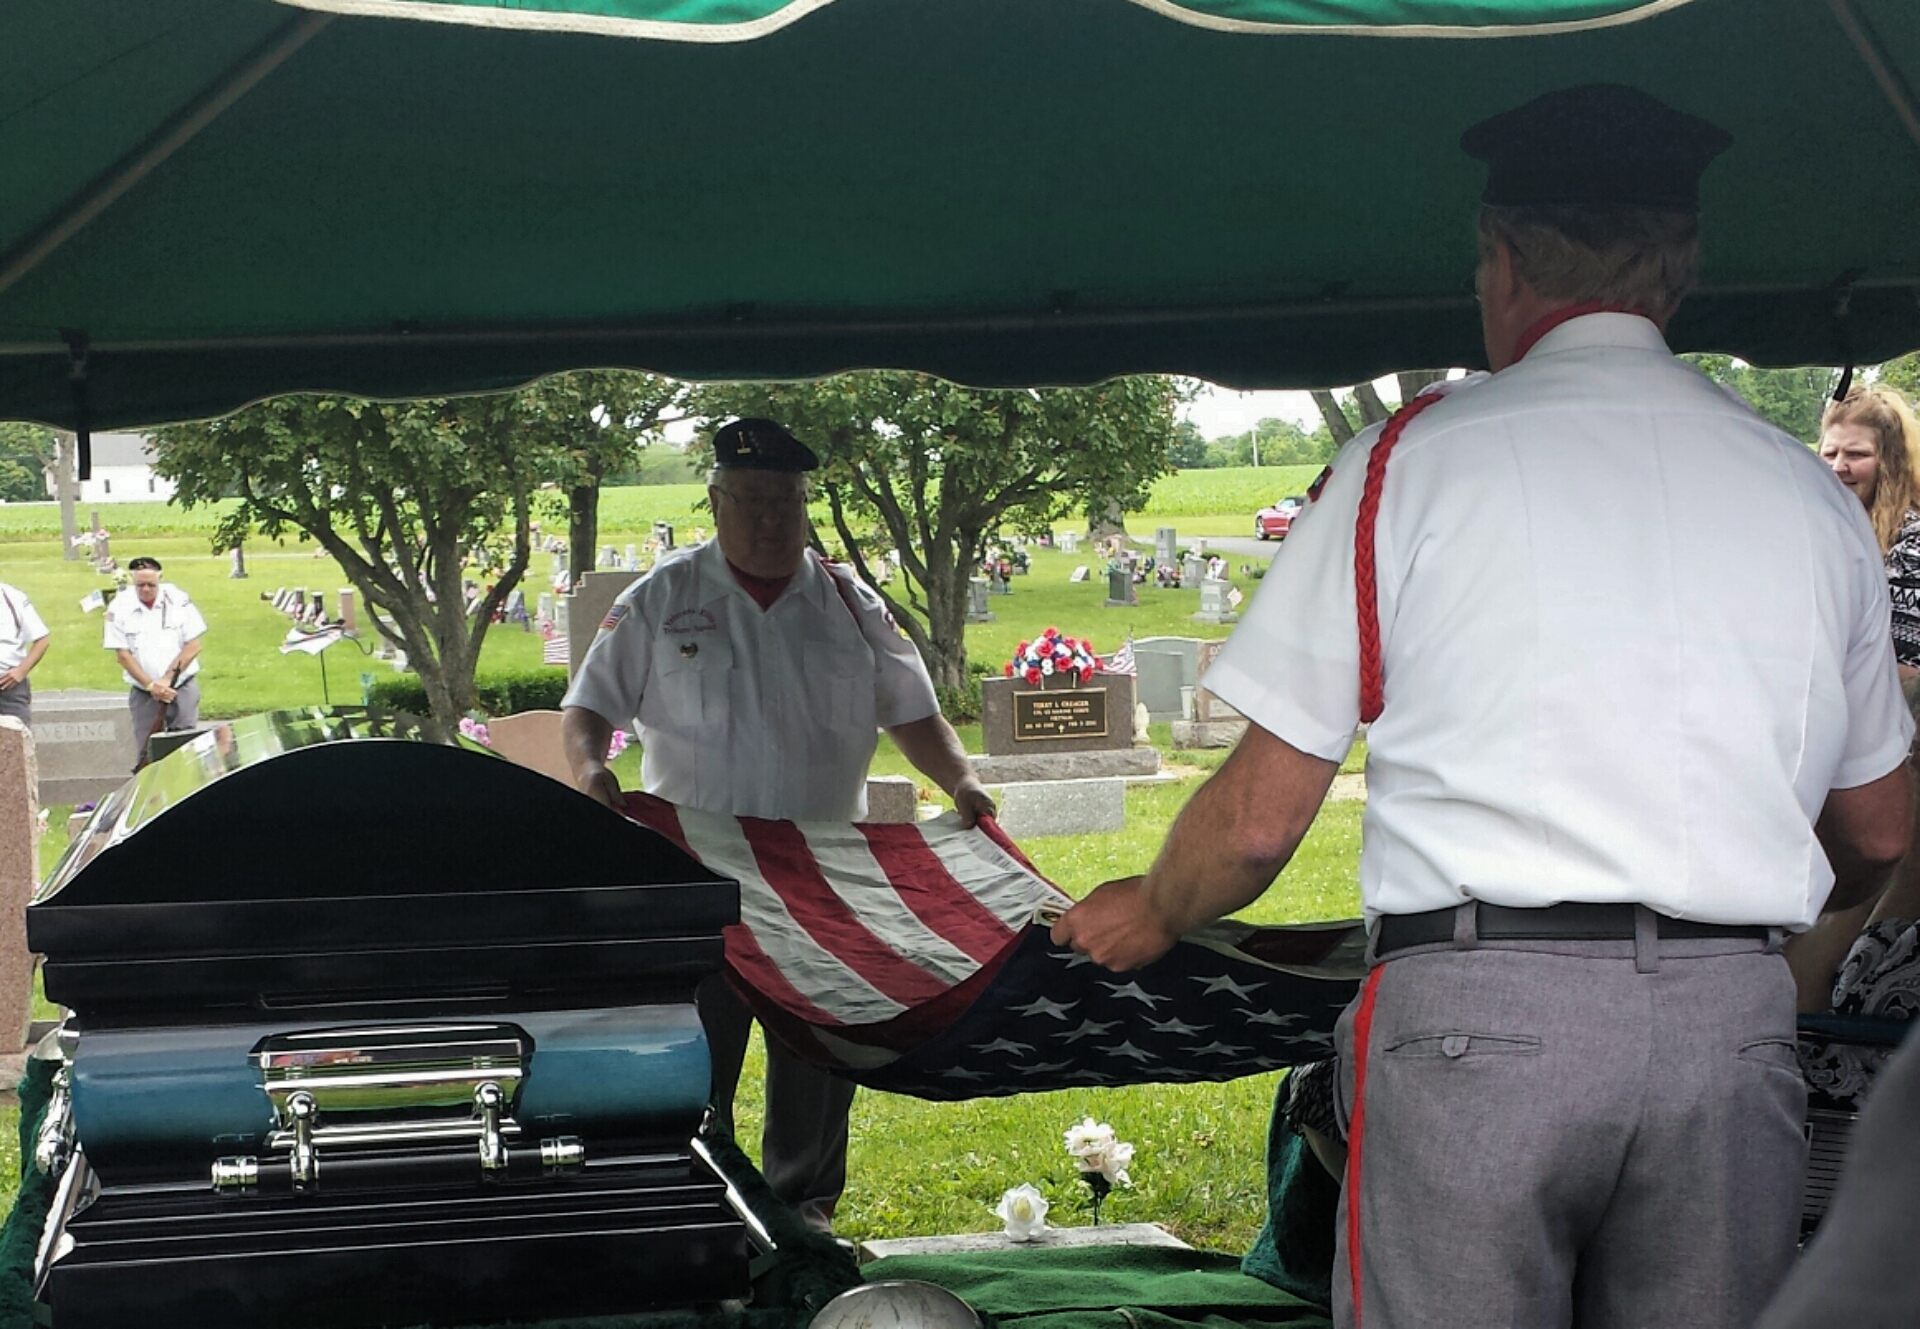
I recently received an email marked URGENT. A long time Genealogy Gems Podcast listener and Premium Member needed help ensuring that her close relatives on the other side of the world could ‘virtually attend’ her brother’s burial service. She wrote:
“This Wednesday my brother is being buried and a service is being held at the crematorium. I have a brother and family who are in Chicago. With your wide experience, what do you consider the best app to use on my iPad or iPhone so that my family in Chicago can see and hear it.”
I was indeed sad to hear of her loss, but happy that she felt she could turn to me. I have two suggestions that might make this virtual funeral possible.
Facetime for the Virtual Funeral
One of the easiest ways to accomplish a virtual funeral is if both parties have Apple mobile devices, then you could use Facetime.
Facetime is a video chat app that comes installed on your Apple devices. You will use Facetime to ‘call’ the family privately at a designated time using either a phone number or email address, depending on the type of device you are calling. The app allows you to share the burial or funeral service with your family members anywhere in the world.
The really nice thing about Facetime is that you can see them and they can see you making this as interactive as it can be.
Android Users: Click here to read 5 Best Alternatives to Facetime for Android on Geek.com.
Periscope App for the Virtual Funeral
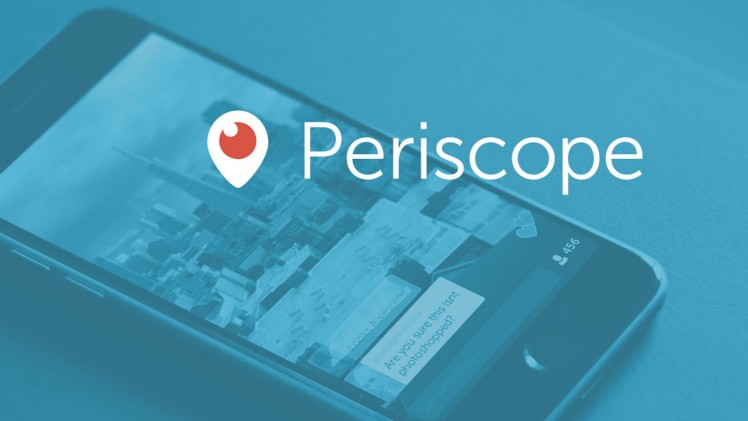 Available on both Android and Apple, the free Periscope is my go-to app for live broadcasting here at Genealogy Gems. (At the end of this article, you can watch a video of one of my classes that was live-streamed using Periscope.) Using the Periscope app would be a great solution for privately broadcasting the virtual funeral.
Start by downloading the free app from the App Store (Apple) or Google Play (Android.) If you decide to use it on your iPad rather than your iPhone, select the “iPhone” filter from the menu. Even though the app was built for iPhone, it will work on your iPad. (Periscope requires iOS 8.1 or later and is also compatible with the iPod touch.)
Sign-in with a free Twitter account or your phone number. Then, add each other as friends. Each person needs to install the app on their device.
Start a “Broadcast,” but before you click the “Start Broadcast” button that pops up, tap the lock icon. From there, you can select your “Friends” (your brother and his family in Chicago) and start a “Private Broadcast.” The Periscope app will also record the broadcast to your phone so you’ll have a video of it. Your video can be saved for a future viewing or as part of your family history.
Sharing Special Moments
Sharing special moments using new apps and technology is one of the advantages of living in today’s modern world. Even when distance keeps you apart, you and your family can lean on each other during hard times or cheer each other on in happy times. I would love to hear from you. How have you shared your special moments with family far away? Leave a comment below.
Genealogy Gems: your home for learning about the best genealogy apps!
My book Mobile Genealogy: How to Use Your Tablet and Smartphone for Family History Research will teach you about top apps (most of them free!) for all those important geneal ogy tasks we do on-the-go: note-taking, file storage and management, photos, reading, collaborating and communicating, genealogy website apps and more. You’ll find recommendations for both Apple and Android device users. Click here for more information on the book, and then head to this page to watch my free video class Mobile Genealogy Tips and Tricks which we live streamed from a recent conference using Periscope!
 The Genealogist’s Google Toolbox