by Lisa Cooke | Dec 5, 2016 | 01 What's New, Research Skills, Travel
We love the ease with which we can search online, but a genealogy research trip can offer exceptional and unique rewards. If you have been apprehensive about visiting a courthouse or archive, follow our 4 step plan for a successful genealogy research trip that could lead to your own amazing discovery!
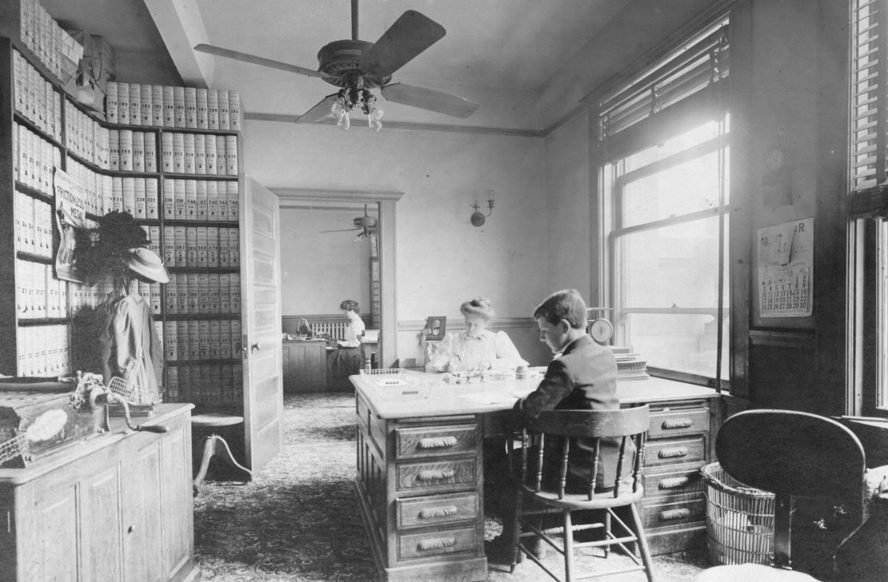
By J. D. Cress [Public domain], via Wikimedia Commons
In my genealogy world, if an answer can’t be found on one of my favorite genealogy website repositories (like FamilySearch, Ancestry, or Findmypast) then a quick Google search usually does the trick.
However, we new genealogists of the Internet era may be banking on the fact that “everything” we need is online. This is obviously not true. In fact, many local libraries and archives are under-staffed and under-funded making digitizing of their holdings difficult. This is why making a genealogy research trip is a really good idea.
The Unprepared Genealogy Research Trip
Several years ago, I made my first research trip. I was woefully unprepared. On a whim, I drove three hours on a weekday to “go to the courthouse.” I arrived at lunch time…and it was closed for an hour. Sigh. However, a nice receptionist sugg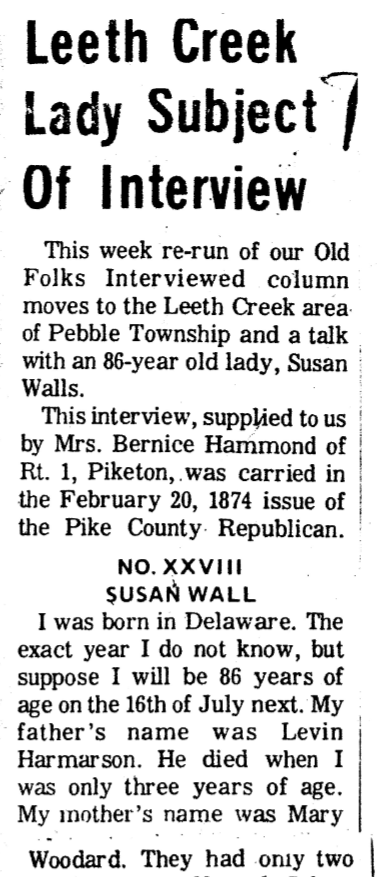 ested I go to the local public library just down the street.
When I arrived at the tiny corner building, I asked at the circulation desk for the history department. She seemed a little taken back, but said, “We have a little room in the basement with some local history and genealogy things.” Note to self: not all libraries are large enough for a “history department.”
In the basement room, no one was on duty, but a nicely printed instruction sheet of what was available and how to use their files laid on the table. “I guess I just dig in,” I thought, and off I went.
Though this was my first genealogy research trip, it proved to be very fruitful. In a scrapbook simply titled “Walls Family,” I found a Xerox
copy of an article from an 1874 newspaper. In this article, my fourth great-grandmother (Susannah Harmarson Walls) had been interviewed because she was the oldest living woman in the township. Her interview began, “I was born in Delaware. The exact year, I do not know, but I suppose I will be 86 years of age on the 16th of July next. My father’s name was Levin Harmarson. He died when I was only three years of age. My mother’s name was Mary Woodard.”
The interview included the story of her mother re-marrying, the family leaving Delaware for Wheeling, Virginia, and she marrying her step-brother there. Then, they traveled on into Scioto County, Ohio. She named each of her eleven children and their spouses.
The information in this one interview was particularly helpful. Before this, we had no idea when or where Susannah and Levi married, and finding the spouses of their children had proved difficult!
Though this was an amazing find, I wonder what other records, items, or photographs I might have dug up had I prepared ahead of time. Perhaps, I would have had time to dig more into their microfilm holdings, archived pictures, atlases, or even had time to go to the local cemetery.
The Prepared Genealogy Research Trip
Fast forward several years and I am making much more prepared genealogy research trips. Get the most from your next genealogy research trip by following these 4 important steps:
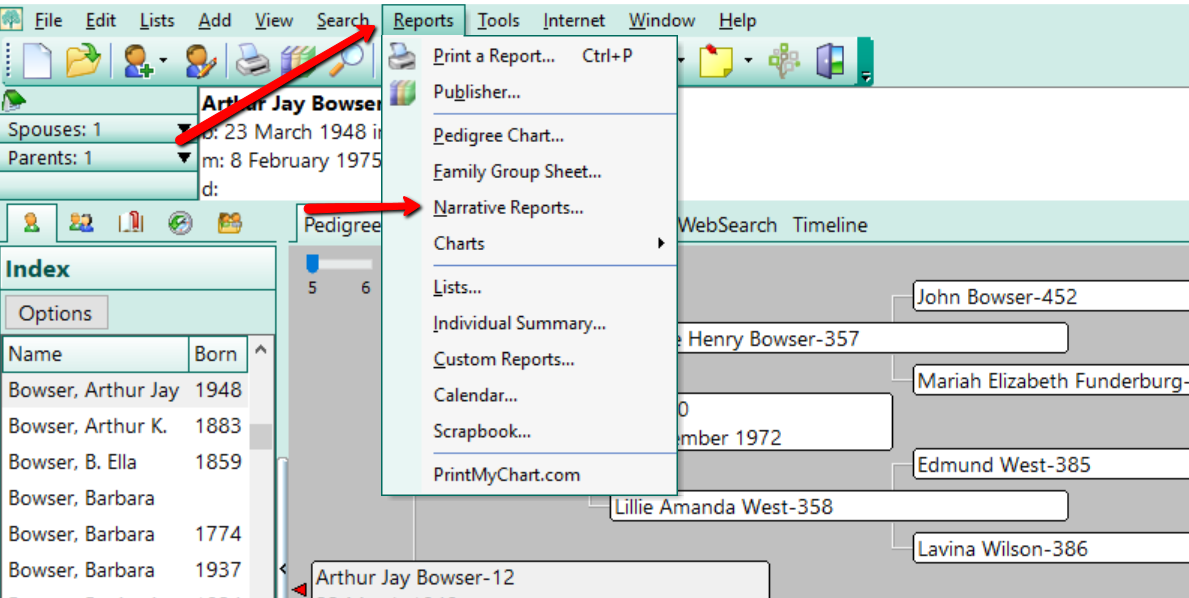
1. Run a Narrative Report. Start creating your genealogy research trip plan by printing out a narrative report of your targeted family line. This can be done with the reports feature found in genealogy database programs like RootsMagic.
2. Look for holes in your research. Carefully read through the report looking for holes in your research or where you may be missing a source. In this case, a “hole in your research,” may be the missing marriage date of a couple, or the missing birth date of a child. Circle these “holes” and make a list of what the needed piece of information is to correct it and where you can find it.
Example: Clark County, Ohio. Need a death date for Edmund West. County didn’t keep death records that early. Likely died between 1830-1840. Check probate record books, estate files, tax records, cemetery records, and tombstones at Wilson Cemetery.
Maybe you have a birth date, but no source. A source is the proof of a particular fact. For example, a good source for a birth date is a birth register or even a marriage record. If you are lacking sources for your genealogy facts or are not sure how to begin sourcing your genealogy, learn more about that here.
3. Decide what repositories you will need to visit. After creating your list, determine where these items are held by asking yourself important questions, such as: Will I need to visit the courthouse, a library, an archive, cemetery, or all the above? Which location will produce the most results? Should I visit the archives first, or the courthouse?
4. Contact each repository ahead of time. Finding out the days and times when each of these places is open before you go is a must! Try to pick a day when all, or most, of the places are open so that you can get a lot done. If this isn’t possible, consider making an extended stay overnight to accomplish your goals.
Keep in mind that not all websites are up-to-date. Just because the library says it is open from 10 to 5 every day but Sunday on the webpage doesn’t necessarily mean that is still the case. Always call each establishment to verify days and hours of operation.
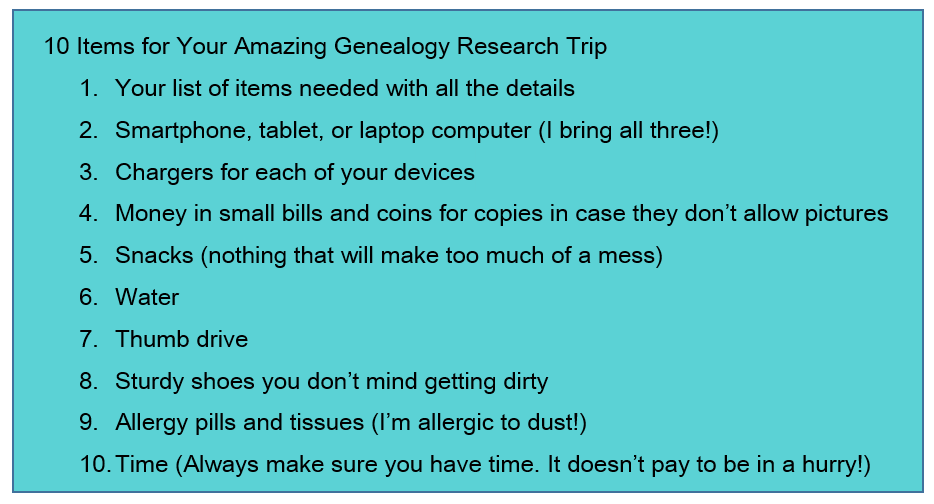
Remember, there are newspapers, maps, documents, and pictures just waiting to be uncovered. By thinking about what you want to achieve while on your trip and what information you need to find and where, your genealogy research trip can be a successful one. Happy hunting!
More on Genealogy Research Trips
Still feeling unmotivated to get on the road, read or listen to these features for inspiring tips to make a courthouse records research trip in your near future!
Courthouse Records Research Trip
Premium Podcast Episode 126 – Road Trips for Genealogy
Premium Video – Using Evernote to Create a Genealogy Research Plan
by Lisa Cooke | Sep 28, 2016 | 01 What's New, Beginner, Organization, Premium Video
Getting genealogy organized is just one of the topics we cover here at Genealogy Gems, and Premium Members have exclusive access to podcast and video content to help you accomplish that goal.
We’ve put together a step-by-step plan for getting the most out of Premium Membership, and going from unorganized to organized in nothing flat!

A new Gem’s reader recently sent us the following email:
Dear Lisa,
I have recently joined Genealogy Gems as a Premium member and wanted to ask if there is a good place to get started.
I have a ton of family information collected, but as yet have not figured out a plan of attack.
I was wondering if you could guide me in which podcasts, premium podcasts, and videos would be good ones to start with. I need to put this information into some semblance of order so that I can move constructively on it, as well as to be able to share the family history with others and have it make sense. Thanks, Gerri.
Getting Genealogy Organized with Premium Content
We are so glad to have you as a Genealogy Gems Premium Member. Welcome!

The best place to start is by digging into these blog posts that I highly recommend:
When you are ready to move onto the Premium Podcast episodes, I suggest you focus first on:
- Hard Drive Organization Part 1 and Part 2
- Use Evernote to Create a Research Plan
- Podcast episode 114: Paper Organization
- Family History: Genealogy Made Easy Podcast episodes 31 & 32: Organizing Your Genealogy Files.
Getting genealogy organized is one of the most overwhelming tasks new and seasoned genealogists deal with. Whether you’re new to Premium Membership or a long time member, make sure you have a solid basic structure for your genealogy organization, as it is the backbone of everything that follows. That basic structure for getting genealogy organized might look like this:
A Quick Plan for Getting Genealogy Organized
- Assess what you have.
- Pick a genealogy database software program. We recommend RootsMagic.
- Set-up a few 3-ring binders with acid free sheet protectors so you have a place to put documents and other important things.
- Set-up a basic folder and file structure for your hard drive based on the Premium videos Hard Drive Organization.
- Have a back-up plan for your precious family history files. We recommend BackBlaze as a way to automatically back-up your computer files.
- Sign-up for our free newsletter (if you haven’t already) to stay up-to-date on all the latest records and techniques.
- Don’t wait to be fully organized before you begin. Stay motivated by scheduling “fun” research time, as well as organization time.
- Make appointments with yourself to stay on track, and listen to the Genealogy Gems Premium Podcast while you organize.
- Regularly tap into all of the Genealogy Gems resources like what’s new in books and guides.
Like us on our Facebook page to see more genealogy ideas
Become a Genealogy Gems Premium Member
If you are not a Genealogy Gems Premium Member, take a look at what you are missing! Premium Members are able to listen to our Premium podcasts packed with even more tips and techniques for all things genealogy. You also have access to my most popular training videos.
BONUS e-book:
 For a limited time, new members will receive
this exclusive digital PDF e-book,
a collection of my most popular
articles from Family Tree Magazine!
(the e-book will be emailed to you
within 24 hours of purchase)
by Lisa Cooke | Dec 19, 2015 | 01 What's New, Ancestry, Beginner, Technology, Trees
As Family Tree Maker software nears the end of its product lifecycle, many may wonder how far past the “expiration date” they should use it. Here’s my take.
Ancestry.com recently announced that they will stop supporting Family Tree Maker, the popular desktop software that syncs with Ancestry.com trees online. Sales will end on December 31, 2015. Product support and major fixes for current users will end a year later. (Click here for full details.)
This means the clock is ticking for Family Tree Maker users to decide where to put their family trees. Or is it? Can you continue to use software after it’s officially “expired?” For how long? What risks do you take if you do?
Consider the “Best If Used By” dates we see on the food products we buy. There is currently still some life in this product, and will be for a year after they stop selling it. According to Ancestry, during 2016 “all features of the software, including TreeSync™, will continue to work, and Member Services will be available to assist with user questions. We will also address major software bugs that may occur, as well as compatibility updates.” So technically, the “Best if Used By” date is the end of 2016. But then what?
What Happens with Family Tree Maker after 2016?
The software will still function on your computer. But it won’t sync to your Ancestry online tree anymore, and there will be no upgrades to make it compatible with future computer hardware or software. So eventually, you’ll need to transfer everything out of Family Tree Maker software anyway to be able to keep up with evolving technology. That’s what happened to me with my first favorite genealogy software. When it was discontinued, I hung on to it for a long time, and honestly, I had no problem.
Eventually, however, the old software was no longer fully compatible with new operating systems and I had to upgrade. I took a risk in continuing to enter information into an obsolete system–and wouldn’t take it again in retrospect. When it finally did come time to transfer, I was gambling with whether my system had gotten so far behind the times that it would be too difficult or even impossible to transfer everything. (Think how much our data transfer technology has changed in recent years: from floppy disks, CD-ROMs, CDs and DVDs to flash drives and now cloud-based transfers.) And I also ran the risk that there might be license limitations to how many computers my old software could be loaded onto.
Our genealogy software contains thousands of pieces of linked pieces of data: names, dates, relationships, source citation information, digitized photos and documents and more. This is not something we could easily re-create and I for one would not want to have to redo all that research (or even just key it in). Even if GEDCOM files continue as a universal file type for genealogy software, the ability to export every piece of information exactly as you want it in GEDCOMs is not guaranteed. For example, consider that when you download a tree from Ancestry, according to their customer support pages,”Any pictures, charts, books, views, or similar items found in the original file will not be included in the [downloaded] GEDCOM. Vital information, notes, and sources are usually retained after conversion.”
Why continue to load your Family Tree Maker software with data you might not be able to fully retrieve when you want to?
If you’re a Family Tree Maker user, I’m not saying you should panic. You have time to do your homework and carefully consider the best next step for you. You could start using new family history software with a reliable cloud-based back-up service for your computer, so your files are fully protected. You could migrate to another cloud-and-software-sync model over at MyHeritage (their desktop software is free). Click here to read more about those options and see current offers by RootsMagic and MyHeritage.com for Family Tree Maker users.
Bottom line: “Best if Used By” usually indicates that the sooner you finish consuming a product and move on, the healthier and better your experience will be. That is an applicable analogy for Family Tree Maker users. Research your options and move on to another product so your family tree will continue to grow and be healthy!
More Gems for Family Tree Maker Users
Here at Genealogy Gems we care about you and your data. Here are more resources for you:
What Ancestry’s Retirement of Family Tree Maker Software Means for You
Best Genealogy Software: Which You Should Choose and Why
How to Download and Backup Your Ancestry Data
by Lisa Cooke | Sep 5, 2015 | 01 What's New, Ancestry
When you invest your money in a genealogy website, you want to ensure that you’re getting the most value possible. Here we share tips for getting the most out of Ancestry.com.

I noticed recently that Ancestry subscribers’ attitudes run the same gamut as attitudes of big-box retailer shoppers. Some people {heart} them unabashedly: they’ll spend hours strolling the aisles and share every great find on social media. Others dash in and grab just the items they can’t live without.
Whatever your stance toward the site, Ancestry is still the big-box retailer most genealogists need at some point. Take your cue from top big-box store shopping strategies for getting the most out of Ancestry.com:
1. Grab first what you can’t get anywhere else.
Learn what exactly you want from Ancestry versus other sites, the same way you’ve learned whose house brand of spaghetti sauce you like and who carries your favorite protein bars.
A few examples for U.S. researchers:
- Ancestry has the most U.S. census non-population schedules online. (They’ve padded HeritageQuest Online with several of these but they didn’t give them everything.)
- Ancestry’s collection of digitized U.S. city directories (over a BILLION) is second to none.
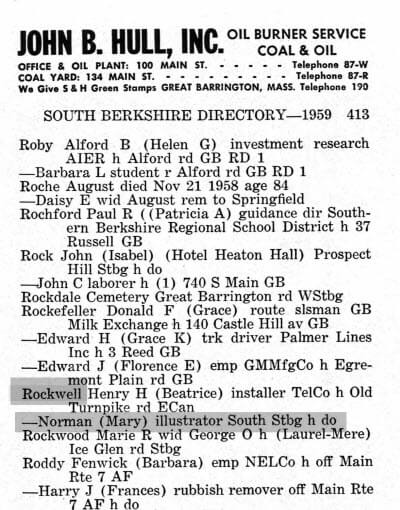
Beloved illustrator Norman Rockwell in a city directory. (Massachusetts Berkshire 1959 Berkshire, Massachusetts, City Directory, 1959)
2. Stock Up on Items that are Easy to Reach
While your subscription is active, stock up on easy to find items.
One way to do that is with Ancestry’s hints. Ancestry’s hinting system taps the most popular Ancestry collections (about the top 10% of the most popular collections). Watch your Ancestry tree for hints and check them all. When you first log in, note whether anyone new has taken an interest in your tree (if it’s public)–and see if they are relatives worth contacting.
3. Watch for New Products!
We’ve written about Ancestry updates that have stopped us in our tracks, like the recent U.S. Wills and Probates and Social Security Applications and Claims databases and the AncestryDNA Common Matches Tool.
We also update you regularly on new records collections that go online throughout the genealogy world: Ancestry databases are often among them.
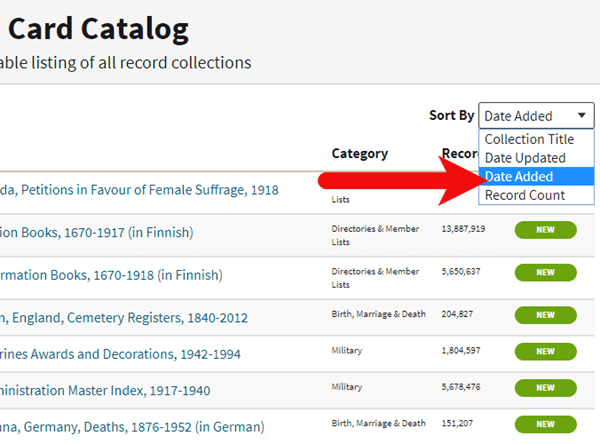
You can also sort by “Date Added” in Ancestry.com Card Catalog. This is a great way to see the collections most recently added. Look for the green “NEW” tag.
4. Avoid the Parts of the Experience that are Frustrating
Those who hate battling lines avoid big stores on peak shopping days and during the after-work rush. I avoid returning things at certain stores because their customer service desk is not worth the hassle.
Similarly, if the way Ancestry handles photos, sources, or Life Story timelines drives you nuts, ignore as much as you can except for your direct ancestors and closest relatives.
Perhaps you simply download each record you find and work with photos and timelines on your family history software (Lisa recommends RootsMagic–click here to read why). Or use Evernote’s newly updated web clipper (you can even make notes on top of your screen captures!) and store all your sources there.
Resources
Want to learn more about how to get the most out of Ancestry? Here are two additional resources:
Genealogy Gems Premium Podcast Episode 125: Using Ancestry Library Edition and other tips from a public library genealogist (available to Genealogy Gems Premium members only)
3 Things This Gems Follower Loves About the New Ancestry Site

 ested I go to the local public library just down the street.


 For a limited time, new members will receive


