by Lisa Cooke | Oct 3, 2016 | 01 What's New, Google
You can use Google Slides for genealogy to create one-of-a-kind presentations, a virtual scrapbook, or a virtual library list…and it’s free! Here’s how to take advantage of yet another awesome Google tool.
I was recently asked if there was a software program or app, something free perhaps, to share a slideshow or create a visual presentation. There is! It’s called Google Slides. Here’s how Lisa Louise Cooke, author of The Genealogist’s Google Toolbox, explains it:
Google Slides is an online presentation application, much like Microsoft’s Powerpoint. It’s part of Google’s free office suite of tools. As a genealogist, it provides the opportunity to create and visually share your family history.
It’s a Cloud-based service and that means you can access your presentations wherever you are and on any computing device. You will sign-in to Google Slides with your personal Google account. That means you will be able to keep everything private unless you decide to share it. Although it’s Cloud-based, you can use it offline too. Any new presentations you create or changes you make will be automatically updated when you get back online. You can show your presentation at the next family reunion or genealogy society meeting even if there’s no Internet access.
There’s a lot of potential for using this powerful tool for genealogy!
With that great introduction, I’d like to share a few unique examples of how a genealogist or a genealogy society could use Google Slides.
Google Slides for the Genealogist
Google Slides is an easy way to create a fun slide show of your ancestor photos. This can be shared at family gatherings or reunions right from your laptop. You can also share the presentation with a click-able link.
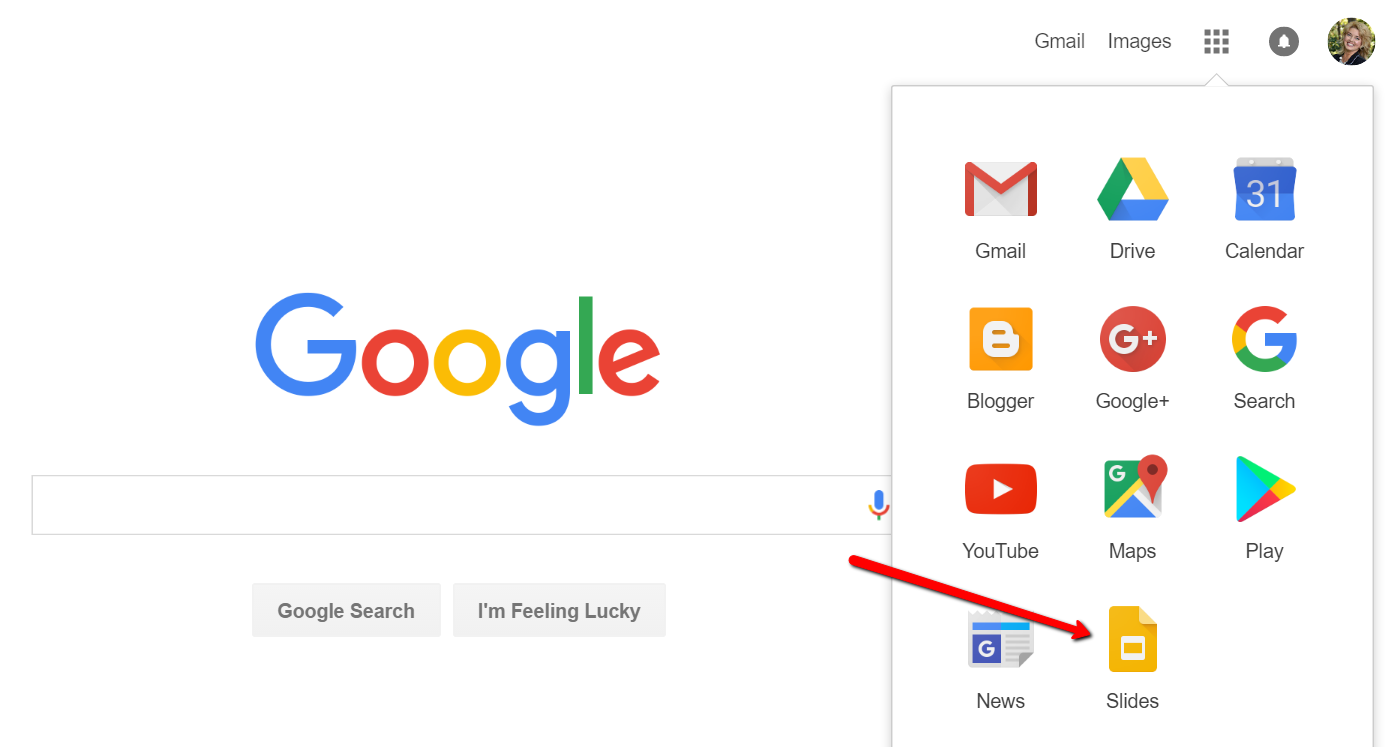
To begin, find Google Slides by going to Google.com and sign-in to your free Google account (or sign up if you don’t have one.) Click on the grid to the left of your sign-in avatar. This will bring down several options. If you don’t see Google Slides as an option, click More at the bottom.
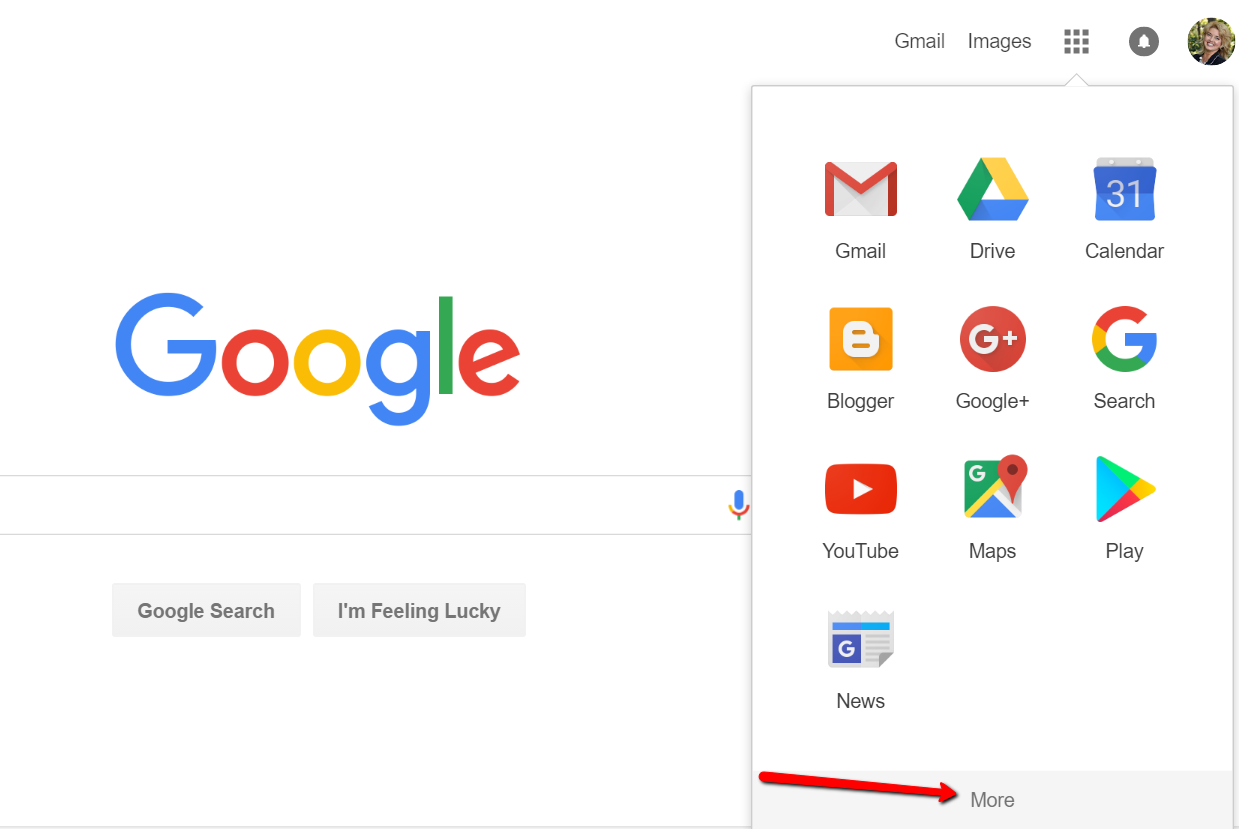
If you still don’t see Google Slides as an option, click on Even More from Google. This will take you to another screen of all sorts of Google goodies! Scroll down until you find Google Slides and click on it.
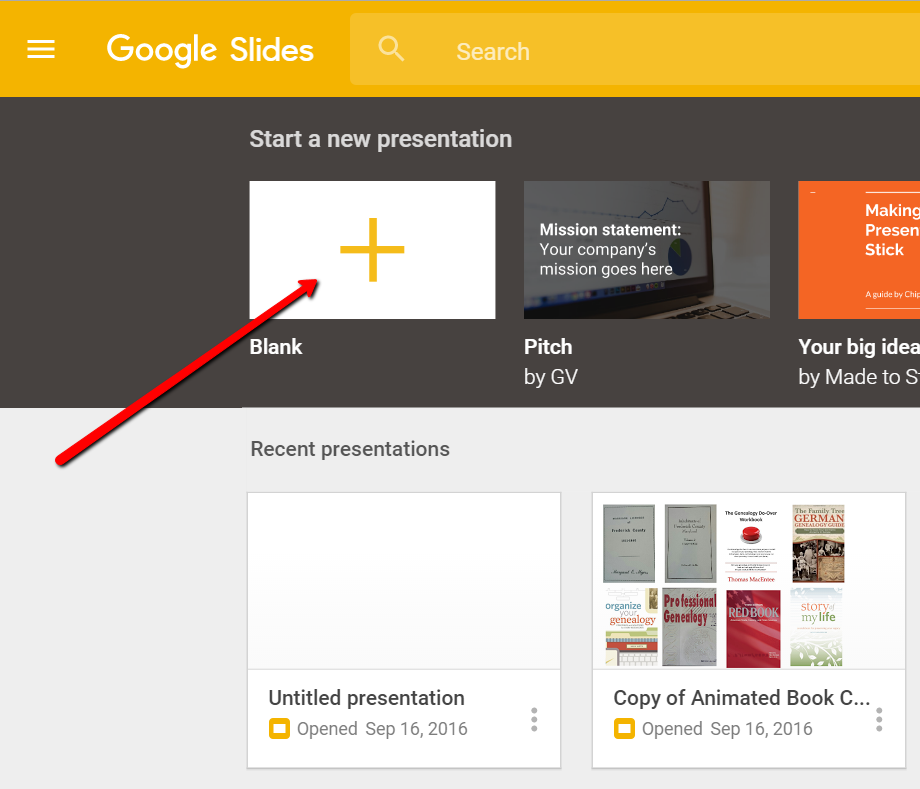
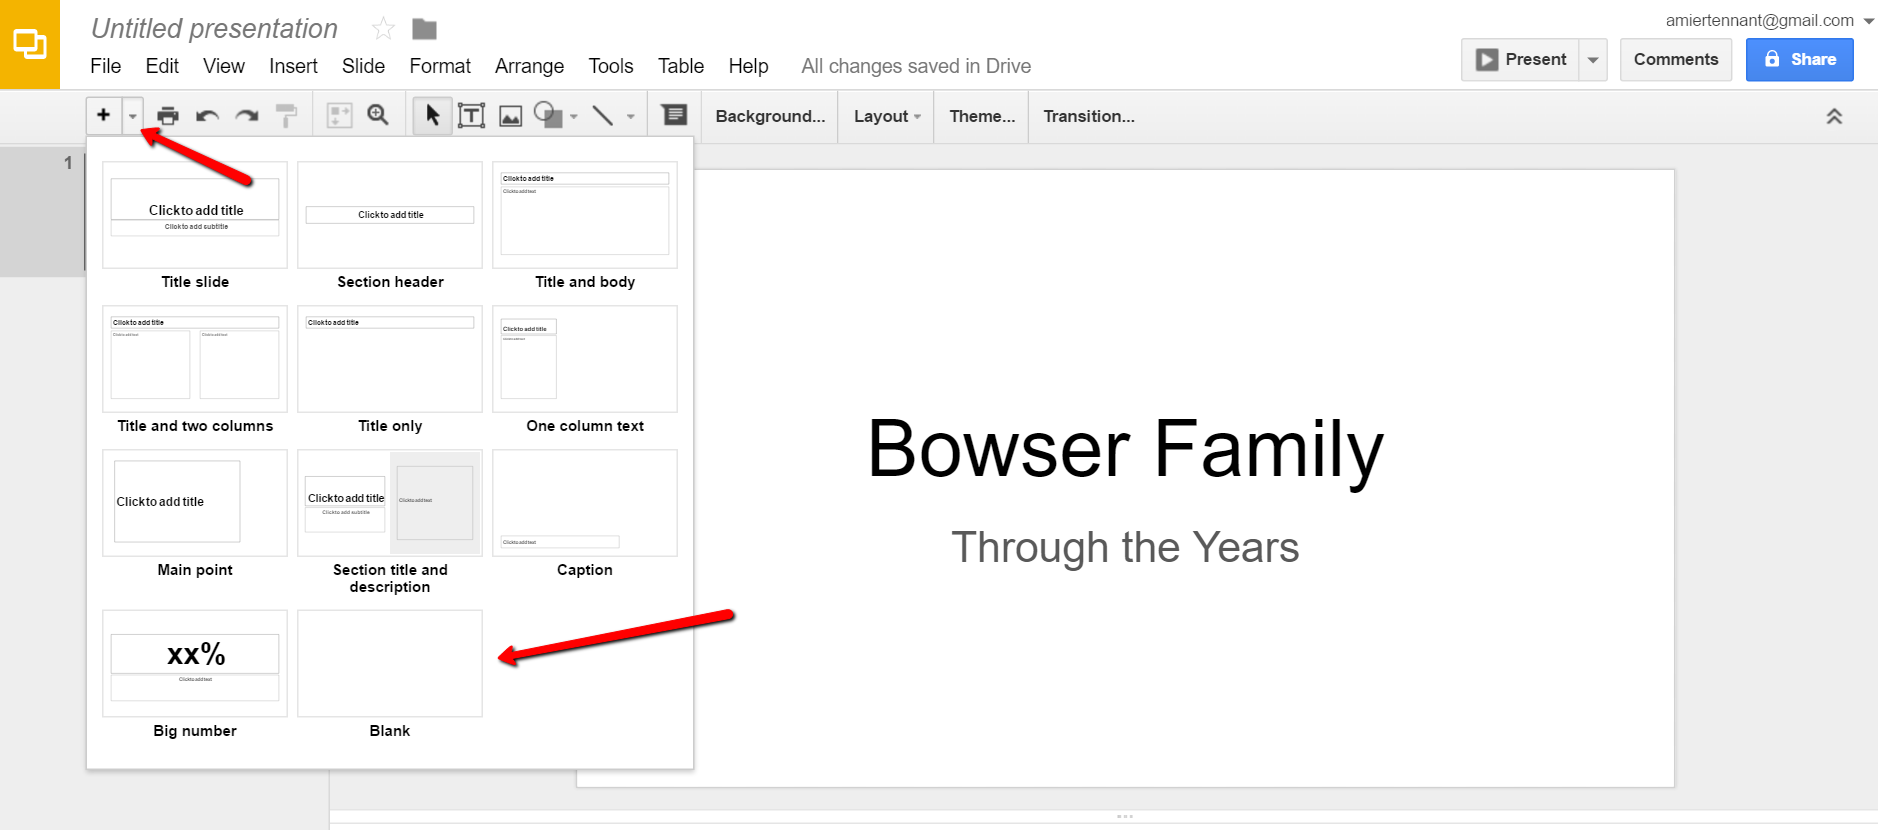
Once you have opened Google Slides, click the plus sign to begin.
I added a title and then clicked the tiny arrow to the right of the plus sign to add a new blank slide.
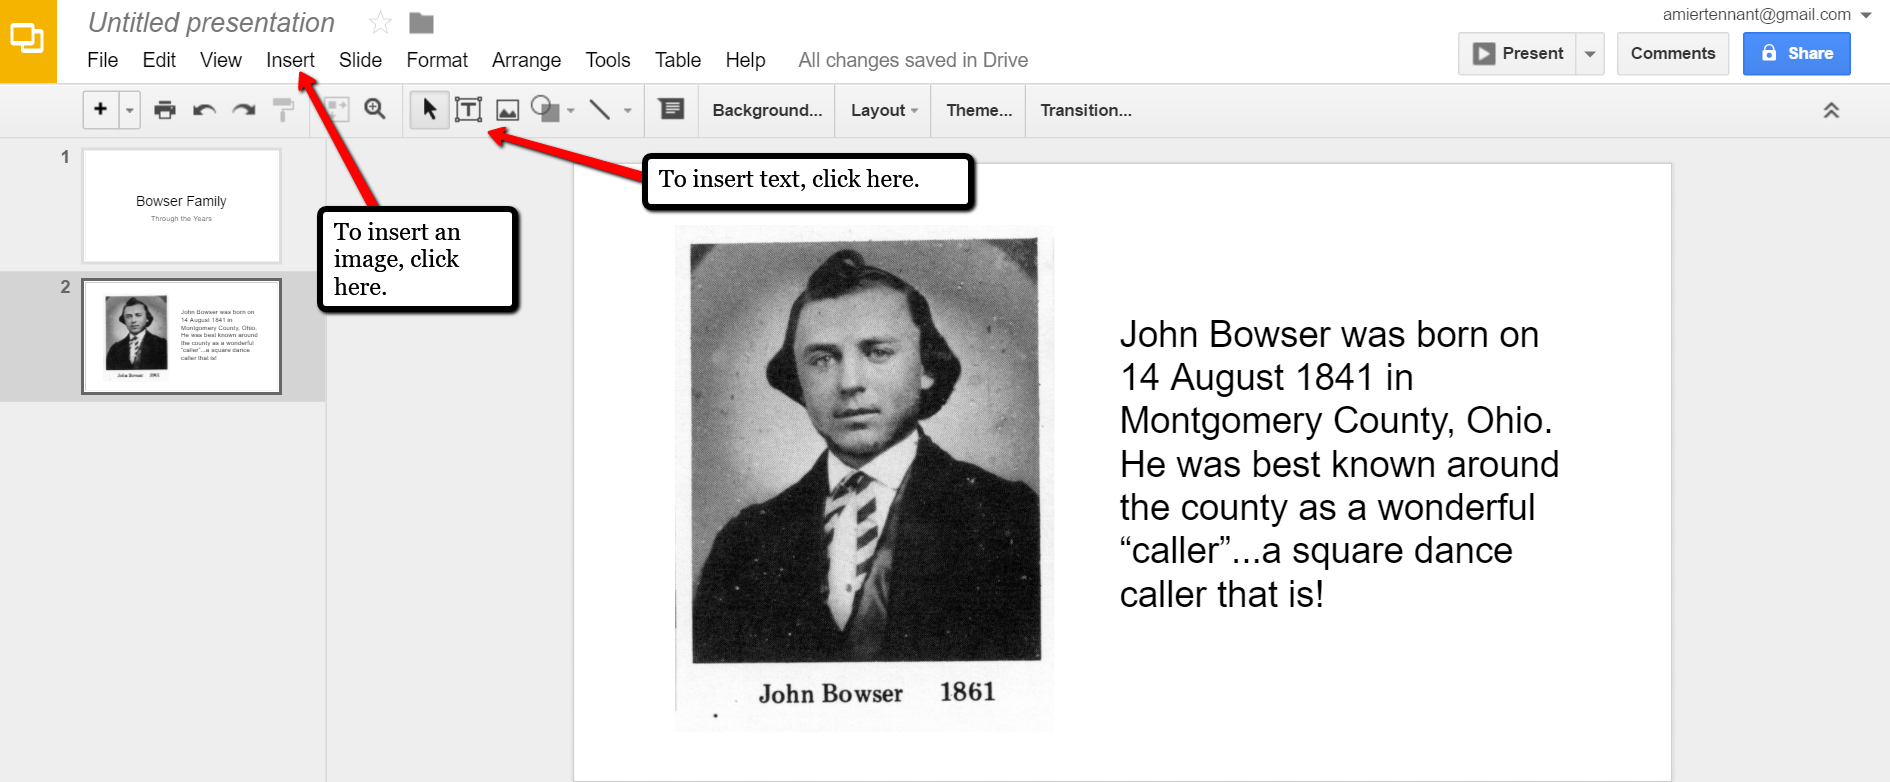
At the new slide and each additional slide, you can add a picture by first clicking Insert from the labels listed across the top, then choose Image. A pop-up window will appear and allow you to Choose an Image to Upload. You will then find the image you have saved on your computer and click Open.
Keep adding your slides until you have all of them created.
Sharing Your Google Slides Presentation
Like many of us, I like to share my ancestor photos with my family and friends. While at a family gathering of a small group, I just set my laptop up on the coffee table and we huddle around. Bring up your Google Slides presentation on your laptop or mobile device and click on Present at the top right of the screen. The computer does the rest and presents a slideshow for your viewers.
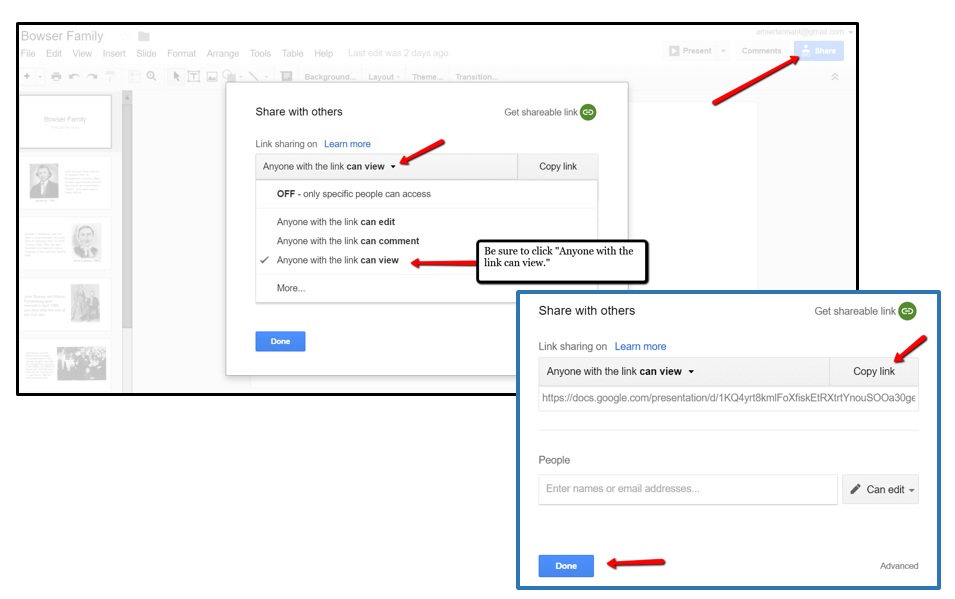
You might also wish to share your slides with family and friends far away. You can do this by sharing a link. To create a shareable link, click Share at the top right corner.
A pop-up window will appear. Click the little drop-down menu next to the words “can view.” This option allows you to choose whether you wish people to be able to edit, comment, or view only. I typically choose the “view only” option. Then, a shareable link is created for you. Click Copy link and paste that into an email directly to a family member, to your family history blog, in a Tweet, or in a Facebook post. Wa-la! You have shared your Google Slides presentation.
Create a Virtual Book Cover List with Google Slides
Another stellar way to use Google Slides for genealogy is to create a convenient virtual library list. A recent article found online gave me the idea of creating a library list using images of the covers of books.
For example, if you enjoy attending genealogy conferences and buying books for your society, you may get stuck wondering, “Do we already have that in our collection?” By creating a virtual book cover list, you won’t have to wonder anymore!
You will first need to begin this project by taking a picture of the covers of each of your books and saving the images to your computer or laptop. I took pictures, cropped them, and sharpened them up a bit with my smartphone. Then, I saved them to a file folder on my computer named Book Covers. [Tip: It would be an even better idea to save the Book Covers folder to your Google Drive!]
For something quick and easy, use the virtual book cover template here:
Virtual Book Cover List Template. If you choose to use this link, when it opens, click
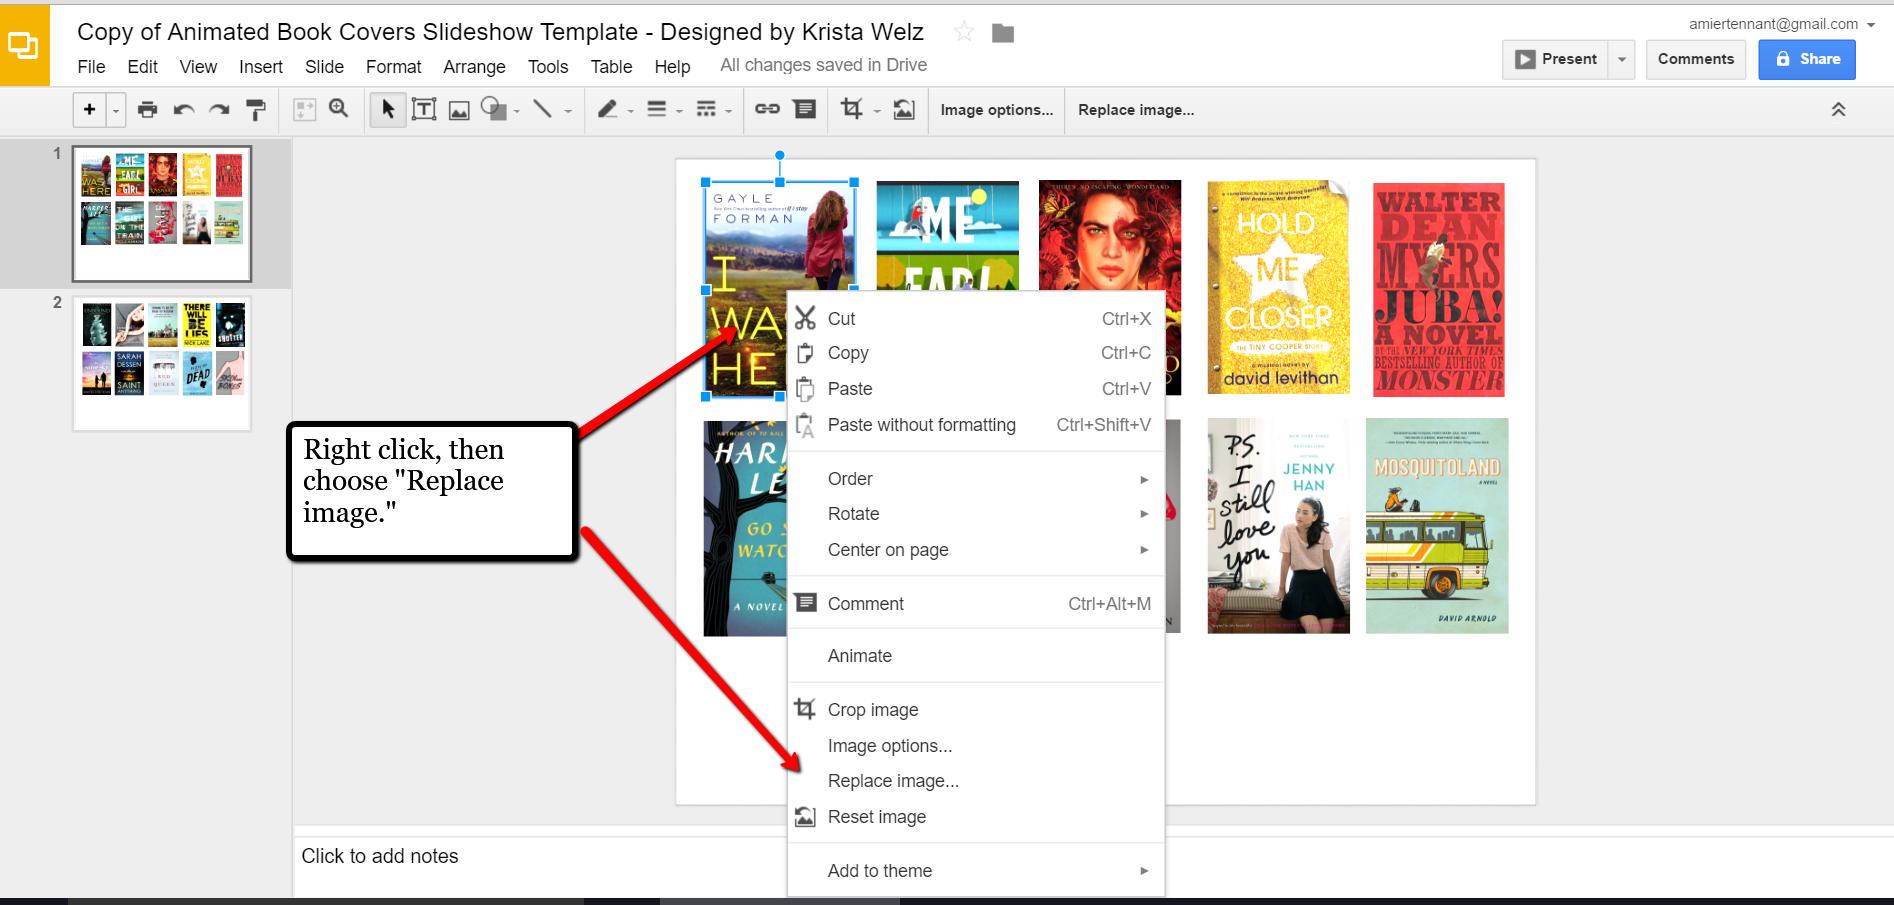
Make a copy and Google Slides will open. Right click on any of the book cover images you see, a pop-up window appears. Choose
Replace image and then find an image of one of your own book covers.
Once you have replaced each of the book covers with ones of your own, you can rearrange them with the click-and-drag method. You might want to put them in alphabetical order or perhaps categorize them by subject or place.
When you have finished, don’t forget to title it. There is no need to save it because Google Slides automatically saves for you. Google Slides is accessible from any of your devices and can even be viewed on-the-go from your mobile device. You’ll love this feature when you are trying to decide what books to add to your genealogy library.
How Can You Use Google Slides for Genealogy?
We are sure there are dozens of ways to use Google Slides for genealogy. Give Google Slides a try and if you think of another use for this wonderful tool, let us know about it in the comments below! Thanks for reading, friends.
More Gems on Google for Genealogy
by Lisa Cooke | Sep 19, 2019 | 01 What's New, Maps |
Old maps are vitally important for genealogy because the characteristics of a location can change in many ways over time. Historic maps help us understand the world as it was at the time our ancestors lived.
Here is a short list of just a few of the things that may have changed:
- Street addresses
- roads
- town names
- county boundaries
- waterways that may have been filled in or opened up
- railway lines
In fact, the country itself where they lived may be a completely different country. For example, my German ancestors lived in Prussia in the 19th century. Today, that area is part of Poland. Therefore, all of the village names have been changed to Polish names.
The David Rumsey Map Collection is an excellent place to go to find maps of your ancestors homeland for free.
Watch the Map Search Video
I’m going to explain the 7 steps to finding the maps you need for your genealogy research at this wonderful website! I highly recommend that you watch the short video below to see it in action as you read. The player will stay with you as you scroll down the page.
Step 1: Go to the David Rumsey Map Collection Website
The first thing you need to do is go to the David Rumsey website here. You’ll be greeted on the home page with glorious historic maps. (Stay focused because it’s easy to get distracted by all the fascinating maps!)

Scroll down on the David Rumsey website home page.
Step 2: Scroll Down to the Bottom of the David Rumsey Home Page
While you can search for a place name in the search box at the top of the page, there’s a better way to search. Scroll down the page until you get to Featured App: MapRank Search (it’s almost at the bottom.)
Step 3: Launch Map Rank Search
The Featured App – MapRank Search is the best place to search the website, but it’s easy to miss because it’s not at the top. So go ahead and click the Launch MapRank button in the upper corner of this section.

In the Featured App: MaprRank Search section click the Launch MapRank button
When you click the button it will open a new tab in your web browser which will take you to the Geographical Searching with MapRank Search page.
Quick Tip: The Fastest Way to MapRank Search
You can get there faster by going directly to https://rumsey.mapranksearch.com. I didn’t take you straight there from the beginning because I think it’s important to be aware of the home page and everything else it offers. However, today our focus is conducting the optimal search for old maps for you family history.
Step 4 Selecting the Map Time Frame
Here’s what the search page looks like.
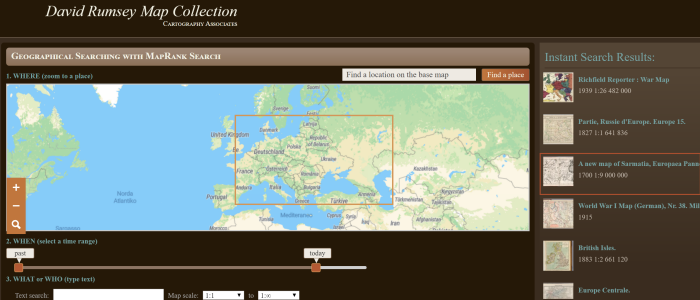
The DavidRumsey.com search page
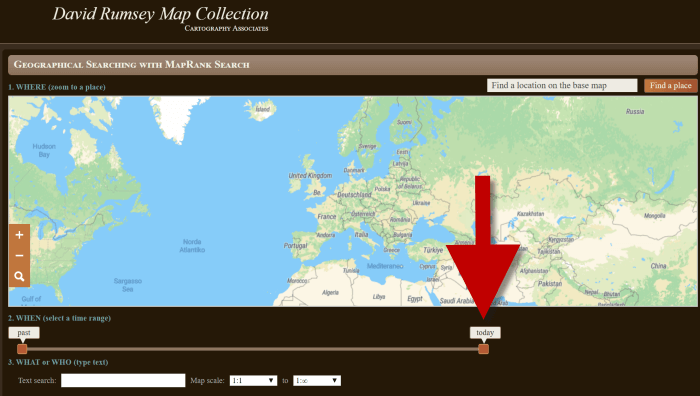
There are two very important features on this app page that will help you get the best results possible: the time slider and the location search box.
The time slider is located beneath the map:
Time Slider for searching maps by time frame
It’s important to first select the time frame that you are searching because that will dictate the results you get when you search on the location name. (We’ll get to that in just a moment.)
There is a slider on each end of the timeline. Slide them to specify the desired time frame. In my example below, I’m looking for maps between 1800 and 1900.
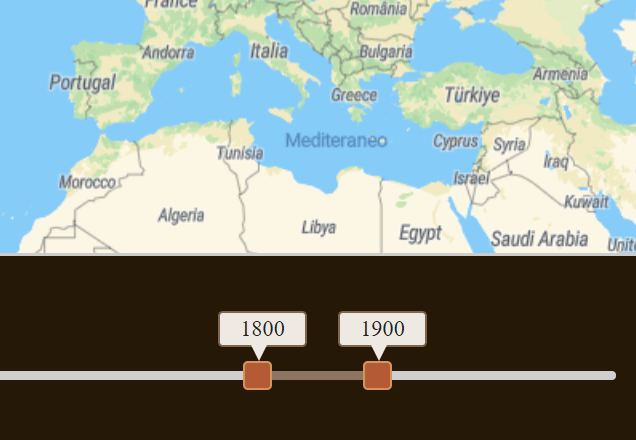
Searching for maps between 1800 and 1900
As you move the sliders, you’ll notice that the maps in the right hand column will change. This is because only maps that fall within the range you select will be offered in the Instant Search Results column. But before we look at those, we need to type in a location in the next step.
Step 5: Selecting the Location
With your time frame selected, now you’re ready to type the location in the search box.
As you type, the app will make suggestions. But wait! Before you click the Find a Place button to run the search, look carefully at the list of suggested locations that may appear. Many locations names can be found in different areas. That is certainly the case with the name of the tiny village where my great grandfather was born: Kotten.
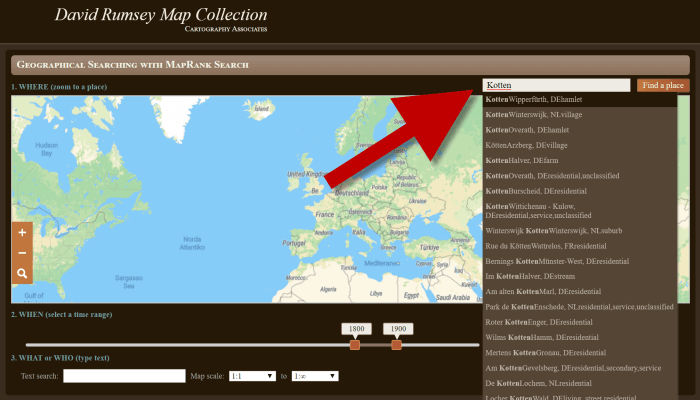
Type the location name to search the maps
In fact, the list doesn’t even include the Kotten I am looking for.
In cases like this, it is best to search a little more broadly. When Kotten was part of Prussia, it was located in Kreis Johannisburg so I could try searching for that. Even better might be to search for the largest city in the area since Kotten was such a tiny village. Arys was the largest city in the area.
Once you type in the name (and select from the suggestions if needed) click the Find a Place button just to the right of the search box.
Step 6: Analyze the Map Results
In my example of searching for the city of Arys (which is the name it was known by in the 19th century when it was part of East Prussia) the modern-day map displayed is actually Poland.
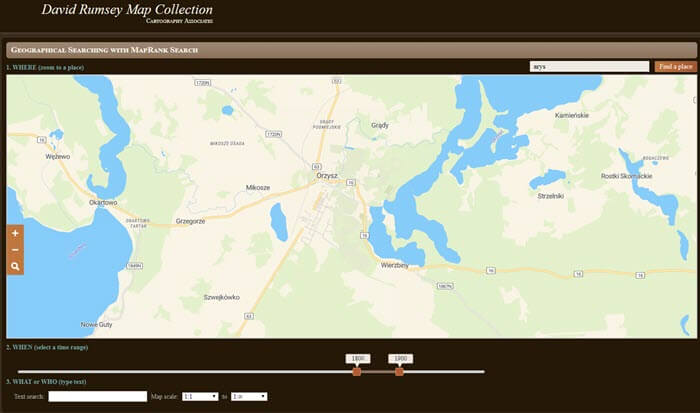
My search resulted in a map showing Orzysz, Poland
However, the David Rumsey website does a good job of cross-referencing the older German names (Arys) with the new Polish names (Orzysz). This is another reason why searching for a larger city works well. Larger cities are more likely to be in the David Rumsey system for cross-referencing, and of course they are easier to spot on the map. Generally speaking, the location you searched will be in the center of the display map.
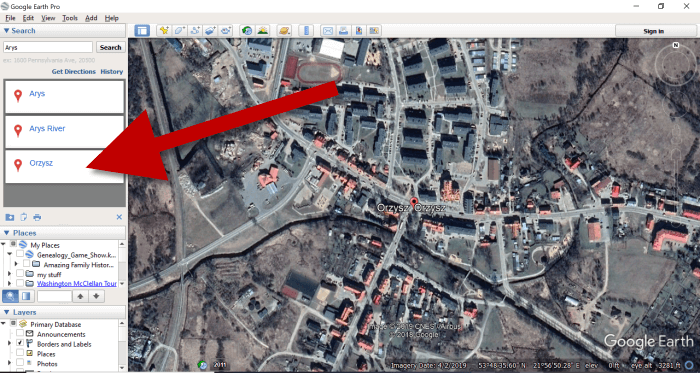
Quick Tip: Verifying Location Names
Another quick way to cross-reference location names (or verify your findings in David Rumsey) is by searching for the name in Google Earth. In the example below, I typed in the Prussian city of Arys. Google Earth will offer options if more than one matching result exists.
I was a bit surprised to see “Arys” as one of the three listed results since it is not called that today. When I clicked Arys it took me to the city of Arys in the Turkistan Region of Kazakhstan, far away from Poland! Clicking Orzysz in the results list took me to the area of Poland that was once East Prussia. This confirms the results I received at the David Rumsey website.
Learn more about using Google Earth for Genealogy by watching my free class here.
Now it’s time to review the map results listed in the Instant Search Results column on the right. Isn’t it fantastic that David Rumsey’s website not only presented me with the correct Polish location, but also maps published between 1800 and 1900 that include Arys? I think so!
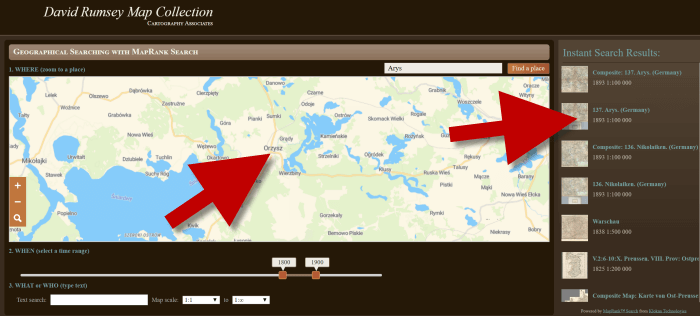
Map results appear in the column on the right side of the page.
Click the map you think best suits your needs. The map will open in in a new tab in your web browser. (These browsers tabs provide a nice bread crumb trail for your searching activities.)
All of the source information about the historic map that you chose will appear in the column on the left. (See the image in Step 7.) If you decide to use this map you’ll definitely want to accurately cite the source. Learn more about the importance of source citations here.
Step 7: Export the Map
I was delighted to find the village of Kotten on this map of Arys published by Reichsamt fur Landesaufnahme in 1893!
When you find a map that you would like to use for your family history research, export it to your computer. To do this, click Export in the upper right corner of the map and select the desired size. You can select a size ranging from Small Thumbnail to Extra Extra Large. Keep in mind that the larger the size, the more clarity you will have as you zoom in closer and closer. This is very important if you plan on using the map in an overlay in Google Earth. You can learn how to create your own map overlays in my video tutorial series on using Google Earth for genealogy available here, and in my book The Genealogist’s Google Toolbox.

Click “Export” to save the map to your computer.
Be patient while downloading to your computer because it can take several moments to export a large map. The saved file will probably be zipped. To unzip it, on a PC right-click and select Extract All from the pop-up menu. This creates an open version of the folder containing the map.
Get Started Finding Your Ancestral Locations in Old Maps
With this step-by-step process you are now ready to explore any given ancestor’s world through the rich details of historic maps. I can’t wait to hear what you discover! Please be sure to leave a comment below. And if you found this tutorial helpful, will you please share it with your friends on social media so we can help even more people find the homes of their ancestors? Thank you!
by Lisa Cooke | Jul 15, 2015 | 01 What's New, Google Earth, images, Inspiration, Maps, Photographs, United States

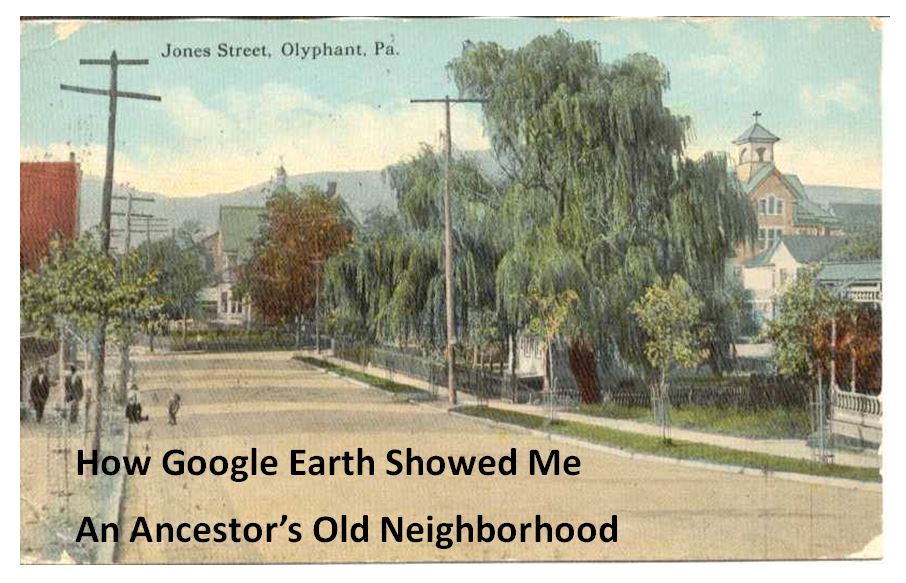
Jones Street, Olyphant, PA, 1910. Image courtesy of Michael Grayson.
When Lisa blogged recently about Google Earth’s 10th birthday, it reminded me of something on my family history “to do” list. A few years ago I found a postcard of what I thought was an ancestor’s neighborhood. Could Google Earth confirm it?
Lisa uses Google Earth’s powerful 3D renderings of the world’s streets to identify where old pictures were taken. I knew from deeds, a plat map, and addresses on censuses and draft registrations that the O’Hotnicky lived on a certain block of Jones St. (now named Grant St.), around the corner from and behind Holy Ghost church.
This postcard of “Jones Street, Olyphant” looks like its viewpoint is from the end of the block behind the church. This would mean the tall tree shown here was shading–and blocking our view of–the O’Hotnicky home.
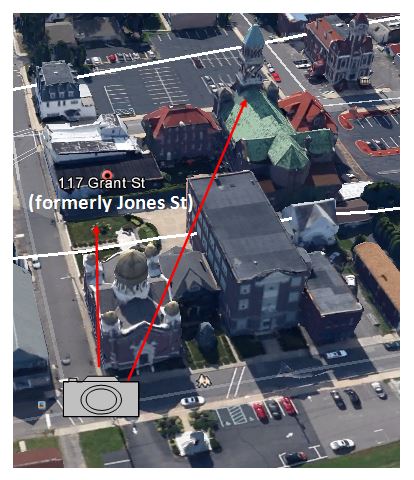
 I opened Google Earth and flew to “117 Grant St, Olyphant, PA.” The initial view, hovering from above, was promising. The camera icon shows where I thought the photo was taken. The left arrow points to the former line of trees, in front of the ancestral address. The right arrow points to the church tower behind.
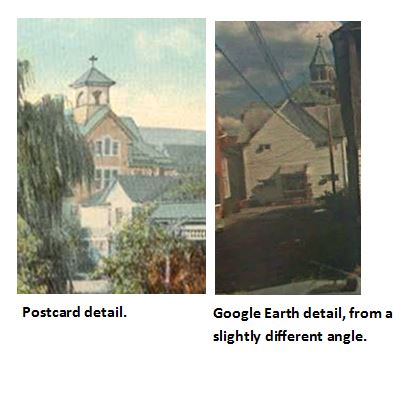
Unfortunately, when I enter Street View at that exact spot, the new church on the corner and a tall apartment building block the view that would have been seen a century ago. There is no Street View available on Grant Street itself so I couldn’t move up the street toward the church. So I moved into Street View along the side street (parallel to the bottom of the photo).
In the opening between two buildings, Google Earth gave me a glimpse of the church tower. I compared the postcard view with Google Earth’s photo. The church towers look so similar: a simple cross on top, pointed copper roof, arched tower and the building roof line. Even more striking to me is the white frame house. Was this the same white house shown in the postcard view?
These two visuals taken together–the church tower profile and the position of the white house–seem consistent with my theory of where the photo was taken. Which means that yes, indeed, this 1910 postcard shows the trees in front of an ancestor’s home as they appeared 105 years ago.
Google Earth can fly you to an ancestor’s neighborhood–and whatever clues its current landscape gives you into the landscape of the past. Click here to watch Lisa’s free video about using Google Earth for genealogy!
by Lisa Cooke | Mar 1, 2016 | 01 What's New, Conferences, Google, Google Earth
Are you in or near Orange County, California? Come see Lisa Louise Cooke this weekend at the OCCGS Genealogy Bash!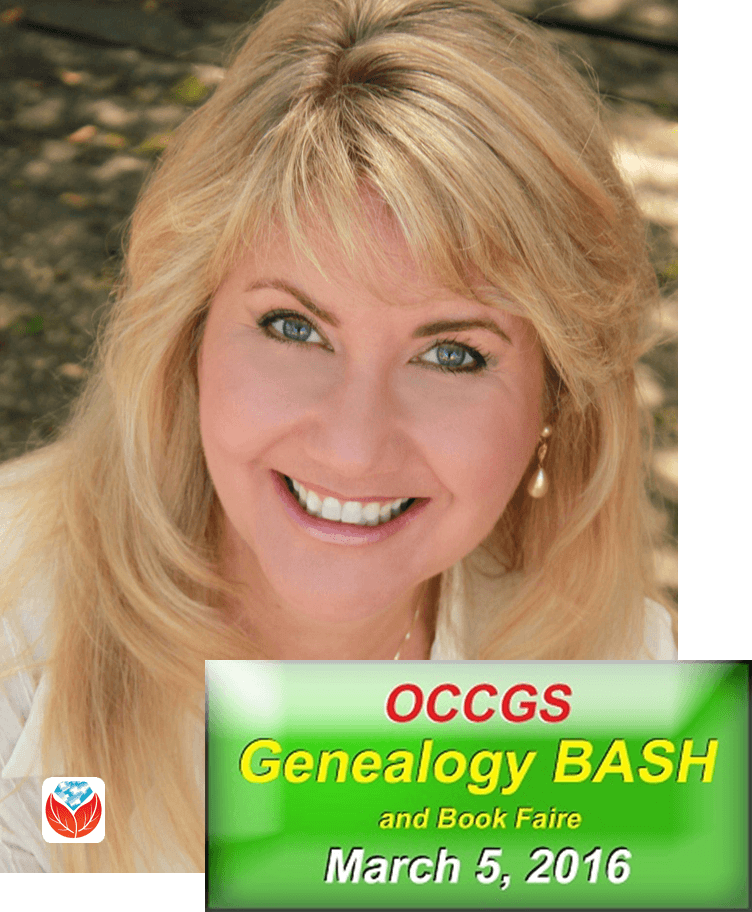
On March 5, 2016, Lisa Louise Cooke will be speaking at the Orange County, California Genealogical Society. “A Day with Lisa Louise Cooke” Genealogy Bash and Book Faire will have something for everyone! Lisa will be giving four of her popular lectures:
- Google Tools & Procedures for Solving Family History Mysteries
- Google! Everything New that You Need to Know for Genealogy
- How to Reopen and Work a Genealogical Cold Case
- Future Technology and Genealogy
WHAT: Lisa Louise Cooke at the OCCGS Genealogy Bash
WHEN: March 5, 2016
WHERE: Huntington Beach Central Library, 7111 Talbert Ave., Huntington Beach, CA
REGISTER: Click here for more information
In addition to Lisa’s lectures, the OCCGS Genealogy Bash will offer:
- A huge genealogy book sale (bargain prices for over 1000 books),
- Free beginners classes (limited seating–see the society website) and
- Chances to win fabulous prizes, including a year’s Ancestry World membership worth $300, a 3-day stay at the Salt Lake Plaza Hotel, and other prizes worth a total of $2000.
The day before, on March 4, Lisa will be at Aliso Viejo Library (OC Public Library system) in Laguna Hills, California. She’s teaching Google Earth for Genealogy at 10:00 am.
Attending both days will give you the ultimate Google for genealogy experience: Lisa’s Google search methodology PLUS her unique take on Google Earth. You’ll come away with powerful new tools and strategies for finding your family history in free Google resources that are literally at your fingertips every time you go online.
Learn all these Google skills–with step-by-step tutorials and video demonstrations–in Lisa’s book and Google Earth video tutorial. Click here for a special price on the bundle!
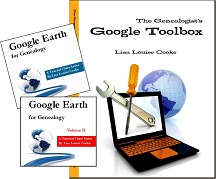
Can’t attend? You can still learn Google expertise from Lisa in her book The Genealogist’s Google Toolbox (2nd edition completely updated in 2015) and Google Earth for Genealogy, a 2-CD set that’s also available as a digital download. Purchase these products individually by clicking on the links above, or bundle and save!
More Google for Genealogy Gems
Google Earth for Genealogy: A Free Video Introduction
Google Search Tips 101: Keyword Search Tips
7 Google Search Features Everyone Should Use
 The Genealogist’s Google Toolbox